Before linking to diagram
After linking to diagram

Block Category: Extensions
Description: The PSIMCoupler block lets you link a PSIM schematic to an Embed diagram to perform co-simulations, view the co-simulation results, and edit the linked PSIM schematic.
PSIMCoupler is available only in Embed 64-bit version.
Altair PSIM must be installed on your computer to use the PSIMCoupler block.
To link a PSIM schematic to an Embed diagram
1. Insert a PSIMCoupler block and right click it.
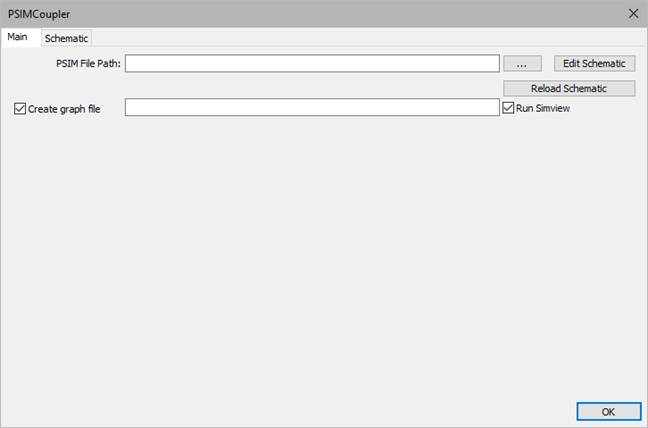
2. Under the Main tab, next to PSIM File Path text box, click … to select the PSIM schematic to be linked to the diagram.
3. Click OK to link the PSIM schematic to the Embed diagram..
The PSIMCoupler block is propagated with the inputs and outputs from the linked PSIM schematic.
|
Before linking to diagram |
After linking to diagram |
|
|
|
4. Wire the PSIMCoupler block into the Embed diagram.
To run a co-simulation and view the results in a Simview graph file
After you link a PSIM schematic to an Embed diagram, you can run a co-simulation and view the results in a Simview graph file. Viewing can occur at the end of the co-simulation or saved for later viewing.
1. Right click the PSIMCoupler block.
2. Under the Main tab, do the following:
a. Activate Create Graph File and enter a graph file name in the text box. By default, the graph file is stored in binary format in the same directory as the PSIM schematic. You can change the graph file format to TXT using Options > Settings in PSIM.
b. Activate Run Simview if you want to view the results immediately after the co-simulation completes.
c. Click OK.
3. In the Embed diagram, click System > Go or press the Go toolbar button.
4. At the end of the co-simulation, Simview opens the graph file for viewing.
To view a linked schematic or change schematic component parameters
You can view the linked schematic or edit schematic component parameters. If, however, you want to open the linked schematic in PSIM, click on the Edit Schematic button.
1. Right click the PSIMCoupler block.
2. Click the Edit Schematic tab.
The schematic is displayed in the Schematic tab. Note that you can quickly zoom in and out of the schematic using CTRL+mouse-wheel.
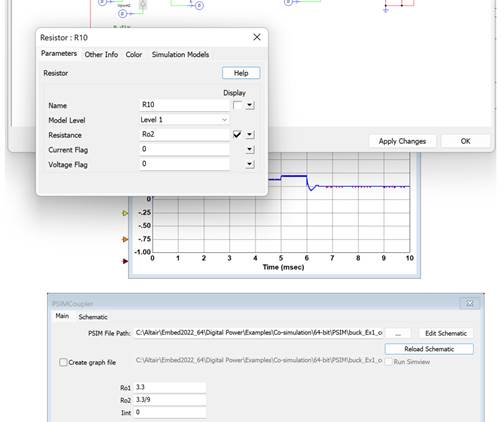
3. Double-click on the schematic component to display the PSIM parameter attribute window. For example:

4. Update the parameter values accordingly and click x in the upper right corner.
5. Click Apply Changes <tbs. Sreeram is changing this> to save the new parameter values to the schematic. Changed variables are displayed under the Main tab.
 .
.
6. In the Embed diagram, click System > Go or press the Go toolbar button to run the co-simulation with the new component values.
For a detailed desription of Altair PSIM, see the PSIM documentation.
<tbs. need new dialog box>
Create graph file: Creates a Simview graph file. The default file format is binary. To change the file format to text, use Options > Settings in PSIM. To view the graph file in Simview as soon as the co-simulation ends, you must also activate Run Simview.
Edit Schematic: Invokes PSIM and opens the schematic in the Schematic tab. Schematic tab. After editng the schematic, click Apply Changes in the Schematic window to save your changes. <tbs. This is changing>
PSIM File Path: Indicates the complete path to the PSIM schematic to be linked to the Embed diagram. Click … to select the PSIM schematic. The file extension for PSIM schematics are PSIMSCH and SCH. SCH indicates schematic files generated by old versions of PSIM. PSIM can load both SCH and PSIMSCH schematics; however, PSIM automatically saves all schematics as PSIMSCH files.
Run Simview: Opens the specified graph file in Simview. If Create graph file is not activated, Simview opens an empty schematic.
Reload Schematic: Reloads the PSIM schematic with the latest changes. If you have made changes to the schematic, you must click Apply Changes in the Schematic window.

Window area: Displays the current PSIM schematic that is either to be linked to the Embed diagram or available for editing. In order to edit the schematic, you must have clicked Edit Schematic in the Main tab.
Apply Changes: Saves the schematic with the changes you made it. You can then click Reload Schematic in the Main tab to use the new schematic in the next co-simulation.
OK: You must click OK when you initially link the PSIM schematic to the Embed diagram.
Examples: pointer to examples TBS.