Elasticsearch 7.x Connector
The Elasticsearch 7.x connector allows you to connect and access data from an Elasticsearch cluster using Java High Level REST Client.
|
NOTE |
· To enable the Elasticsearch 7.x connector, refer to Elasticsearch Connectors Dependency Installation for more information on how to copy the provided dependency files to the Lib folder. · The Elasticsearch 7.x connector supports Elasticsearch 7.x versions. · Elasticsearch 6.x and Elasticsearch 7.x connectors will not work in a single Panopticon Real Time instance due to conflicting Elasticsearch API dependencies.
|
Steps:
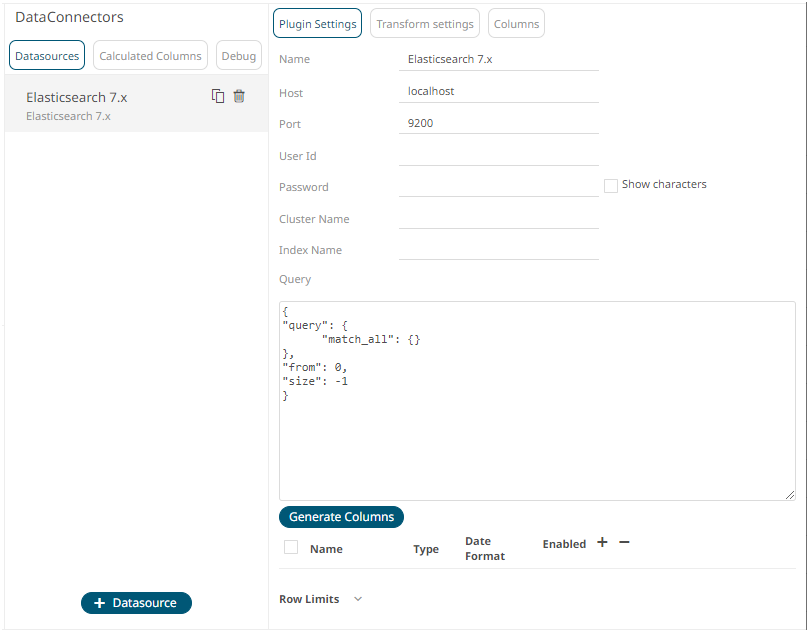
1. Select Elasticsearch 7.x from the Connectors panel. The Elasticsearch 7.x Settings panel displays.

2. Enter the Name of the Elasticsearch
7.x data source, then click  .
.
3. Enter the following information:
|
Property |
Description |
|
Host |
The hostname of any node in your Elasticsearch cluster, or localhost for a node on your local machine. |
|
Port |
The port running the Elasticsearch HTTP service (default is 9300). If the port you wish to use is different from the default port, change the value to the correct one. |
|
User Id |
The username used to connect to the Elasticsearch 7.x service. |
|
Password |
The password used to connect to the Elasticsearch 7.x service. Check the Show Characters box to display the entered password characters. |
|
Cluster Name |
The cluster name that can be used to discover and auto-join nodes. |
|
Index Name |
The Index name in Elasticsearch. This is some type of data organization mechanism that allows partition of data in a certain way. |
4. Enter an optional JSON-encoded request body in the Query box.
5. Click  . The
columns populate the Output Column section.
6. Click  to add columns and specify their properties:
|
Property |
Description |
|
Name |
The column name of the source schema. |
|
Type |
The data type of the column. Can be a Text, Numeric, or Time |
|
Date Format |
The format when the data type is Time. |
|
Enabled |
Determines whether the message field should be processed. |
To
delete a column, check its  or all the column entries, check
the topmost
  ,
then click
  .
.
7. Set the row limit of the data set.
8. Tap the Preview Selected Data Source slider to turn it on.
9. Click  to display the data preview.


