Saving Images
Saving a Single Image
You can export and save the image displayed in the Viewer in .png or .bmp format.
- Use the animation controls to select the image you wish to export.
- Use the camera controls to set the angle.
- Use the controls in the Tools menu to turn the axis key display, bounding box, or timestamp on or off. Increase the particle detail to improve the appearance of particles.
- Select File > Export > Image.
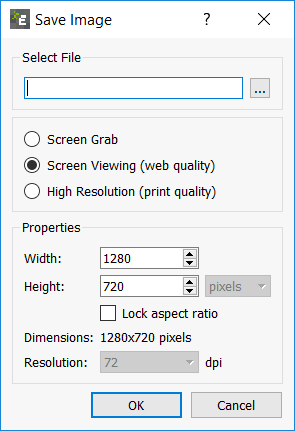
- In the Save Image dialog box, specify the file name and save location.
For Quality, specify one of the following:- Screen Grab
Select to export the image with the same dimensions as the Viewer. - Screen Viewing
Select to export the image with web quality. - High Resolution
If this option is selected, the image exported is print quality, and width and height can be specified in inches, millimeters, or pixels. Also, the resolution can be specified in DPI.
- Screen Grab
- Set the image width if the screen grab option is not selected.
- Set the image height if the screen grab option is not selected.
Saving Multiple Images
You can save multiple images with a range of Time steps.
- Use the animation controls to select the first image in the range and display it in the Viewer.
Images will be exported from this point onward. - Set the step factor in the Viewer controls pane.
This determines how often an image is exported. For example every fifth Time Step or every 0.0001s. - Use the controls in the Tools menu to set the axis key, boundary box ,and time stamp.
- Increase the particle detail to improve the appearance of particles.
- Click the blue record animation
 icon in the Viewer.
 - In the Export Images/Video dialog box:
- Export Format
Set the export format to Images. - Filename
Set the base file name and save location. Each image will be given the base name plus a numeric suffix. - Frame Width
Set the width of each image. For example, 640 pixels. - Frame Height
Set the height of each image. For example, 480 pixels. - Set to Screen Size
Click the screen grab icon to set the width and height to match the screen size. The image exported will be of the same dimensions as the Viewer.
- Export Format
- Click OK.
The record animation icon changes to .
. - Use the animation controls to play or step through the simulation.
- When finished, click the record animation icon again to stop recording.
(c) 2023 Altair Engineering Inc. All Rights Reserved.