Multi-stage Manager Macro (Incremental_LS-DYNA) |

|

|

|

|
|
Multi-stage Manager Macro (Incremental_LS-DYNA) |

|

|

|

|
The Multi-stage Manager macro opens a dialog that provides an easy way to set up and run multi-stage processes after you have completed all changes to your model. You can create complex, multi-stage processes by following four simple steps in the Multi-stage Manager:
| 1. | Select process stages to add them to the process sequence. |
| 2. | Specify a source file reference for each stage. |
| 3. | Specify setup parameters for each stage. |
| 4. | Run the process. |
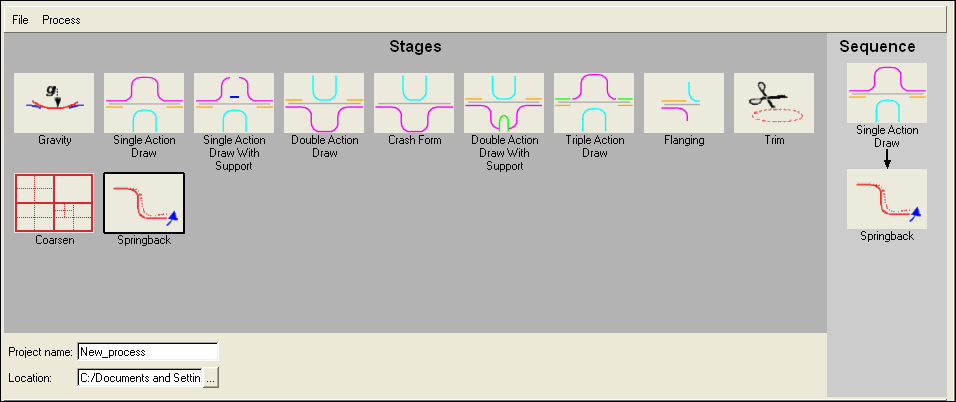
Each process can be saved and reopened, or you can create a new process each time you open the tool. The Multi-stage Manager dialog consists of available stages on the left side and a vertical sequence that you create on the right side, as shown in the image below.

Process stages are selected by double-clicking the stage’s icon in the list. The stage then appears in the sequence list in the next position. Add the stages in the order in which you want the sequence to execute.
Once you have added the first stage to the sequence, you can specify its source file in the Source file: field, as shown in the image below, which appears when the stage (in the sequence list) is selected.

The source file is the model file to which the process stage applies. You may use more than one source file for the various stages in your multi-stage sequence. During each stage after the first, the Multi-stage Manager loads the previous stage’s dynain file.
For each stage in the sequence, you must also specify the setup parameters. Select a stage by clicking its icon in the sequence list on the right side of the dialog. (When the stage is selected, its icon is surrounded by a red outline.) From the Process menu, click Setup to access the parameters for the currently-selected process stage. Two tabs appear in the left side of the dialog on which you can specify all the details of the analysis and review the settings. For information about using the setup views, see Process Stage Setup.
When all the processes are defined, select Run from the Process menu to run the process simulation.
| Note: | The Multi-stage Manager automatically positions all the tools with respect to the blank at the beginning of each stage. If you prefer to disable autopositioning, open the settings.dat file and set MSM_Autoposition to 0. |
| To use all the features of the Multi-stage Manager, you must specify the path to your LS-DYNA solver executable. Modify the lsdyna.bat file in the /hm/scripts/hyperform/automation subdirectory of your HyperWorks installation. The relevant line in the settings file looks like the following example: LS-DYNA "C:/LSDYNA/program/ls970_s_nsmp_sse.exe" |
In the left side of the Multi-stage Manager dialog, process types are listed in icons that indicate the schematic for the process. When you select a process stage, it appears in the vertical sequence. To add a process stage to the sequence, double-click an icon. To remove an icon from the sequence, right click on the icon and select Delete.
|
|
|
|
Set up a forming stage using the Auto Process macro