Programming Guide
Overview
This document describes the EDEM API, which you can use to code and implement your own contact physics, external couplings and particle-generation factories in the form of a User Defined Library (UDL) which operates as a plugin to EDEM. Read this document along with the API reference help at \src\Api\Help\index.html.
Note: When using the EDEM API all units are SI.
EDEM User Defined Library Development Process
The figure below depicts a high-level sequence diagram showing the steps to write and use a UDL contact model. The same steps apply for Particle Body Force and Particle Factory UDLs.
The programmer typically adapts an existing contact model source file (available from the EDEM Forum) using a development environment or editor. Once compiled, the new contact model is loaded into EDEM for use in simulations.

EDEM Simulation Sequence
The figure below shows when UDL libraries are called during EDEM’s simulation sequence. Depending on where the UDL lies in the chain, each stage connects to the relevant UDL (if applicable) before performing its main function (such as calculating contacts).

- Move geometries.
- Generate new particles by calling each registered particle factory in turn (some of which may be UDLs). A Custom Factory typically uses the Material and Particle Prototype defined in the EDEM Creator and can determine the position, scale and properties (such as velocity and orientation) of the material in the EDEM simulation.
- Detect contacts. Contacts are Particle-Particle or Particle-Geometry. A single particle can have multiple contacts at any time step.
- Invoke the Contact Model chain for each contact. Each Contact Model in the chain is executed in order from top to bottom, irrespective of whether it is a UDL or built-in model. Note there are two different contact model chains: one for particle-to-particle contacts and one for particle-to-geometry contacts. Your UDL can be loaded into one or both of these as required.
For any given model EDEM particle, material and geometry data is passed to the Contact Model API, this includes information such as the particle positions and velocities. Depending on the API version used calculated forces from other API or in-built models may be also provided to the custom model.
In EDEM 2018.2 Contact Model API version 2.6.0 additional Contact Model chaining was implemented. The in-built Contact Models will receive the calculated force from the model above and provide this to the contact model in the chain below.
API models created with Contact Model API version 2.5.0 or earlier will not receive forces from models in the chain above however they will provide forces for any Contact Models in the chain below.
API models created with Contact Model API version 2.6.0 or later will receive forces from models in the chain above and provide forces for any models in the chain below. - Apply the Particle Body Force chain to each particle in the system. Particle Body Force models in the chain are executed in order, irrespective of whether it is a UDL or built-in model.
- Update particles based on the forces applied to them in this time step.
- Update bond information (if applicable).
- If there are more time steps, repeat from step 1 otherwise finish.
EDEM API Files
EDEM 2019.1 includes C++ EDEM API v3.1.0 for Contact Models, v2.1.0 for Factories and v3.1.0 for Particle Body Force. You can also continue to use any legacy API from previous versions of EDEM. The tables below give an overview of EDEM’s API source file location and files. For full details, refer to the API reference help at \src\Api\Help\index.html
Example source files (which you can use as the basis for writing your own UDLs) are available from the customer area of our website. Header files which also contain details of each available function can be found in the EDEM Install Directory EDEM 2019 > src > Api
API Directories
| Directory | Description |
|
src/Api |
v2.0.0 (and later) API files for contact models, particle body forces, and factories. |
| src/Api/Help | Online reference help. |
| src/Misc | Additional files that may be of use when developing UDLs. The Helpers.h file is an updated version of sharedTypes.h from the legacy API. |
| src/LegacyApi | Older API files as shipped with the previous version of EDEM. |
Core API Header Files
| Header File | Description |
| ApiIds.h | Contains unique ID numbers for all supported APIs. |
| ApiTypes.h | Contains constants and declarations used by the EDEM generic API. |
| IApi.h | Defines the IApi interface. This is the base interface for all non-UDL APIs. |
| IApiManager_1_0.h | Defines the IApiManager_1_0 interface that provides the ability to allocate and initialize various APIs for use by UDLs. |
| ICustomPropertyDataApi_1_0.h | Provides basic access to custom property data and delta values. |
| ICustomPropertyManagerApi_1_0.h | Provides basic access to custom property meta-data for one of four different custom property collections (particle, geometry element, contact, simulation). |
| IFieldApi_1_0.h | Defines the IFieldAPI_1_0 interface that provides basic access to field data via a series of query methods. |
| IFieldManagerApi_1_0.h |
Provides basic access to the field manager via a series of query methods. |
| IGeometryManager_1_0.h | Provides basic access to the custom properties associated with configured geometries. |
| IGeometryManager_1_1.h | Enables the custom geometry property data entries to be reset by property index instead of by name, improves speed of user API code. |
| IParticleManagerApi_1_0.h | Provides basic access to the particles, and the ability to reset particle custom property values as well as get and set the size (scale) of the particles. |
| IParticleManagerApi_1_1.h | Provides a function to get the total number of particles of a specified type. |
| IParticleManagerApi_1_2.h | Enables the custom particle property data entries to be reset by property index instead of by name, improves speed of user API code. |
| ISimulationManagerApi_1_0.h | Provides access to the simulation properties, enabling them to be reset to a specified value. |
| ISimulationManagerApi_1_1.h | Allows custom simulation property values to be reset by index instead of by name, improves speed of user API code. |
|
NCalcForceTypesV3_0_0.h |
Contains structures used in calculateForce() function. |
|
NExternalForceTypesV3_0_0.h |
Contains structures used in externalForce() function. |
| PluginConstants.h | Contains constants and declarations used by Contact Model, Particle Body Force, and Factory UDLs. |
Contact Model Header Files
| Header File | Description |
| IPluginContactModel.h | Defines the IPluginContactModel interface that all Contact Model UDLs versioned interfaces derive from. |
| IPluginContactModelV3_1_0.h |
Defines the IPluginContactModelV3_1_0 versioned interface for contact models. Contains all the main methods to implement. |
| PluginContactModelCore.h | Core interface for contact models. Implement the methods contained here to enable EDEM to access your UDL. |
Particle Body Force Header Files
| Header File | Description |
| IPluginParticleBodyForce.h | Defines the IPluginParticleBodyForce interface that all Particle Body Force versioned interfaces derive from. |
| IPluginParticleBodyForceV3_1_0.h | Defines the IPluginParticleBodyFroceV3_1_0 versioned interface for particle body forces. Contains all the main methods to implement. |
| PluginParticleBodyForceCore.h | Core interface for Particle Body Force UDLs. Implement the methods contained here to enable EDEM to access your UDL. |
Factory Header Files
| Header File | Description |
| IPluginParticleFactory.h | Defines the PluginParticleFactory UDL interface that all Factory versioned interfaces derive from. |
| IPluginParticleFactoryV2_1_0.h | Defines the IPluginParticleFactoryV2_1_0 versioned interface for factories. Contains all the main methods to implement. |
| PluginParticleFactoryCore.h | Core interface for factories. Implement the methods contained here to enable EDEM to access your UDL. |
Other Header Files
| Header File | Description |
| CGenericFileReader.h | Provides a generic way to read configuration files. You will also need to compile the CGenericFileReader.cpp file into your UDLs shared library along with other source files. |
| Helpers.h | Includes various utility classes to help with vector and matrix calculations. |
Example source files (which you can use as the basis for writing your own UDLs) are available.
Contact Model User Defined Libraries
Using the EDEM API, you can write and compile custom contact models as a User Defined Library (UDL) written in C/C++. A Contact Model UDL consists of a shared library file and, optionally, a file containing preferences.
Overview of Creating a New Contact Model:
- Create a directory to contain the new contact model project.
- Copy the following header files into the directory:
- IPluginContactModel.h
- PluginContactModelCore.h
- IPluginContactModelV3_1_0.h
- PluginConstants.h
- If required, also copy the following optional header files:
- CGenericFileReader.h
- Helpers.h
- Create a new class (CNewContactModel) derived from the contact model interface you want to use (e.g. IPluginContactModelV3_1_0).
- Save the class declaration to a header file (e.g. CNewContactModel.h). This should consist of declarations of the methods in the chosen interface, any extra methods required, and any variables.
- Implement all of the methods defined in your header file and save as a cpp file (e.g. CNewContactModel.cpp).
- Create a new .cpp file with implementations of the methods in PluginContactModelCore.h. For example, save as NewContactModel.cpp
- Compile all of your src files and link them together into .dll (Windows) or .so (Linux) library files.
- Be sure the library and optional preferences file are in the contact model folder (as specified with Tools > Options > File Locations) or in the same folder as the simulation_name.dem file (only for versions EDEM 2017 onwards).
- Start EDEM then select the required contact model category from the Interaction pull-down in the Physics section.
- Click the + drop-down list then select your new contact model.
Contact Model API v3.3.0
The contact model interface IPluginContactModelV3_3_0 provides these methods:
| Method | Description | Type |
| getPreferenceFileName | Retrieves the name of the config file used by the UDL. | Setup |
| isThreadSafe |
If the UDL’s calculateForce() method is thread-safe then this method should return true. Thread safe programming requires a number of conventions and restrictions to be followed. If in doubt set this to return false.
Not applicable for CUDA API. |
Setup |
| usesCustomProperties | Indicates whether the UDL wants to register or receive custom property data. | Setup |
| getModelType | Indicates what model type the plugin is. This is a required method for every model. | Setup |
| getExecutionChainPosition | Indicates the position in the contact-model chain for the plugin to be executed. This is a required method for every model. | Setup |
| usesContactFactor |
Indicates whether the UDL wants to use contact factor. Contact factor is the number of contacts between two particles or between one particle and different mesh elements belonging to the same plane. This is not supported for GPU solvers. |
Setup |
| setFilePath | Called inside starting() method to provide the plugin with the full simulation path (i.e., including the simulation filename). | Setup |
| getGpuFileName | Initializes GPU plugin by accepting it's file name without extension. If empty, the model will not be supported on the GPU solver. | Setup |
| setup | Initializes the plugin by reading any config files, opening temporary files, generating data structures or any other setup work. | Setup |
| starting | Called once at the start of a simulation to indicate processing is about to begin and the model should allocate any temporary storage and retrieve any required file/API/socket handles. | Simulation |
| stopping | Called once at the end of a simulation to indicate processing is finished and that the model should free any temporary storage and close/release file/api/socket handles. | Simulation |
| calculateForce | Called when two elements are in contact with each other. These may be surfaces (in-contact when their contact radii cross), or a surface and a geometry element (when the contact radius of the surface touches the surface geometry). Also used to set contact forces and deltas for custom properties. Not required for CUDA solvers. | Simulation |
| configForTimeStep | Called during processing, at the start of each time step. Not used for CUDA solvers, should be implemented in CUDA file. | Simulation |
| getNumberOfRequiredProperties | Returns the number of custom properties this UDL wants to register with the system. | Setup |
| getDetailsForProperty | Retrieves details for a given property. These properties will then be registered with the system if they do not clash with any existing properties. | Setup |
| getGeometryParameterData | Retrieves geometry parameter data in a buffer format. | Setup |
| getParticleParameterData | Retrieves particle parameter data in a buffer format. | Setup |
| getPartPartContactParameterData | Retrieves particle-particle contact parameter data in a buffer format. | Setup |
| getPartGeomContactParameterData | Retrieves particle-geometry contact parameter data in a buffer format. | Setup |
| getSimulationParameterData | Retrieves simulation parameter data in a buffer format. | Setup |
|
calculateTriangleDeformation |
Calculates deformation for triangle elements and returns parameters for updated mesh element.
Not Supported on GPU solvers. |
Simulation |
|
deformationEnabled |
Enables and disables mesh deformation.
Not Supported on GPU solvers. |
Simulation |
|
ignoreZeroForceTriangles |
Skips geometry deformation call if force acting on geometry element is zero
Not Supported on GPU solvers. |
Simulation |
|
getDeformationTransformSpace |
Defines Global or Local reference frame for triangle deformation.
Not Supported on GPU solvers. |
Simulation |
Methods of type "Setup" are called once, at the start of the simulation, whereas those of type "Simulation" are called during the simulation.
Refer to the API documentation for full details.
Particle Body Force User Defined Libraries
Using the EDEM API, you can write and compile custom particle body forces as a UDL written in C/C++. A Particle Body Force UDL consists of a shared library file and optionally a file containing preferences.
Overview of Creating a New Particle Body Force UDL:
- Create a directory to contain the new Particle Body Force project.
- Copy the following header files into the directory:
- IPluginParticleBodyForce.h
- PluginParticleBodyForceCore.h
- IPluginParticleBodyForceV3_1_0.h
- PluginConstants.h
- Helpers.h
- Create a new class (CNewParticleBodyForce) derived from the particle body force interface you want to use (e.g. IPluginParticleBodyForceV3_1_0).
- Save the class declaration (consisting of declarations of the methods in the chosen interface and any extra methods needed for your functionality and any variables) to a header file (e.g. CNewParticleBodyForce.h)
- Implement all of the methods defined in your header file and save as a cpp file (e.g. CNewParticleBodyForce.cpp).
- Create a new .cpp file with implementations of the methods in PluginParticleBodyForceCore.h. Save as e.g. NewParticleBodyForce.cpp
- Use command line or create a makefile (or equivalent) to build and compile .dll (Windows) or .so (Linux) library files.
- Be sure the library and optional preferences file are in the particle body force model folder (as specified with Tools > Options > File Locations) or in the same folder as the simulation_name.dem file (only for versions EDEM 2017 onwards).
- Start EDEM then select the required particle body force model category from the Interaction pull-down in the Physics section.
- Click the + drop-down list then select your new particle body force model.
Particle Body Force API v3.3.0
The interface IPluginParticleBodyForceV3_3_0 provides these methods:
| Method | Description | Type |
| getPreferenceFileName | Retrieves the name of the config file used by the UDL. | Setup |
| isThreadSafe |
If the UDL calculateForce() method is thread-safe then this method must return true. Thread safe programming requires a number of conventions and restrictions to be followed. If in doubt set this to return false.
NB. This has no effect on CUDA solver |
Setup |
| usesCustomProperties | Indicates whether the UDL wishes to register or receive custom property data. | Setup |
| setFilePath | Called inside starting() method to provide the plugin with the full simulation path (i.e., including the simulation filename). | Setup |
| getGpuFileName |
Initializes GPU plugin by accepting cl file name without extension. If empty, the model will not be supported on the GPU solver. |
Setup |
| setup | Initializes the UDL by giving it a chance to read any config files, open temporary files, generate data structures or any other one off setup work. | Setup |
| starting | Called once at the start of the simulation to indicate processing is about to begin and the model should allocate any temporary storage and retrieve any file/api/socket handles it may need. | Simulation |
| stopping | Called once at the end of the simulation to indicate processing is finished and that the model should free any temporary storage and close/release file/api/socket handles. | Simulation |
| externalForce |
Called every single time step for every single particle. It allows the user to add a particle body forces (e.g. electromagnetic force, drag force) to particles.
This is not used by CUDA solvers and should be left empty. |
Simulation |
| getNumberOfRequiredProperties | Returns the number of custom properties this UDL wants to register with the system. | Setup |
| getDetailsForProperty | Retrieves details for a given property. These properties will then be registered with the system if they do not clash with any existing properties. | Setup |
| configForTimeStep |
Called during processing, at the start of each time step.
This should be empty for CUDA solvers and implemented in the CUDA file instead. |
Simulation |
|
getParticleParameterData |
Retrieves particle parameter data in a buffer format. |
Setup |
|
getSimulationParameterData |
Retrieves simulation parameter data in a buffer format. |
Setup |
|
processParticleOfInterest |
Process particles that were marked for additional processing in externalForce call. |
Simulation |
Methods of type "Setup" are called only once, at the start of a simulation, whereas those of type "Simulation" are called during the simulation.
Refer to the API documentation for full details.
Particle Factory User Defined Libraries
Using the EDEM API, you can write and compile a custom Particle Factory for creating and initializing particles. A Particle Factory UDL consists of a shared library file and optionally a file containing preferences.
Overview of Creating a New Particle Factory:
- Create a directory to contain the new Particle Factory project.
- Copy the following header files into the directory:
- IPluginParticleFactory.h
- PluginParticleFactoryCore.h
- IPluginParticleFactoryV2_1_0.h
- PluginConstants.h
- Helpers.h
- Create a new class (CNewParticleFactory) derived from the factory interface you want to use (e.g. IPluginParticleFactoryV2_1_0).
- Save the class declaration to a header file (e.g. CNewParticleFactory.h). This should consist of declarations of the methods in the chosen interface, any extra methods required and any variables.
- Implement all of the methods defined in your header file and save as a cpp file (e.g. CNewParticleFactory.cpp).
- Create a new .cpp file with implementations of the methods in PluginParticleFactoryCore.h. For example, save as NewParticleFactory.cpp
- Compile all of your src files and link them together in to .dll (Windows) or .so (Linux) library files.
- Be sure the library and optional preferences file are in the factories folder (as specified with Tools > Options > File Locations) or in the same folder as the simulation_name.dem file (only for versions EDEM 2017.1 onwards).
- Start EDEM then switch to the Factories tab. Click the Import button then select the new factory from the Import Factory popup. Click OK.
Particle Factory API v2.1.0
The contact model interface IPluginParticleFactoryV2_1_0 provides these methods:
| Method | Description | Type |
| getPreferenceFileName | Retrieves the name of the config file used by the UDL. | Setup |
| usesCustomProperties | Indicates whether the UDL wishes to register or receive custom property data. | Setup |
| setFilePath | Called inside starting() method to provide the plugin with the full simulation path (i.e., including the simulation filename). | Simulation |
| setup | Initializes the UDL by reading any config files, opening temporary files, generating data structures or any other setup work. | Setup |
| starting | Called to indicate processing is about to begin and the model should allocate any temporary storage and retrieve any required file/API/socket handles. | Simulation |
| stopping | Called to indicate processing is finished and that the model should free any temporary storage and close/release file/api/socket handles. | Simulation |
| createParticle | Called when a new particle is to be created and passed back to EDEM for addition to the simulation. This method is called at least once per time step. | Simulation |
| getNumberOfRequiredProperties | Returns the number of custom properties this UDL wants to register with the system. | Setup |
| getDetailsForProperty | Retrieves details for a given property. These properties will then be registered with the system if they do not clash with any existing properties. | Setup |
| configForTimeStep | Called during processing, at the start of each time step. | Simulation |
| getSmallestScale | Used to retrieve a value for the smallest scale of a particle that the factory will create. | Simulation |
Refer to the API documentation for full details.
Custom Properties
With custom properties you can dynamically define custom attributes to use in your simulation. Custom properties store additional attributes (for example, contact duration) for further post-processing. Custom properties can be graphed and exported just like any other attribute. When loaded, contact models, particle body forces, and coupled applications can all use and share data about these new custom properties.
| Custom Property Category | Example |
| Contact | Contact duration, highest force during contact. |
| Geometry | Cumulative impact force, wear. |
| Particle | Residence time, temperature. |
| Simulation | Stickiness of a surface. |
A custom property is a named group of one or more numeric (double precision floating point) values with an associated unit type. You can define any number of custom properties. Each property has the following attributes:
| Attribute | Description |
| Name | The unique name of the custom property. |
| State | When properties are first added, they are defined as tentative. Tentative properties have not yet had space allocated for them. When simulation starts, tentative properties are finalized and space allocated for them. |
| Storage Type | The properties data type (currently always a C++ double). |
| Number of Elements | Indicates the number of elements. Usually a property has one element. A property with a position in 3D space would have three elements (X, Y, and Z). |
| Units | The unit type, for example length, temperature, charge, velocity etc. If the property has no unit, this is set to None. |
| Values | Indicates the property’s initial values. Double-click to change the value (provided the custom property is either still tentative or is a simulation property). For custom simulation properties, the Values area also indicates the value for the current time step. |
Any UDL that uses a custom property with the same name and category will share the property’s value(s) and have the ability to manipulate them, provided the two UDL definitions (name, units, number of elements and data type) are identical. If two UDLs have differing definitions then the first UDL only will load. The second UDL will not load and an error is given.
The Value of a custom property can be called and the Delta of a custom property can be modified. At the end of a simulation cycle the Delta is added to the Value and the Value is updated for the next time step accordingly.
Using Custom Properties
To use custom properties:
- Indicate your UDL is to use custom properties by setting its usesCustomProperties() method to return true.
- Register each custom property you want to use. For each custom property category (contact, particle, geometry or simulation).
- Use getNumberOfRequiredProperties() to indicate the number of custom properties to be registered. When the UDL is loaded, EDEM calls getNumberOfRequiredProperties() once for each category.
- Use getDetailsForProperty() to indicate the name, number of elements and unit type of each property. getDetailsForProperty() is called once for each property you are registering.
When EDEM starts processing, tentative properties are finalized and EDEM allocates storage for each new property.
OpenCL GPU API User Guide
OpenCL GPU API
As of EDEM 2019, EDEM’s API now supports GPU processing. Prior to this the API had only been supported on CPU, with the API code itself being written in C++. To take advantage of the increased performance of GPU API, when compared to CPU API, users will have to first create an equivalent version of their API model in a different format. GPU API models need to be written in the *.cl file format, which is the OpenCL file extension. GPU API models will also need to be run in tandem with an existing CPU API model as they are not self-contained.
Version 3.0 of the API is not supported in EDEM 2020. If the OpenCL Error Message "Version of the <API name> plugin is no longer supported" is shown when running the API model on GPU then the API model will have to be updated to use the v3.1 API or later.
As well as the introduction of the OpenCL GPU API the existing CPU API has also been updated, introducing significant changes. The changes to the CPU API have been made so that the inputs and outputs for a user’s API code are largely similar, if not the same, whether their code be written for CPU or GPU.
To convert an existing CPU API (*.cpp / *.h) code to be compatible with the GPU API (*.cl), there are several steps that a user needs to follow, which are outlined in the rest of this document. A summary of the process is:
-
Update existing CPU API code (.cpp) to v3.1 of the API.
-
Recompile the CPU API to a library (.dll or .so).
-
Create an OpenCL (.cl) file from the updated CPU API code.
-
Create a DataTypes.cl file for transferring information between GPU and CPU.
-
Run a simulation with the library file (for CPU) and .cl files (for GPU) in the same location.
Updating to v3.1 of the API from v2.x
The first step a user will need to do is to update their API code to be API v3.1 compatible. Compared to versions 2.x of the API, the externalForce() and calculateForce() functions have been changed significantly, to match the incoming GPU API format. The same inputs are available as in previous versions of the API but are now available through several structures rather than outright.
For example, to assign a rolling friction value using a v2.6 Contact Model a user would have written:
variable1 = variable2 * rollingFriction;
whereas to do the same using a v3.1 Contact Model a user would now write:
variable1 = variable2 * interaction.rollingFriction;
To access the simulation time using a v2.6 Particle Body Force a user would have written:
If (time > 5.0)
{
...
}
whereas to access the simulation time using v3.1 Particle Body Force a user would now write:
If (timeStepData.time > 5.0)
{
...
}
A complete list of all these structures and the variables that they hold can be found in the EDEM API documentation. Once you have made these changes, the corresponding *.cpp file that informs EDEM about which API version to use will also need to be updated to reflect the change, for example, for a Particle Body Force:
…
EXPORT_MACRO int GETEFINTERFACEVERSION()
{
static const int INTERFACE_VERSION_MAJOR = 0x03;
static const int INTERFACE_VERSION_MINOR = 0x01;
static const int INTERFACE_VERSION_PATCH = 0x00;
…
where … is used to imply additional code has been omitted for brevity.
As of EDEM 2019.0, or v3.0 of the API interface, two required methods were added for contact model plugins, namely getModelType() and getExecutionChainPosition(). The user must specify these to determine the type of physics and where in the contact model chain the model is positioned.
The types of models available are Base (such as Hertz-Mindlin), Optional (such as Heat Transfer) and Rolling Friction. The ApiTypes.h file details the range of options available for both the model type and chain position. Examples of how to add these to the custom model header file are:
NApi::EPluginModelType getModelType() override;
NApi::EPluginExecutionChainPosition getExecutionChainPosition() override;
And the custom model .cpp file:
NApi::EPluginModelType CHertzMindlin_v3_1_0::getModelType()
{
return EPluginModelType::eBase;
}
NApi::EPluginExecutionChainPosition CHertzMindlin_v3_1_0::getExecutionChainPosition()
{
return EPluginExecutionChainPosition::eBasePos;
}
Note that only the Contact Model and Particle Body Force versions have been updated to v3.x. Custom Factories remain entirely on the CPU and have not been updated at this time.
Handling Operations
OpenCL is based on the C programming language meaning the *.cl file format does not support some of the advantages C++ offers, that users may be used to. Although there are some minor differences, users can broadly expect any limitations in C (when compared to C++) are also applicable to OpenCL. Basic operations like brackets, division, multiplication, addition and subtraction are supported for doubles. Operator overloading is not supported in OpenCL, meaning these operations are not readily supported on vector or matrix classes that are common throughout EDEM API models. This means that to perform even relatively simple vector algebra, say multiply a vector by a double, requires multiplying each element of the vector by the double manually. To simplify this process, a range of helper functions have been introduced for the GPU API to replace the overloaded operators that are not available. For example, to multiply a vector by a double in the CPU API, this may take the form of something like the following:
CSimple3DVector vectorName;
double d;
CSimple3DVector scaledVector = d * vectorName;
and C++ is handling the multiplication on the vector elements. On GPU this would take the form of:
CVector vectorName;
double d;
CVector scaledVector = vecMultiply(vectorName, double);
where the function vecMultiply() has been used to multiply the vector by a double. Similar functions are available for vector addition/subtraction, dot-product, cross-product, length, and many more. A complete list of available functions can be found in the EDEM API documentation. Any operation that is not a straight forward operation on a double, will need to be replaced with one of the helper functions or else it likely will lead to an error at run time.
Function Names
In addition to the operation changes, the next major difference a *.cl file has when compared to its *.cpp equivalent is in the function names. There are 4 main functions within a *.cl file that must have the model name prefixed to them. The main functions for contact models and particle body force models are the first two, namely contactForce() and externalForce(). The second two are functions that replace the single function configForTimestep, namely configForTimestepParticleProperty() and configForTimestepTriangleProperty(). This means that if you are using the functions:
contactForce()
externalForce()
configForTimestep()
in your CPU API code, then in your corresponding GPU API *.cl file they will take the form:
ClFilenameCalculateForce()
ClFilenameExternalForce()
ClFilenameConfigForTimestepParticleProperty()
ClFilenameConfigForTimestepTriangleProperty()
where in this case the name of the *.cl file would be ClFilename. Note the change in case for the function names too.
>Specifying the File Name
In order for EDEM to know what the prefix to these functions will be, within the *.cpp file you must specify the name of the corresponding *.cl file using the function:
getGpuFileName()
i.e. the value that EDEM takes as an input for this function should match:
-
the name of the *.cl file
-
the prefix of the 4 functions mentioned above
The inclusion of this function informs EDEM that the API model is compatible with the GPU API.
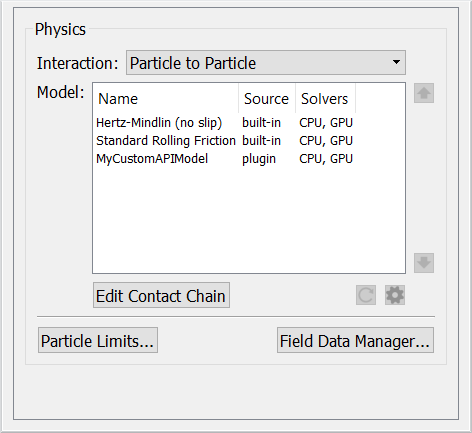
An API model without this function will show up in the EDEM Creator > Physics tab as CPU compatible only, including this function lets EDEM know the model is GPU compatible. The API must have an associated GPU compatible .cl file for the same model to run on GPU. For example MyCustomAPIModel shown below has both the CPU and GPU solvers available as this function has been implemented.
To run the Custom API model on GPU the associated .cl file must also be in the same location as the library file (MyCustomAPIModel.dll or MyCustomAPIModel.so).
Handling Parameters
If the API model uses a preference file to get parameter values, special attention needs to be given to the handling of these parameters. The OpenCL GPU API does not have a method for directly reading from a preference file. For this reason, the CPU plugin (*.dll file) continues to read the preference file and a series of functions need to be used to pass this data to the GPU API model.
If you are using parameters from a preference file you will have to handle the parameter data using one of four available structures:
typedef struct
{} SParticleParameterData;
typedef struct
{} SGeometryParameterData;
typedef struct
{} SContactParameterData;
typedef struct
{} SSimulationParameterData;
Each of these four structures has a corresponding ‘get’ function within the API (though there are two to get contactParameterData), i.e.:
getParticleParameterData()
getGeometryParameterData()
getPartGeomContactParameterData()
getPartPartContactParameterData()
getSimulationParameterData()
If you wish to pass a parameter from a preference file to a OpenCL GPU API model, first it needs to be passed into one of these ‘get functions’. You can find the definitions for these functions in the v3.1 header files (IPluginContactModelV3_1_0.h and IPluginParticleBodyForceV3_1_0.h).
Taking the bonded contact model as an example, this uses a preference file to read in six different values relating to the bonds to be formed. As these are values that are assigned to the simulation, they should be handled by the getSimulationParameterdata() function (they do not relate to a contact and they are not parameters for specific particles/geometries). This means that the start of the *.cl file will now look something like:
typedef struct
{} SParticleParameterData;
…
typedef struct
{
double m_requestedBondTime;
int torque_feedback;
int break_compression;
double damping_coeff;
double rotation_coeff;
double m_contactRadiusScale;
} SSimulationParameterData;
In addition to setting up these structs within the *.cl file, the corresponding *.cpp and *.h files also need to be amended to use the getSimulationParameterdata() function. The *.h file will need to include version 3.1 of the contact model API:
#include "IPluginContactModelV3_1_0.h"
and also include the function definition for the getSimulationParameterdata() function:
virtual unsigned int getSimulationParameterData(void* parameterData);
The *.cpp file will then need to implement this function and contain the parameters you wish to pass to the GPU API model:
unsigned int CBonded::getSimulationParameterData(void* parameterData)
{
SSimulationParameterData*params = reinterpret_cast<SSimulationParameterData*> (parameterData);
params->m_requestedBondTime = m_requestedBondTime;
params->torque_feedback = torque_feedback;
params->break_compression = break_compression;
params->damping_coeff = damping_coeff;
params->rotation_coeff = rotation_coeff;
params->m_contactRadiusScale = m_contactRadiusScale;
return sizeof(SSimulationParameterData);
}
The reinterpret_cast() operation is required to change the pointer type of parameterData which is read by the getSimulationParameterData() call from being a void pointer to being of a type that holds all the parameters being passed, i.e. :
typedef struct
{
double m_requestedBondTime;
int torque_feedback;
int break_compression;
double damping_coeff;
double rotation_coeff;
double m_contactRadiusScale;
} SSimulationParameterData;
unsigned int CBonded::getSimulationParameterData(void* parameterData)
{
SSimulationParameterData* params = reinterpret_cast<SSimulationParameterData*> (parameterData);
…
}
For additional examples of how to handle parameters coming from preference files, see the EEPA and Heat Conduction contact model examples on the EDEM forum.
Handling Custom Properties
Like parameters coming from preference files, custom properties also require their own special treatment for OpenCL GPU API models. The updated *CalculateForce() function contains a structure for handling custom properties:
void ApiModelCalculateForce(
int contactIndex,
SApiTimeStepData* timestepData,
const SDiscreteElement* element1,
const SDiscreteElement* element2,
SApiCustomProperties* customProperties,
…
Custom properties are not handled by variable name, but rather by their indices. This means the first step is to assign each of the custom properties to an index. The indices assigned to the custom properties in the *.cl file must match those that are already written in the *.cpp file; assigning the indices cannot be done arbitrarily. Using the bonded model again as an example, towards the end of the *.cpp file the custom properties indices are defined in the following manner:
bool CBonded::getDetailsForProperty(…)
{
if (0 == propertyIndex && eContact == category)
{
strcpy(name, BOND_STATUS.c_str());
…
}
if (1 == propertyIndex && eContact == category)
{
strcpy(name, BOND_NORMAL_FORCE.c_str());
…
}
…
Here, the two custom properties BOND_STATUS and BOND_NORMAL_FORCE take on indices 0 and 1, respectively. To setup these custom properties in the corresponding *.cl file, then requires:
void calculateForce(…)
{
const int BOND_STATUS_INDEX = 0;
const int BOND_NORMAL_FORCE_INDEX = 1;
…
This step is not strictly necessary, but it makes it a lot easier to keep track of which index refers to which custom property and will make the overall code easier to manage. Once these indices have been set up, to get a Custom Property Value requires setting up global variables, denoted __global in OpenCL. To set a custom property Delta requires setting up local variables, denoted __local in OpenCL. The functions getContactPropertyValue() and getContactPropertyDelta() can then be used: :
__global const double* m_BondStatus = getContactPropertyValue(customProperties, BOND_STATUS_INDEX);
__local double* m_BondStatusDelta = getContactPropertyDelta(customProperties, BOND_STATUS_INDEX);
This example sets up two pointers, m_BondStatus and m_BondStatusDelta which can now be used to access the value and delta, respectively, of the custom property BOND_STATUS_INDEX. Note that the custom property value is defined as a const as it cannot be changed directly but can have its value updated by changing the value of the Delta.
Please note that in EDEM 2019 GPU-API both Custom Property Value and Delta used global variables, in EDEM 2020 the local variable was introduced to improve simulation speed. Using __ global for Custom Property Delta in EDEM 2020 results in the message “error: implicit conversion from address space “local” to address space “global 2is not supported in initialization expression __global double* <custom property name”. The solution for this to change all Delta Custom Properties to use __local.
For additional examples of how to handle custom properties, see the EEPA, Heat Conduction and Relative Wear contact model examples in the EDEM installation folder.
Transferring particle data from GPU-API to CPU-API
When running a CPU-API simulation particle (or other) data can be stored in ‘memory’ and copied between Contact Models, Particle Body Force and Factory so long as all models are compiled into one .dll or .so library file.
When running GPU-API simulations the particle information is not automatically passed back to the CPU. In an occurrence where this is required, for example passing information to a API Factory which runs on CPU only, then the following methods can be used:
- In GPU-API use the Particle Manager to mark a particle which information is to be passed to the CPU
markParticleOfInterest(externalForceParticleManager);
-
Introduce the equivalent function in the CPU code. As mentioned, it's not required for CPU only plugins, but is needed to match CPU and GPU implementations.
m_particleMngr->markParticleOfInterest(particle.ID);
- Process the particle information on CPU.
void CCustomParticleBodyForce::processParticleOfInterest(int threadID, int particleOfInterestId)
{
const NExternalForceTypesV3_0_0::SParticle particle = m_particleMngr->getParticleData(particleOfInterestId);
}
The above example would allow the user to then process the particle information in the Particle Body Force on the CPU, allowing it to then be used in any other CPU code such as a Custom Factory.
Running a Simulation using the GPU API
Once you have followed the steps outlined in the preceding sections, you are in a position to be able to run your API model on GPU. To load the model into EDEM, you will need the following 3 files in the same location:
model.dll
The compiled CPU plugin, i.e. the *.dll file corresponding to the CPU version of the model, written using v3.x or later of the API. This is necessary as not every task relating to the running of the API model can be performed on the GPU. Certain information, for example data coming from a preference file, is cached by EDEM and made available to the GPU.
model.cl
The *.cl file, that should look similar to the v3.x version of the CPU API model only with helper functions used instead of operators and class methods, and the function names prefixed with the plugin name.
As is the case when running a CPU API simulation, these files need to be in either the same location as the *.dem file of the simulation or in the folder being pointed to in Tools > Options > File Locations. They will appear in EDEM as additional models, just like the CPU case. The way to check whether a simulation is running on CPU or GPU is by looking at the ‘Solvers’ value. If the API model is only capable of running on the CPU this will read ‘CPU’. If the API model is capable of running on the GPU as well then this will now read ‘CPU, GPU’. Determining whether the API model runs on CPU or GPU is determined in the Simulator at run time.
Multiple GPU API Models
As of v3.1 of the API, you can chain GPU API plugins and have multiple plugins within a single EDEM simulation. This was not the case in v3.0 of the API, which only allowed a single GPU API plugin.
Limitations and Restrictions for GPU API
- The configForTimestep() function is split into two functions for GPU API, configForTimeStepParticleProperty() and configForTimeStepTriangleProperty (), which are limited to changing particle and geometry custom properties, respectively. For example, to reset the heat flux for the heat conduction model:
void configForTimeStepParticleProperty(SApiElementCustomPropertyData* particleProperties)
{
__global const double* flux = getElementPropertyValue(particleProperties, FLUX_INDEX);
__local double* fluxDelta = getElementPropertyDelta(particleProperties, FLUX_INDEX);
*fluxDelta = -*flux;
}
- There is currently no support for BOOL custom properties.
- If your model combines a contact model with a particle body force and uses custom properties, the indices of the custom properties should be consistent between the two models. (See the Heat Conduction model as an example).
Note: By default Nvidia GPU cards use a caching system when compiling kernels. This means changes users make to .cl files can be ignored. To avoid this, introduce the environment variable CUDA_CACHE_DISABLE=1.
Compiling API Models to Libraries
A 3rd party compiler is required to compile C++ code to a library (.dll in Windows or .so in Linux). EDEM does not support any specific compiler however Microsoft Visual Studio is commonly used and Visual Studio Community 2017 is shown in this example along with Linux GCC.
This example assumes the user has already written the code to be compiled. The code used in this example is the Hertz-Mindlin model available on the EDEM Simulation Forum and the EDEM API Contact Model Tutorial. The user written API files are shown below:
Windows:
When installing Visual Studio it is important to choose to install the C++ toolset (Universal Windows Platform development and Desktop development with C++), depending on the install these may be installed by default or additional options in the installer.
-
Create a New Project
-
Open Visual C++ For Windows Desktop and Go to File > New Project...
-
Select Win32 Console Application as shown below.
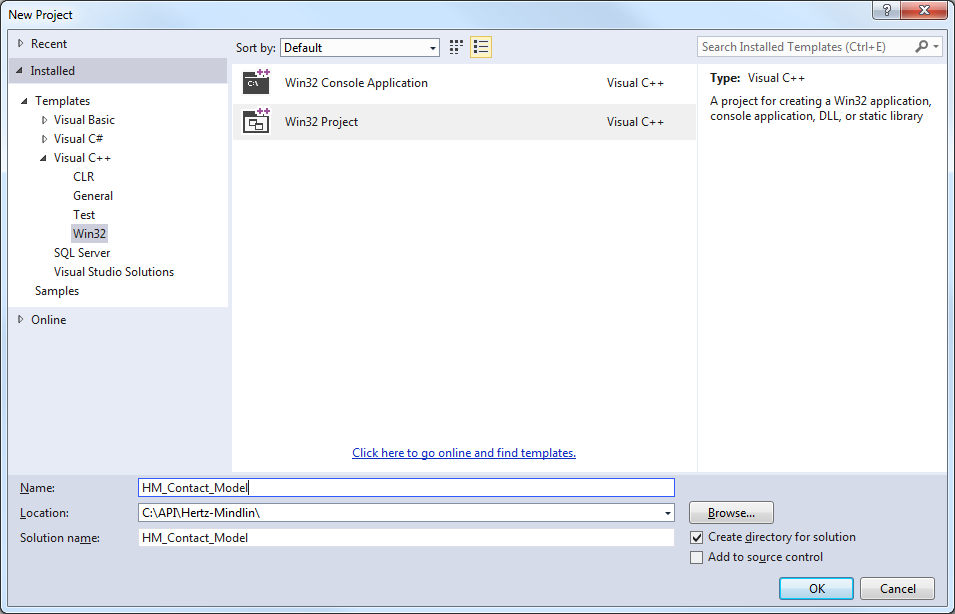
-
Enter a project name and location and press OK.
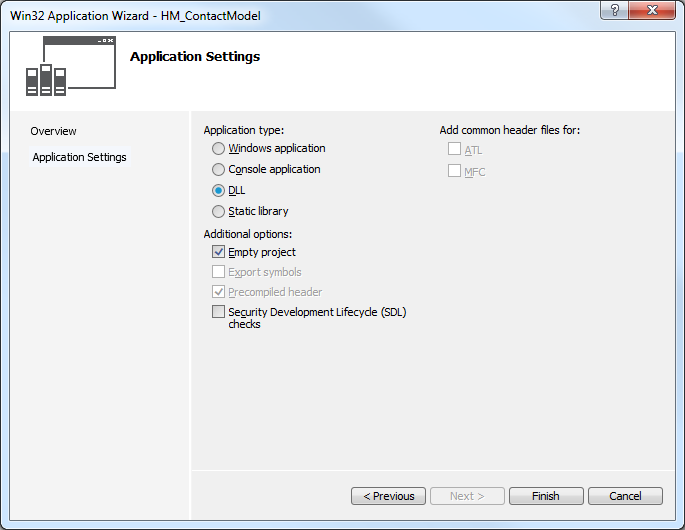
-
On the next window go to Application Settings and select DLL in Application Type.
-
Select Empty Project and Choose Finish.
-
-
Copy the user written .cpp and .h files to the newly created project folder.
-
EDEM header files are also needed before the model with compile. The additional header files can be found in the EDEM install folder > src > API. Copy the following files from Core and ContactModels to your project folder:
-
IPluginContactModel.h
-
IPluginContactModelV2_4_0.h
-
PluginContactModelCore.h
-
ApiIds.h
-
ApiTypes.h
-
IApi.h
-
IApiManager_1_0.h
-
ICustomPropertyDataApi_1_0.h
-
ICustomPropertyManagerApi_1_0.h
-
PluginConstants.h
-
-
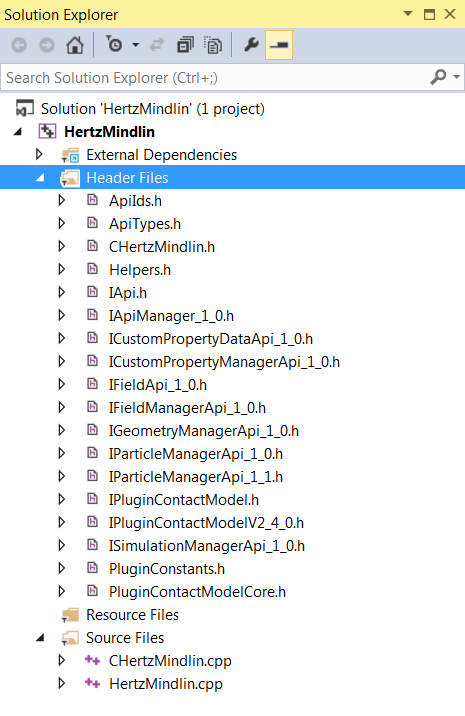
Right Click on Header files and Source files to add the file to the Visual Studio Project. The project should look similar to the following:
-
-
Compiling the Contact Model
-
Go to Visual Studio Build > Configuration Manager
-
From Win32 choose ‘new’ > x64. The Configuration Manager window should now look like:
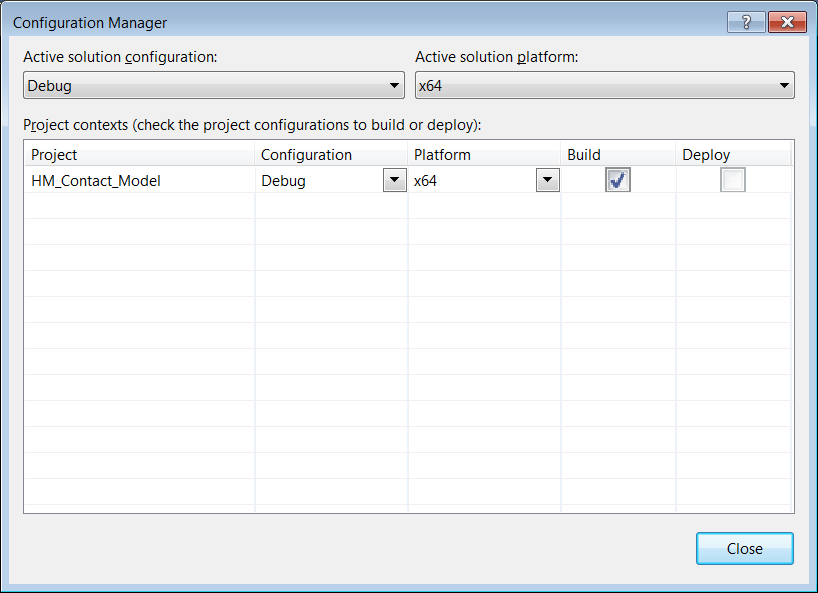
-
Choose Release or Debug and build the solution from Build > Build Solution. This creates a .dll file which can be loaded into EDEM.
-
Linux
Please note that although some basic commands are covered, the following is not intended to be an in-depth guide for new users of Linux.
The GNU Compiler Collection, more commonly referred to as GCC, is typically included with Linux installations and, as the name suggests, is a collection of different compilers. EDEM’s API is based on C++, meaning a compiler that is compatible with C++ is required. We recommend using either the gcc or g++ command, both of which are common ways of invoking a C++ compiler. There are differences between the two commands, which we will not outline here, but you should be able to use either when compiling your EDEM API plugin.
EDEM uses functionality from the C++11 standard, so you will require a compatible version of gcc in order to compile plugins using EDEM’s API. gcc 4.8.1 was the first version to be fully compliant with the C++11 standard. If you have Red Hat / CentOS 7 or later, you should be able to use the default version of gcc. You can check which version of gcc you have by entering “gcc --version” in a terminal:

To compile the Hertz-Mindlin example from command line, with an output file of HertzMindlinAPI.so, the following command can be used:
gcc -std=c++11 -O2 -shared -fPIC
-I/home/<user>/2022/altair/src/Api/ContactModels/
-I/home/<user>/2022/altair/src/Api/Core/
-I/home/<user>/2022/altair/src/Misc/
CHertzMindlin.cpp HertzMindlin.cpp -o HertzMindlinAPI.so
NB. If you change the install path during the installation, you will need to update the file locations to the appropriate directory. <user> should be updated to the appropriate account depending on the folder EDEM is installed in.
where:
- -std=c++11 informs gcc to expect functionality from the C++11 standard and use the appropriate libraries when compiling.
- -O2 specifies the use of optimization method 2. Adding an optimization method flag allows gcc to attempt to improve the performance of the resulting output file, though potentially increases compilation time. Generally speaking, an EDEM API plugin should compile within seconds, so it is usually worth including this optimization option.
- -shared -fPIC creates a shared object file as an output. The default output of gcc is an executable program. Adding these flags means gcc produces a shared library instead.
- -I/<directory> adds the directory to the included path. This allows you to use headers from a particular directory, without having to copy them to the directory where your source code is. In addition to those mentioned above, when creating EDEM API plugins, you may also need to include:
- /home/<user>/2022/altair/src/Api/Factories
- /home/<user>/2022/altair/src/Api/ParticleBodyForce.
Alternatively, you can choose to copy the relevant header files to your working directory if you do not wish to use this flag to include any directories.
- -o specifies the output file name. This is not mandatory, but is required if you would like the created shared library to have a particular name. You can always rename the file after compilation if you do not use this flag.
Note that as this is all one command, there should only be spaces between the arguments and not new lines. The arguments are shown on new lines here to make the code easier to read. When entering this command in a terminal (or script) it should look something like this:

It is recommended the user specifies the compile flags appropriate to their model and requirements, though the above flags are commonly used and found to work when compiling EDEM API plugins. For more detail on flags for gcc, visit https://gcc.gnu.org/ or check out gcc’s man entry (man gcc).
Making a Compilation Script (Recommended)
Although this step is not necessary, if you are compiling API plugins regularly, you may wish to consider putting together a script that does the compilation automatically, to save you from having to type out a long command every time.
-
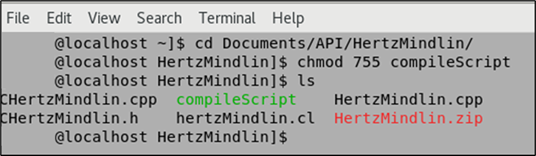
Using a text editor, such as Emacs, Vim or Gedit, create a new text file with your command similar to that written above (edited for your particular filenames and included directories) and save it to a file name of your choice, e.g. compileScript, in the same folder as your source code. Here we are using Vim, which should be available to all Linux distributions, though the text editors available to you might mean it is easier to use something else.

-
Navigate to the directory where you have saved your script, using cd, and then make the script an executable using chmod 755 compileScript. Now when we list the contents of the directory, using the ls command, we can see that the compileScript has executable permissions (it now shows in green).
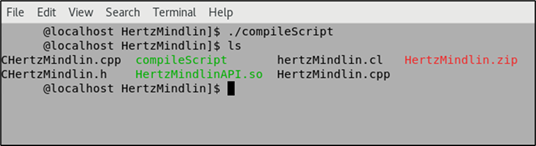
-
Run the compile script using ./compileScript and your .so file will be created.
-
When compiling another model, all you now need to change is the included directories and filenames in this one script, or modify the script to accept arguments instead.
CUDA GPU API
CUDA Function Declarations
CUDA requires that all functions be declared according to where they are going to be called and executed. Given the custom API scripts are called and run on the GPU, they must be declared as “__device__” functions as so:
__device__
void calculateForce(NCudaApiTypesV1_0_0::CApiElement& element1,
NCudaApiTypesV1_0_0::CApiElement& element2,
…
There are other function declarations such as “__Global__” and “__Host__”, however these should not be required.
CUDA programming style
The CUDA API is much closer to C++ programming, in style, compared to the OpenCL API. This means that basic operations usually take a much simpler form. Some examples of this are shown below:
| Type of function | OpenCL function | CUDA function |
|
Vector arithmetic |
vvSubtract(a,b) |
a - b |
|
vvAdd(a,b) |
a + b |
|
|
vecMultiply(a,b) |
a * b |
|
|
vecDivide(a,b) |
a / b |
|
|
Vector Operations |
vvDot(a,b) |
a.dot(b) |
|
vvCross(a,b) |
a.cross(b) |
|
|
vecNormalize(a) |
a.normalize() |
For a full explanation of what functions are available see the API help documents, which can be found at:
“<EDEM install directory>\202X.X\EDEM\src\Api\Help”.
CUDA Class Declarations
Multiple different particle types can be used with the CUDA API whilst only multi-spheres operate on the OpenCL API. Given this difference, the CUDA API operates with a more generalized set of classes and functions compared to OpenCL.
There are some differences which stem from CUDA’s programming syntax compared to OpenCL’s. However there are other differences which originate directly from EDEM. For example, when retrieving the radius of an element in CUDA for a multi-sphere or a sphero-cylinder the following operation would be used:
element1.getPhysicalRadius() ;
The closest equivalent operation which would work for polyhedral particles is:
element1.getVolumeSphereRadius();
This is not a syntactical difference, but rather a real difference in the value. In this case it is due to the fact that Polyhedral particles do not have an inherent radius like Multi-Spheres and Sphero-Cylinders do.
Therefore when developing API scripts on CUDA, several sources are required to fully understand what functionality is available:
- The internal EDEM API documentation: This details the EDEM specific CUDA functions and classes. This can be found at “<EDEM install directory>\202X.X\EDEM\src\Api\Help” then select any html file.
- CUDA Documentation: This details standard CUDA functionality. For the full documentation: https://docs.nvidia.com/cuda/index.html
- Example code can be found on the Altair community page: https://community.altair.com/community. Here there are example codes which provide an insight into how these different functions should be implemented.
CUDA Getter and Setter Functions
In order to maintain backwards compatibility going forwards with the CUDA API, a range of getter and setter functions have been implemented. These allow users to retrieve the same information they could using the OpenCL solver. For example:
element1->position;
Is equivalent to:
element1.getPosition();
CUDA Debugging
This is the same as the OpenCL debugging process. If errors are present EDEM will detail the errors in a dialog box when your simulation is started.
An additional method for debugging which allows a user to gain real time information from the simulation is to run an attached simulation through the command line.
This involves the following steps:
- Add printf() functions as desired throughout your API to output values of interest
- Locate your EDEM.exe directory at “<EDEM install directory>\202X.X\EDEM\bin\”
- Run the command EDEM.exe --no-free as such: C:\Program Files\Altair\2022\EDEM\bin\edem.exe --no-free
- Load your API model into EDEM and run the simulation
- The outputted results should appear on the command window
CUDA Main Functions
Due to the differences in classes and data types between the CUDA file and the multi-sphere OpenCL file, modifications need to be made to the “ExternalForce” and “CalculateForce” functions.
The main function naming in the CUDA API follows a different convention to the OpenCL API. In the CUDA file, the file name should not prefix the main function names.
Examples of these modified main function inputs are:
__device__
void calculateForce(NCudaApiTypesV1_0_0::CApiElement& element1,
NCudaApiTypesV1_0_0::CApiElement& element2,
NCudaApiTypesV1_0_0::CApiInteraction& interaction,
NCudaApiTypesV1_0_0::CApiContact& contactData,
NCudaApiTypesV1_0_0::CApiSimulation& simulationData,
NCudaApiTypesV1_0_0::CApiContactResults& contactResult)
{
}
__device__
void externalForce(NCudaApiTypesV1_0_0::CApiParticle& particle,
NCudaApiTypesV1_0_0::CApiSimulation& simulation,
NCudaApiTypesV1_0_0::CApiTotalForce& result)
{
}
In addition to these functions there are the configForTimestep functions. These allow custom functionality to be modified at each timestep. Even if they are not used it is mandatory to include these functions:
__device__
void configForTimeStepParticleProperty(NCudaApiTypesV1_0_0::CApiCustomPropertyData& particleProperties)
{
}
__device__
void configForTimeStepTriangleProperty(NCudaApiTypesV1_0_0::CApiCustomPropertyData& triangleProperties)
{
}
CUDA Data Precision
In the CUDA API the user is able to specify the precision that they want their data to be handled in. This allows API scripts to take advantage of the speed benefits of the hybrid and single precision solvers. The three CUDA specific data types are: real, longReal and customPropReal. See the table below which shows each data type’s precision depending on the solver settings:
| Data Type | Solver Precision | Usage | ||
| Double | Hybrid | Single | ||
| real | double | single | single | Most situations |
| longReal | double | double | single | High precision data requirements |
| customPropReal | double | double | single | custom properties |
To implement these data types simply specify them when declaring a variable:
real exampleVariable = ...
Here the real data type is used and is an appropriate datatype for most situations. For more information on these data types and the functions associated with them see the API help documents.
Sphero-Cylinders
API users should be careful when implementing contact models for the CUDA solver to not rely on the contact normal being in the same direction as the vector from the API element 'position' member to the contact point. Whilst this does work for multisphere shapes it will not work for Sphero-Cylinder or Polyhedral shapes. Users should instead try to use the contactNormal member which is passed in the overlapData API structure.
Apart from this, all contact properties for Sphero-Cylinders have a similar definition to those for Multi-Sphere particles.