Creating a Wire Port
Apply a wire port to wires (free edges that do not form a face boundary).
-
On the Source/Load tab, in the
Ports group, click the
 Wire port icon.

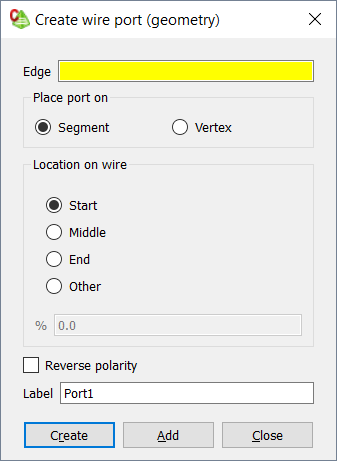
Figure 1. The Create wire port (geometry) dialog.
Specify the wire where the port is to be placed.
-
In the Edge field, use point entry to specify the wire
using one of the following workflows:
- In the 3D view, click on the relevant wire.
- In the details tree, click on the relevant wire.
-
Specify whether the port is to be placed on a segment or a vertex (after the
wire is meshed).
- To add the wire port to a segment, select Segment.
- To add the wire port to a vertex between two segments, select
Vertex.Vertex ports are mainly used where wires are connected to other structures and the phase difference from the end point to the centre of the first segment would have a significance effect on the input impedance.Note: Vertex ports can be set on the end of wires that are connected to infinite ground planes and UTD plates.
-
Specify where the port is located on the wire. Under Location on
wire, select one of the following:
- To specify one of the predefined geometric points on a line, select Start, Middle or End.
- To specify an arbitrary position along the wire in terms of the position
as a percentage of the total wire length, select
Other, where 0% is interpreted as the start point
and 100% as the end point.
If the wire is modified after the port was specified, the port maintains the same relative position along the wire. For example, if the port was one third from the end of a wire and the wire is shortened to work at a different frequency, the port remains one third from the end of the shorter wire.
Tip: Enter a named point or a “pt” expression in the % field to fix the absolute position of the port. The port is then located at the projection of the point onto the wire. If the wire is modified, the point will remain as close as possible to the absolute position.
- [Optional] If the polarity of the port is to be reversed, select the Reverse polarity check box.
- In the Label field, add a unique label for the wire port.
- Click Create to create the wire port and to close the dialog.