Configure a Cam Die

Designate a part or surface(s) on your model for the cam die.

The cam die moves in any direction relative to the draw direction. The example shows a cam die added to a crash form operation.
  1. Add a cam die to an operation, then select the Cam Die.
  2. On the guide bar, choose Part or Surfaces.
  3. If you choose Part, on the model, select an option from the table below based on your desired result, and then click to confirm.
    Option Result
    Assign If you have already designated a part as a cam die, choose assign. Click Assign to confirm.
    Offset If the part requires an offset, on the guide bar, select the Offset check box, then click Create, or click to confirm. In the microdialog, type in a value for the offset. The default is the sheet thickness plus 20%.
    Duplicate If you can create the cam die by copying a part, click Duplicate and the bottom binder will appear.
  4. If you choose Surfaces, on the model, select the surface(s) you want to designate as the cam die, and then click to confirm.
    Option Result
    Offset Click Offset to duplicate the surface(s) and offset them. In the microdialog, type in a value for the offset, then click to confirm. The default is the sheet thickness plus 20%.
    Duplicate Click Duplicate to make a copy of the selected surface(s).
    Partition Click Partition to remove the selected surface(s) and move them to a new part.
    Note: If you modify the blank thickness, you must reconfigure the tools created by offset.
  5. To define the stroke, on the microdialog, select to Closed position or Stroke Value. For Stroke Value, type in the value for the stroke, then click to confirm.
    Note: If you define the stroke value to be larger than the auto-calculated or To Closed position value, the Open position of the tool automatically repositions to match the stroke value to prevent a collision with the bottom die.
  6. On the microdialog, choose a direction or define the direction using the manipulator.
  7. Define the stroke, velocity, and Coulomb friction coefficient.
    1. In the microdialog, to set the stroke value to the closed position of the tools, select . To specify a value, select the pencil tool , type in a value, and press Enter.
      Note: If you define the stroke value to be larger than the auto-calculated or closed position, the open position of the tool automatically repositions to match the stroke value to prevent a collision with the bottom die.
    2. To define the Coulomb friction coefficient, in the microdialog, enter a value next to the icon .
  8. Click to confirm the configuration of the cam die.


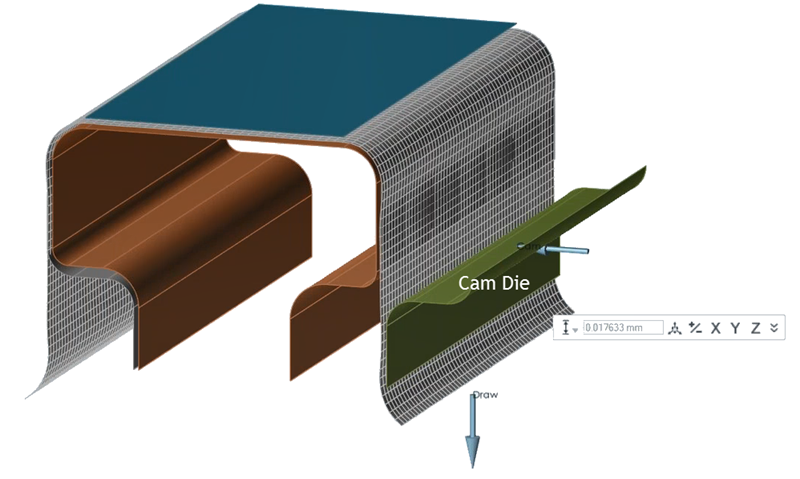
    Figure 1. Crash Form Operation with a Cam Die

Keyboard Shortcuts & Mouse Controls

To Do this
Add/remove from selection Ctrl+click
Reverse selection Ctrl+R