Elements of the graphical user interface (GUI) features
Page and window controls
HyperWorks Desktop files
The exercise is this tutorial is named Learning to Use the HyperWorks
Desktop Interface
HyperWorks Desktop belongs to the HyperWorks software suite and consists of the following
applications. A brief description of each product in HyperWorks Desktop is included under the Select application Menu
topic. For more detailed information on a product listed below, click on the link to
display the product's introductory help page.
HyperMesh
MotionView
HyperView
HyperGraph 2D
HyperGraph 3D
MediaView
TextView
TableView
Templex and Math Reference
While MotionView allows you to create and set up an
analysis for multi-body systems, the remaining applications provide an interactive
and easy to use environment for the visualization, plotting, study, analysis, and
presentation of engineering result data obtained from finite element analysis (FEA)
or multi-body dynamics (MBD) solvers.
This tutorial contains:
Elements of the graphical user interface (GUI) features
Page and window controls
HyperWorks Desktop files
Elements of the Graphics Interface
The main elements of the HyperWorks Desktop graphics
interface are described below.
Title bar
The title bar tells you which product is active. Because you can
switch between clients, clicking on and activating a different
window may change the information in the title bar. The title bar
also tells you the name of the file currently loaded.
In HyperMesh, the name of the active loaded user profile is also
shown.
Menu bar
Windows style pull-down menus that allow you to access the HyperWorks Desktop functions and tools are located
along the top of the screen. The top-level menu choices vary, based
on the active application in the current window.
Toolbar
Panels containing tools associated with the active application can
be accessed using the toolbar buttons. Panels are also accessible
from the menu bar. See Select Application Menu for the various
toolbar types.
Tab area
The portion of the graphical user interface that contains the
browsers, the utility menus for the solver interfacing user
profiles, and other functionality not shown in the panel area. The
Tab Area can be moved to either the left or right side of the
graphics area, or both, or it can be hidden completely.
Graphics area
Models, plots, animations, and text are displayed in this area. It
can be divided into multiple windows.
Panel area
Most operations are perfomed using the panel options.
View controls
Tools that control the orientation of the window display.
The view controls, located in the toolbar area of the panel, allow
you to visually manipulate model graphics, plots, and videos. There
are three view control toolbars in HyperWorks Desktop: Standard
Views, 3D View Controls, and
2D View Controls. The toolbars can be
turned on or off from the View menu. A check mark indicates that a
toolbar is currently displayed. Clicking an item in the Toolbars
sub-menu toggles the state between "on" and "off". Like the toolbar
buttons, the view controls available vary based on the current
application.
Toolbars can be moved and "docked" to any of several possible
locations inside the user environment. Each toolbar has a toolbar
handle, , used to drag a toolbar on (docked) or
off (undocked) a toolbar area. To move a toolbar, simply
click-and-drag the handle to the new location that you wish the
toolbar to reside.
The tables below explains the functionality of the view control
buttons in MotionView, HyperView, and HyperGraph:
Standard Views toolbar
Figure 1. Standard Views toolbar
Table 1.
Icon
Function
Description
Fit Model
Left click: Fit model
Right click: Fit all models
Previous View
XY Top Plane View
Set the view to the xy top plane
XY Bottom Plane View
Set the view to the xy bottom plane
XZ Left Plane View
Set the view to the xz left plane
XZ Right Plane View
Set the view to the xz right plane
YZ Rear Plane View
Set the view to the yz rear plane
YZ Front Plane View
Set the view to the yz front view
Isometric view
Set the view to the isometric view
Reverse View
Set the view to the "reverse" of the current
view
User views
Set/Retrieve the currently memorized user
view
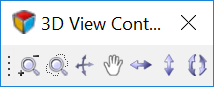
3D View Control toolbar
The 3D View Control toolbar provides enhanced options when viewing
models in 3D. Figure 2. 3D View Control toolbar
Table 2.
Icon
Function
Description
Zoom
Zoom in/out with a factor of 2x
Circle/Dynamic Zoom
Left click: Circle zoom mode Right click:
Dynamic zoom mode
Dynamic Rotate/Spin
Left click: Dynamic rotate mode Right click:
Dynamic spin mode
Pan
Left click: Pan mode Right click: Center
model mode
Rotate Left/Right
Left click: Rotate left Right click: Rotate
right
Rotate Up/Down
Left click: Rotate up Right click: Rotate
down
Rotate clockwise/counter-clockwise
Left click: Rotate clockwise Right click:
Rotate counter-clockwise
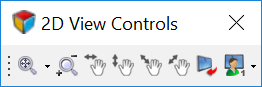
2D View Controls toolbar
The 2D View Control toolbar provides enhanced options when viewing
models in 2D. Figure 3.
Table 3.
Icon
Function
Description
Fit
Fit all data within viewable graphics
area
Fit x data only within viewable graphics
area
Fit y data only within viewable graphics
area
Zoom
Left click: Zoom in Right click: Zoom
out
Pan horizontal
Left click: Pan left Right click: Pan
right
Pan vertical
Left click: Pan up Right click: Pan
down
Pan diagonal
Left click: Pan diagonal upper left Right
click: Pan diagonal upper right
Pan diagonal
Left click: Pan diagonal lower left Right
click: Pan diagonal lower right
Reverse view
Flip x and y data
User view
Set/Retrieve the currently memorized user
view
Select application menu
This menu allows you to change the active HyperWorks Desktop application in any window. Loading
each application changes the toolbar and menu bar settings. The
table below describes the purpose of each application and shows the
changes in their corresponding tool bar. The options are: HyperMesh, HyperView, HyperGraph 2D, HyperGraph 3D, MediaView, TextView, MotionView.
HyperMesh - Analyze product design
performance in a highly interactive and visual environment.
Figure 4.
HyperView - Visualize CAE results.
Deformed, linear static, modal, and transient animations for finite
element and multi-body analyses are supported.
Figure 5.
HyperGraph 2D - Analyze and plot data.
Figure 6.
HyperGraph 3D - Create and analyze 3-D plots.
Figure 7.
MotionView - Pre-process, post-process,
and visualize mechanical system simulations, including
industry-leading capabilities for flexbodies.
Figure 8.
MediaView - Read video files.
Figure 9.
TextView - View and edit text files. In
this window, you can embed mathematical functions using the Templex language. Also, you can access xy
data from a plot window and perform mathematical operations on it
using Templex functions.
Figure 10.
TableView - Spreadsheet capabilities.
Figure 11.
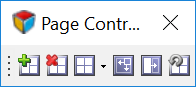
Page and window controls
These toolbar buttons allow you to control the page and window
layout. The following buttons are displayed for all HyperWorks Desktop applications, and are used to
manage pages, change page layouts, and manipulate individual
windows:
Table 4.
Icon
Function
Description
Add Page
Adds a new page to the session.
Delete Page
Deletes a page from the session.
Page Layout
Displays a pop-up menu containing 20 page
layouts that can be applied to the displayed
page.
Expand/Reduce Window
In a multi-window display, use this feature
to enlarge or reduce the selected window.
Swap Windows
In a multi-window display, use this feature
to rearrange window order.
Page counter
Displays the current page number and the
number of pages in the current session in the
upper right corner of the screen. You can enter a
page number directly to access that page.
Note: The
page counter is located near the upper right side
of the graphical user interface.
Next Page
Browse forward through the pages.
Note: This
arrow is located near the upper right side of the
graphical user interface.
Previous Page
Browse backward through the pages.
Note: This
arrow is located near the upper right side of the
graphical user interface.
Session Files (MVW)
Each time a HyperWorks Desktop application is
launched, a new session is started. Saving a session creates a
session (MVW) file, which allows you to retain many of the actions
you performed during the session. You can then close the session and
restart it later without having to redo procedures. This file has an
.mvw extension.
An MVW file is a plain
text file that contains commands that were performed in the
operations of the corresponding session. Results and model file
data are not stored in this file. Rather, soft links point to
the data files used in the session, helping to keep the MVW file
size small. If you move the data files to a different folder,
the MVW file will not be able to locate them unless you edit the
file path names in the MVW file. It is suggested that you save
the MVW file to the same folder that contains the data files.
You can edit the MVW file using a text editor.
To save a
session to a session file, select File > Save Session File from the menu bar. To open the file, select File > Open.
Preference File
The preference file is a script file that is read each time a
HyperWorks Desktop application is started.
It specifies default user settings such as the window type, printer,
page layout, the autosave interval, and the order in which colors
are assigned.
A standard preference file for all HyperWorks Desktop applications exists in the
installation directory and is read every time HyperView is
started. On Windows, the file is named preferences.mvw, while on
UNIX, it is named .preferences.mvw. An
additional preference file can be created in your working folder
that either overwrites the standard preference file or adds it
to the existing settings in the standard preference
file.
A set of seven include preference files are
contained in the installation. These files are customized for
each HyperWorks Desktop application. They
are called from the standard preference file when a session is
started, and cannot be called independently. These files are
located at <installation
directory>/hw/prefinc. For more information, see
Preference File Location.
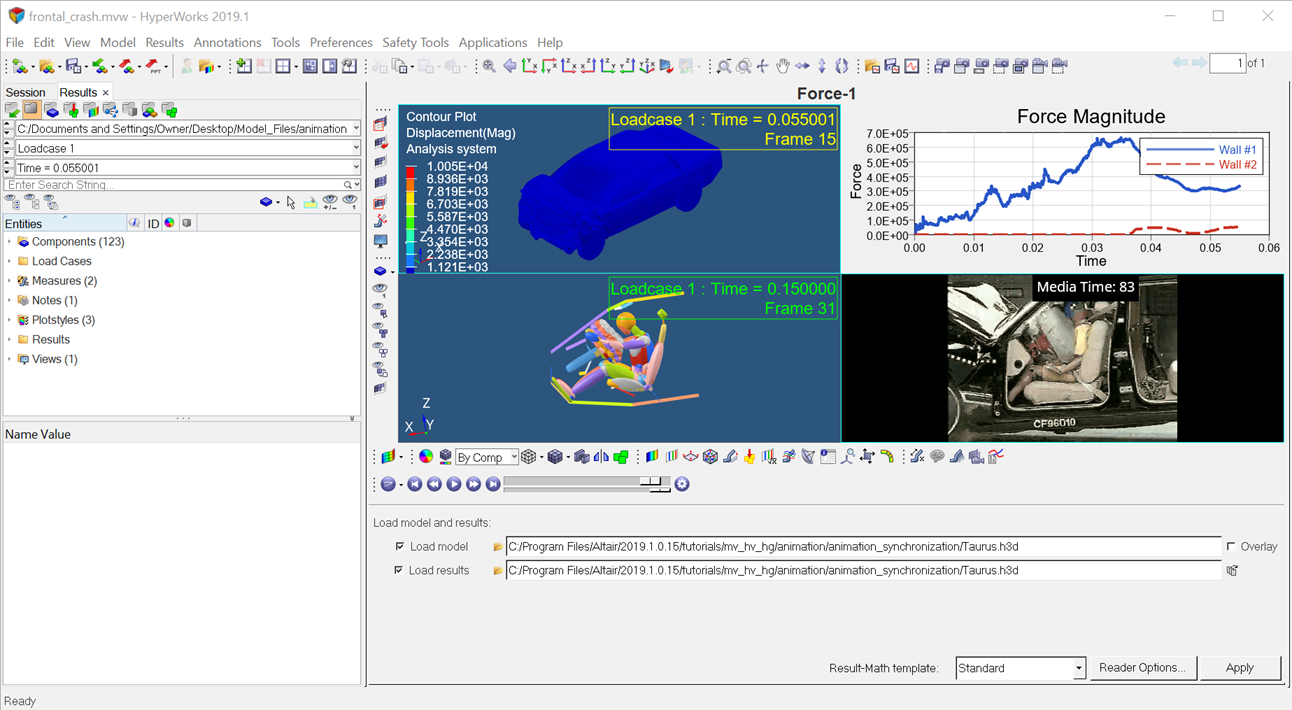
Open the Session File
From the File menu, select Open > Session.
Select the file frontal_crash.mvw, located in the
../tutorials/mv_hv_hg/animation directory and click
Open.
Figure 12. A HyperWorks Desktop page featuring multiple windows with different
applications
Add Pages and Use Page Controls to Navigate between Pages
Click the Add Page button, , to add a second page.
Observe the changes to the page counter.
Add one more page.
Click the icons, , , to navigate to the next page
and previous page, respectively.
You can also enter the page directly in the page number field, .
Go to page 1.
Using the Session Browser to Rename a Page and Use the View Menu to Navigate between
Pages.
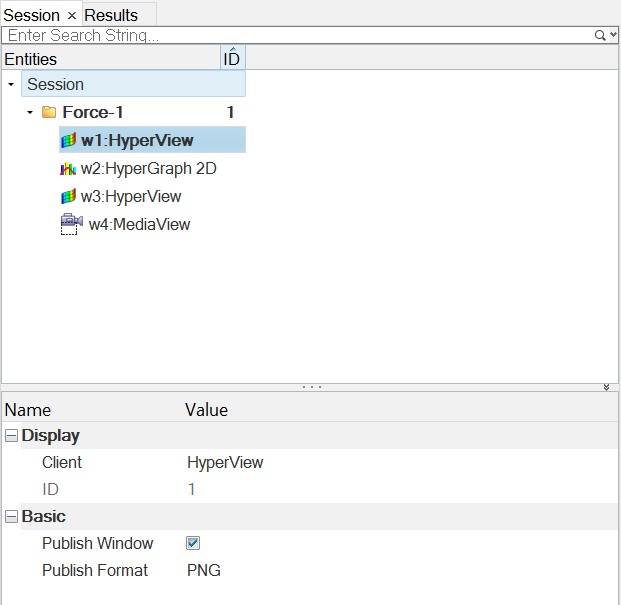
Click the Session tab.
Figure 13.
Right-click on Force-1 and select Rename.
Type HyperView-Class, to rename page 1.
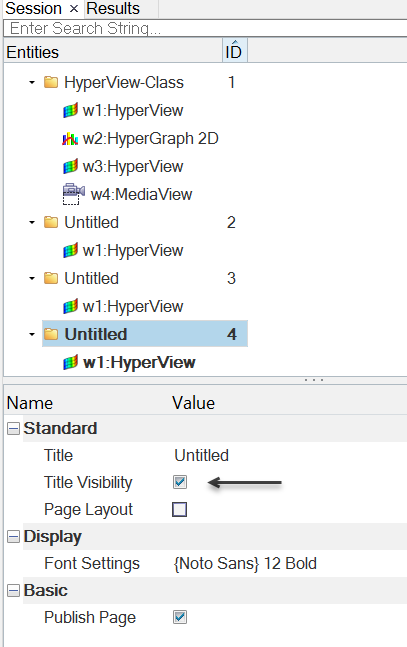
Right-click in the Session Browser and select Create.
This adds a fourth page.
The new page is displayed as Untitled.
Double-click the page in the Session Browser to switch to page 4.
To display the name of page 4 at the top of its page, from the View menu,
select the Page > Title or you, select page 4 from the Session Browser and check the box
for Title Visibility.
To display page 2, double-click Untitled (with the ID "2") in the Session
Browser.
Use Page Layout to Create a Four-Window Layout.
Click the arrow next to the Page Layout button, , to display the Page Layout options.
Click the four window layout, .
The border of the upper left window in the four-window layout is cyan to
indicate it is the active window.
Change the Applications in Windows 2-4 on Page 2.
From page 2, click in the upper right window (window 2) to make it active. A
cyan border is displayed around window 2, indicating that it is the active
window on the page.
From the Select application menu, select HyperGraph 2D to change the window type for window 2 from
animation to plot.
The toolbar changes to reflect the plot window mode.
Activate window 3.
Change the window type for window 3 from HyperView
to MotionView.
Click on window 4 to make it active.
Change the window type for window 4 from HyperView
to MediaView.
Go to page 1.
Use Swap Windows to Change the Order of Windows on Page 1.
Change the page to page 1.
Activate window 2 (plot window).
Click the Swap Windows button, .
Click on window 3 in the drop down image.
The contents of windows 2 and 3 are exchanged.
When there are only two
windows on a page and you click the Swap Windows button, the windows are
automatically swapped.
Expand Window 2 to the Graphics Area.
Use the Expand/Reduce Window button to temporarily expand the HyperView window to fill the entire graphics area. This
allows you to see a larger view of the model without changing the window layout.
Make window 1 (dummy model) active.
Click the Expand/Reduce Window button, .
The Expand/Reduce Window button changes to . This button acts as a toggle.
Click the button again to return to the original display.
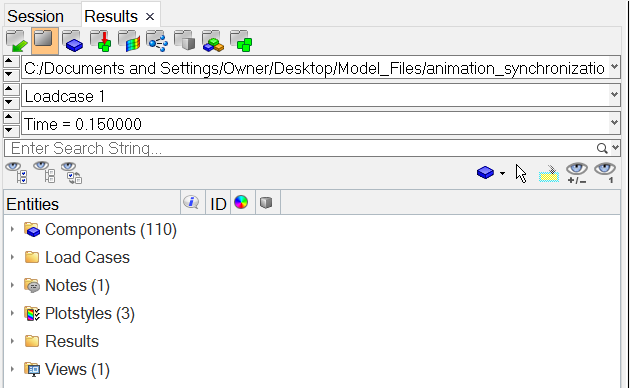
From the tab area, click the Results tab.
Click the Model view icon, , to display the model
properties.
Figure 14.
Use the View Controls
From the View menu, select Toolbars > HyperWorks > Standard Views or 3D View Controls to remove the checkbox next to the menu item and turn the
toolbars off.
Turn the toolbars on again.
Dock the toolbars by selecting the toolbar docking dots, , and dropping it in the graphics area.
Click the bar again to display the view controls.
Use the button to view the model in the
YZ Front Plane View.
Rotate the model clockwise and counter clockwise by left and right clicking on
.
Use the and buttons to rotate the model
about the horizontal and vertical axis, respectively. The horizontal axis runs
along the width of the screen, while the vertical axis runs along the height of
the screen.
Each mouse-click rotates the model by 30 degrees.
Use to zoom in and out. Left click to zoom in and right
click to zoom out.
Use the button to fit the model to the
window.
Click for a left-side view of the
model.
Click to change the view to Iso.
In the Results Browser, right-click and select Create >
View.
This saves the current view so that it can be recalled in the
future.
Rotate the model to a new position.
Expand the Views folder in the Results Browser and
select the icon before View 1.
This restores the saved view.
Save the Session to a Session File
From the File menu, select Save As > Session.
Specify a path and the name practice for the
MVW file and click Save.
Now that the exercise is complete, you can clear the data from the HyperView session (see Clear the Data from the Session for more information).
Clear the Data from the Session
From the File menu, select New > Session.
Answer Yes to the pop-up message "This operation
will discard current session file data. Continue?".
Open the Session File practice.mvw
Open the session file practice.mvw (See step 1).
Notice the contents of the session. It contains the number of pages and the
window layouts you created in the previous steps of this exercise.
 , used to drag a toolbar on (docked) or
off (undocked) a toolbar area. To move a toolbar, simply
click-and-drag the handle to the new location that you wish the
toolbar to reside.
, used to drag a toolbar on (docked) or
off (undocked) a toolbar area. To move a toolbar, simply
click-and-drag the handle to the new location that you wish the
toolbar to reside.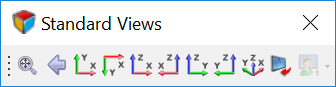


 .
.
 .
The border of the upper left window in the four-window layout is cyan to indicate it is the active window.
.
The border of the upper left window in the four-window layout is cyan to indicate it is the active window. , to display the model
properties.
, to display the model
properties.