


|
Customizing Your Preferences
You can specify output settings for RMS, such as a home page, document sort order, date format and so on, on the Preferences page. To display the page, click Preferences in the upper rightcorner of the RMS window.
The Preferences page allows you to customize the following settings:
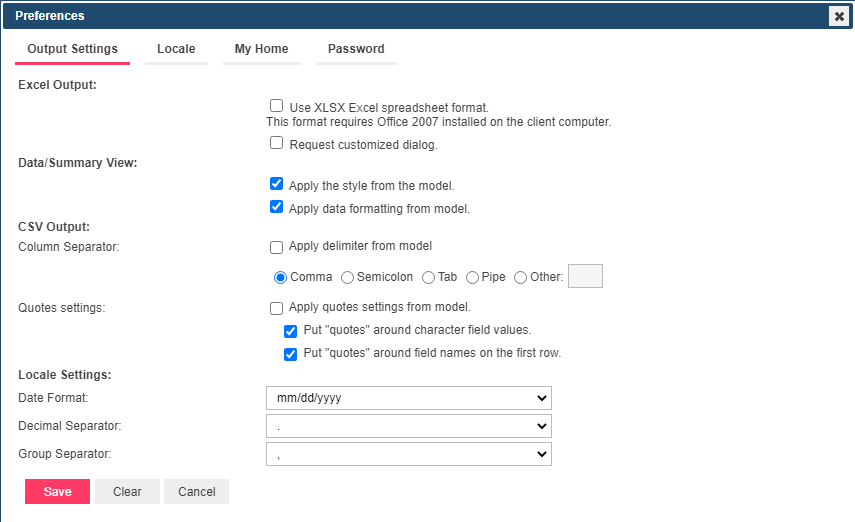
Output Settings tab
-
Excel Output:
-
Use XLSX Excel spreadsheet format. This format requires Office 2007 installed on the client computer:
Select this check box, to use the XLSX format for Excel output. -
Request customize dialog: Select this check box, to specify customize properties before data export.
-
Data/Summary View:
-
Apply the style from the model (background, font size, table settings, etc. will be applied from the report model).
-
Apply data formatting from the model.
-
CSV Output: Specify the settings for the column separator and quotes used in the CSV export
-
Column Separator
-
Apply delimiter from the model: Select this check box to apply the delimiter from the model.
-
Comma: Select this button to use a comma as the delimiter for the CSV export.
-
Semicolon: Select this button to use a semicolon as the delimiter for the CSV export.
-
Tab: Select this button to use a tab as the delimiter for the CSV export.
-
Pipe: Select this button to use a pipe as the delimiter for the CSV export.
-
Other: Select this button to specify a preferred delimiter.
-
Quotes Settings
-
Apply quotes settings from model: Select this to use the quotes settings from the model
-
Put “quotes” around character field values: Use this setting to enclose the character fields in quotes
-
Put “quotes” around field names on the first row: Use this setting to enclose the data on the first row of the file in quotes.
Note:
Selecting both quotes settings results in the following:

Here, only field names and text-based field values are quoted. Numbers and dates are not quoted.
When a comma is used as a column separator:

When a semicolon is used as a column separator:

When a tab is used as a column separator:

When a pipe is used as a column separator:

When a specified column separator is used:

Not selecting both quotes settings results in the following:

Here, no fields or strings are quoted.
Selecting only the quotes setting for character field values results in the following:

Here, the header is not quoted, and only the text string-based field values are quoted.
Selecting on the quotes settings for field names on the first row results in the following:

Here, only the field names on the first row are quoted.
-
Locale Settings: Specify the date format, decimal separator and group separator.
-
Date Format: Select one of the following options to specify a date format:
-
mm/dd/yyyy: Select to use the month/day/year date format.
-
dd/mm/yyyy: Select to use the day/month/year date format.
-
Decimal Separator: Select one of the proposed decimal separators: comma or period.
-
Group Separator: Select one of the proposed group separators: comma, space or period.
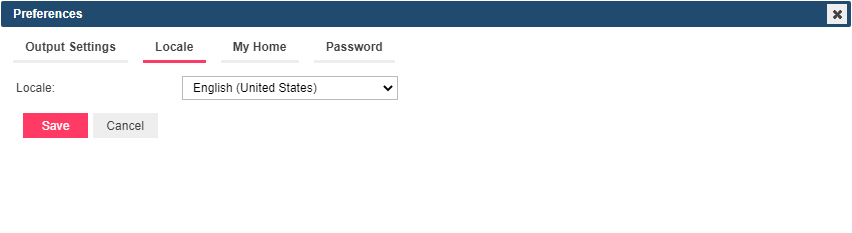
Locale tab
-
Locale: Select language from the drop-down list.
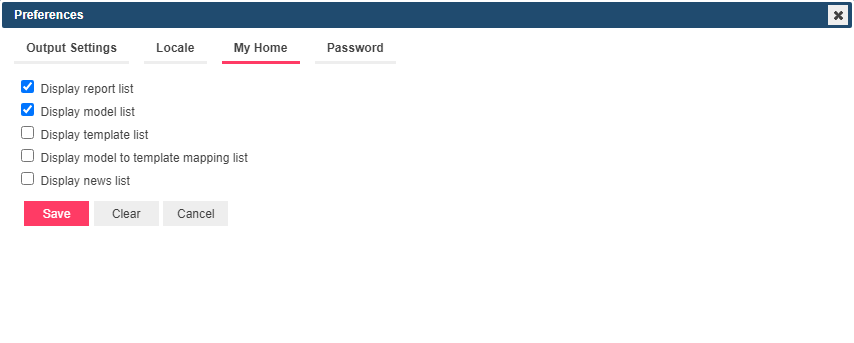
My Home tab
-
Display Report List: Select check box, to display the list of reports selected while logging on.
-
Display Model List: Select check box, to display the list of models and templates models selected while logging on, and models saved for the document type ID.
-
Display Template List: Select check box, to display the list of templates selected while logging on.
-
Display model to template mapping list: Select check box, to display the list of templates models selected while logging on.
-
Display news list: Select check box, to display the news list.
When you made your changes
-
To save the changes, click the Save button.
-
To cancel any changes you have made at particular tab, click the Clear button (not available at the Locale tab).
-
To close the Preferences page without saving, click Cancel. Keep in mind that no changes will be saved.