


|
Kafka Publisher
The Kafka Publisher connector allows a tuple to be published to a Kafka topic.
Steps:
1. Select Kafka Publisher from the Data Sources pane. The Kafka Publisher Settings pane and the retrieved Kafka Publisher source are displayed.
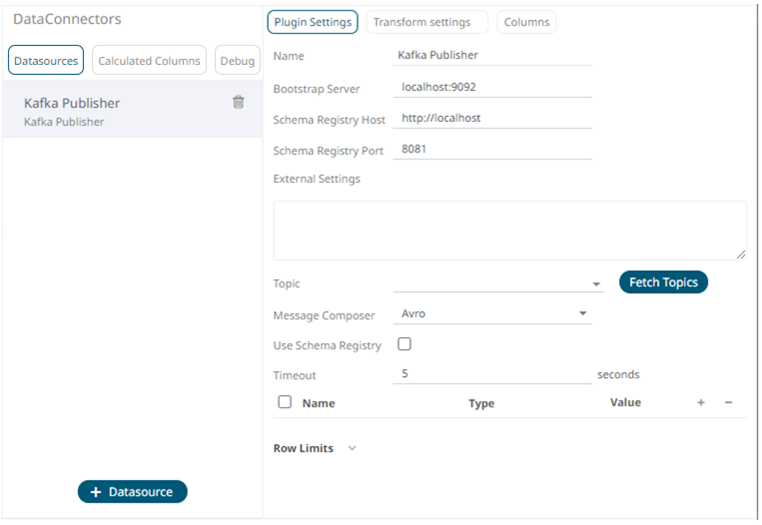
2. Enter the Name of the Kafka Publisher
data source, then click  .
.
3. Enter the following properties:
|
Property |
Description |
|
Bootstrap Server |
List of host/port pairs of Kafka servers used to bootstrap connections to a Kafka cluster. By default, the value is localhost:9092. However, this can be overridden by specifying another bootstrap server in the External Settings text box. |
|
Schema Registry Host |
Where the Schema Registry is located. This can be in a different location from the Kafka cluster. |
|
Schema Registry Port |
The port number of the schema registry which provides the serving layer for the metadata. Default is 8081. |
4. To support authentication (i.e., username and password), enter the system settings in the External Settings box.
|
NOTE |
If the bootstrap server is not secure, then there is no need to authenticate and you may leave the External Settings blank.
|
Below is an example of system settings for an SASL authentication:

5. Click  to populate the drop-down list
and select a Topic.
to populate the drop-down list
and select a Topic.
|
NOTE |
· Ensure that the ability to ping is enabled in the ZooKeeper Host. Otherwise, if ping is disabled, the Fetch Topics button will not be able to populate the list of topics and you need to manually enter the topic names. · For Avro format messages, make sure to select an output topic. This populates the list of columns, with the data type found from inspecting the first ‘n’ rows of the file.
|
6. For non-Avro format messages, select Json in the Message Composer drop-down list box.
7. Check the Use Schema Registry box to support Avro and JSON serialization formats.
8. Enter the Timeout or the length of time to wait for the server response. Default is 5 (in seconds).
9. Click  to add columns to the Kafka connection
that represent sections of the message.
to add columns to the Kafka connection
that represent sections of the message.
10. Then enter or select:
· Name
· Type (Numeric, Text, or Date/Time)
· Value (can either be a parameter or data entry that can be used as a publish value)
To
delete a column, check its  or all the column entries, check
the topmost ,
then click
or all the column entries, check
the topmost ,
then click  .
.
11. Set the row limit of the data set.
12. Tap the Preview Selected Data Source slider to turn it on.
13. Click  to display the data preview.