


|
Creating JDBC Database Input Data Source
|
IMPORTANT |
For DolphinDB, the query builder is not supported, only the query mode.
|
Steps:
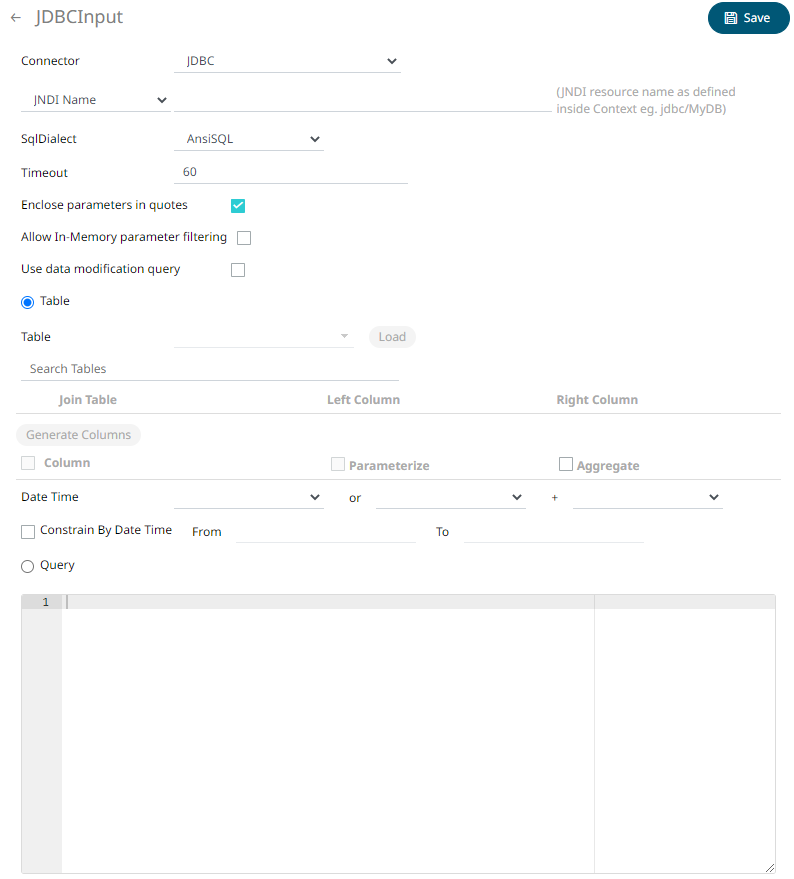
1. In the New Data Source page, select Input > JDBC in the Connector drop-down list.
2. You can either select:
· JNDI Name

Enter the JNDI resource name to be used.
|
NOTE |
The JNDI resource name needs to be on the form: jdbc/[resourcename]
|
· URL
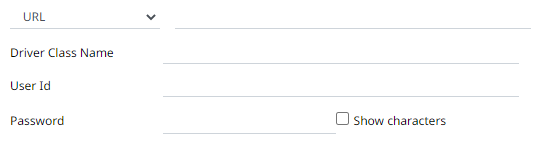
Enter the URL specific to the database’s JDBC driver, the Driver Class Name specific to the driver, and the User Id and Password.
Check the Show Characters box to display the entered characters.
3. Select the appropriate SQL Dialect in the drop-down list to be able to generate the correct SQL for the required data repository.
You can select any of the following SQL dialects: AnsiSQL, Access/Excel, MySQL, Oracle, SQL Server, Sybase IQ/ASA, Sybase ASE, Netezza, Vertica, SQLite, HadoopHive, KxQ, DB2, PostgreSQL, Impala, Redshift, Informix, Teradata, dBase, SparkSQL.
Default is AnsiSQL.
4. Enter the Timeout. This is the length of time to wait for the server response. Default is 60.
5. Check any of the following options when building the query:
· Enclose parameters in quotes
By default, this option is checked, as the common use case for parameters is a filter WHERE clause.
· Allow in-memory parameter filtering
Allows the whole dataset to be returned, and then filtered in memory. This process is much less efficient than adding the parameter as a WHERE clause of the SQL query; however, it may be efficient in cases where small sets of records are returned on a very frequent basis.
· Use data modification query
Signals that the table is created for writing data. This property is also used for filtering out target data tables for further data update action configuration
6. When Table is selected, the section below is enabled:
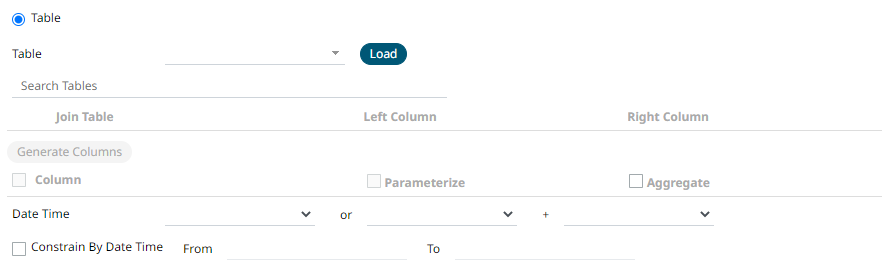
7. On the Table field, click  to populate the drop-down list with tables. Select
a table.
to populate the drop-down list with tables. Select
a table.
The list of tables that you can join is displayed. Also, the SQL query is generated and displayed in the Query text box.
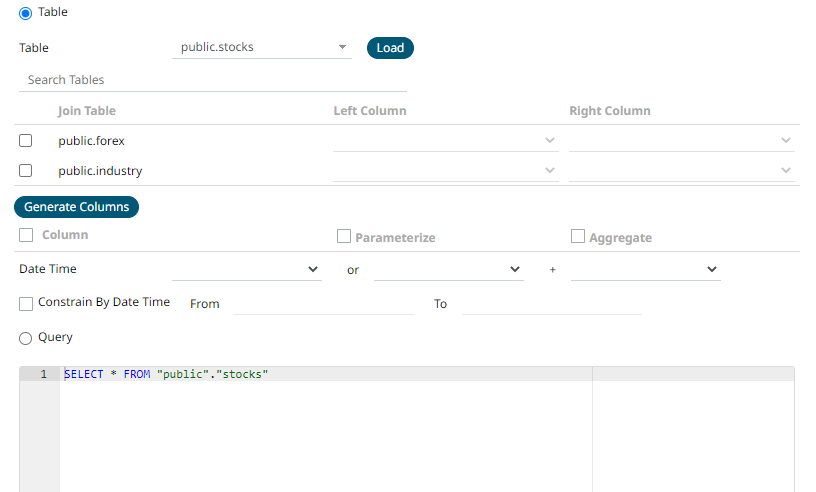
Use Search Tables to filter the list.

8. Perform a join by checking one or more tables in the list.
The Left Column and Right Column fields are automatically filled out with the common fields.
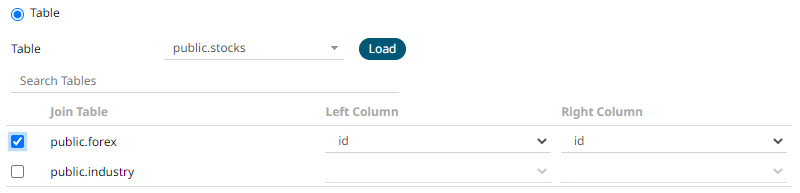
You can also opt to select other common fields.
The SQL query is generated and displayed in the Query text box.
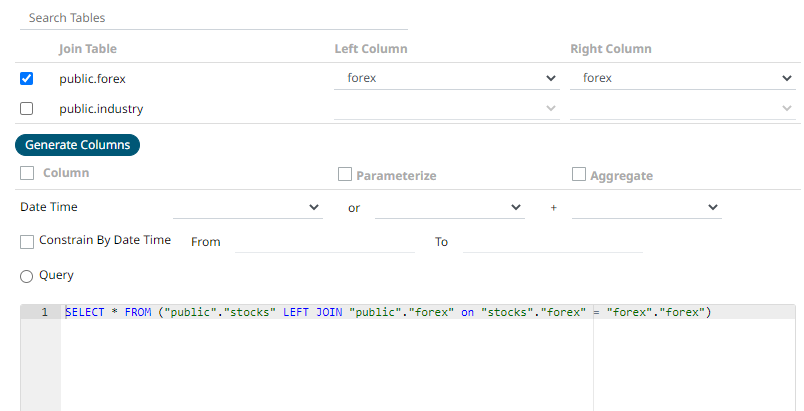
9. Click  . The columns populate the
Output Column section.
. The columns populate the
Output Column section.
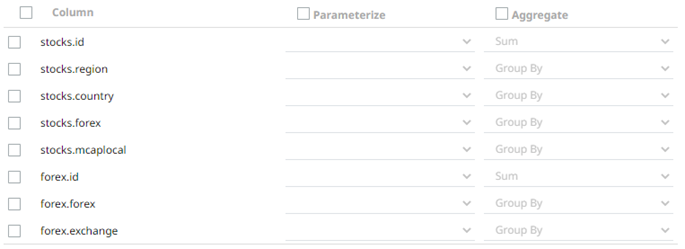
10. Individual columns can be added by checking the corresponding Column box in the Output Column listing. To select all of the columns, check the topmost box.
The SQL query is generated and displayed in the Query text box.
11. If the data returned is to be aggregated, then the Aggregate box should be checked. For each selected column, the possible aggregation methods are listed including:
· Text Columns: Last, First, Count, Group By
· Date Columns: Count, Min, Max, Group By
· Numeric Columns: Last, First, Sum, Count, Min, Max, Mean, Group By
The SQL query is generated and displayed on the Query text box.
12. Check the Parameterize box and match the parameter to the appropriate column. By default, they will be matched by name.
The appropriate SQL Query is updated in the Query text box. This shows the default parameter value for the preview, and at run time the SQL will be updated to whatever the parameter value is.
13. If the data is to be filtered or aggregated on Date/Times, then a valid Date Time field needs to be selected from either a single Date/Time field, or a compound column created from a selected Date and a selected Time column.

14. Check the Constrain by Date Time box and enter From and To Date/Time constraints.
15. Click the Query radio button to enable the text box and modify the SQL-like query language.
16. Click  . The new data source is added in the Data Sources
list.
. The new data source is added in the Data Sources
list.