


|
Load Balancer
A load balancer is a server used to distribute the workload across multiple computer resources. A load balancer allows you to scale the system to max and optimize the resource use and throughput, and at the same time minimize the response time. A load balancer can also be used to ensure that the system will still be available, even during downtime on a computer resource.
Very much like proxies, there are a variety of load balancers available. The only requirement Panopticon Real Time has on the load balancer is that it supports persistence or stickiness. This means that the proxy will establish a user session and ensure that the user continues to use the same computer resource.
Stickiness are mainly implemented in two means: Cookies or URL encoding. These two alternatives will be used to determine which route the user will continue to take in the load balancer. The rest of this section will cover how to implement stickiness with cookies.
Sticky load balancer that are using cookies are normally using session tokens. Due to this, it is required to configure Panopticon to use session tokens. This is done by updating the following property to SESSION in the Panopticon.properties file: authentication.token.persistence.
authentication.token.persistence=SESSION
|
IMPORTANT |
After modifying the property value to SESSION, ensure to clear the AppData/Token folder before starting the server.
|
For details on how to configure multiple servers to run in a cluster and synchronize content between them, see Server Cluster Configuration.
Apache HTTP Server
The following section describes the steps on how to install and configure an Apache Load Balancer. The guide expects that the Apache HTTP Server is being setup for the first time. Please note that the installation steps might vary depending on your environment. These steps cover how to install and configure an Apache HTTP Server with proxy support for Microsoft Windows.
1. Download the Apache HTTP Server from the official webpage: https://httpd.apache.org/download.cgi
2. Unzip and copy the files to a folder.
3. Configure the proxy by opening the httpd.conf file in the conf folder.
4. Update the SRVROOT variable. The value must be updated to the file location of the Apache HTTP server.

5. Modules are required to be loaded to make the Apache HTTP Server into a load balancer. Add or uncomment the following lines in the httpd.conf file.

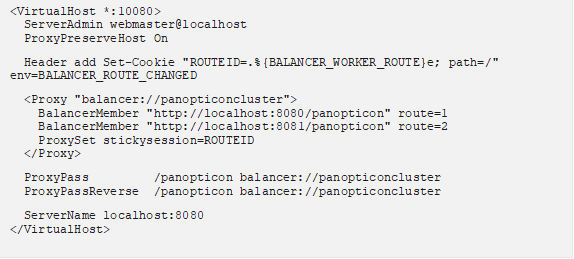
6. Configure the logic for the load balancer and how requests should be passed.
In the following example, we have configured the load balancer to listen to port 10080 and to use two balancer members (Route 1 and Route 2). The example will also set a session cookie named ROUTEID. The cookie contains the route that the user took and will continue to use throughout the active session.
7. The Apache HTTP Server can be started when all the configurations are in place. This is done by running the httpd script or application in the Apache binfolder.