


|
Creating OneTick CEP Input Data Source
The OneTick CEP connector allows connection to OneMarketData OneTick tick history databases on a streaming subscription basis. The connector supports either:
q Execution of a specified OTQ
q Execution of a specified parameterized OTQ
q To use the OneTick CEP connector, it requires a JAR file to be added and some configurations to be performed. Further details are provided in the Panopticon Real Time Installation and Troubleshooting Guide.
Steps:
1. In the New Data Source page, select Input > OneTick CEP in the Connector drop-down list.
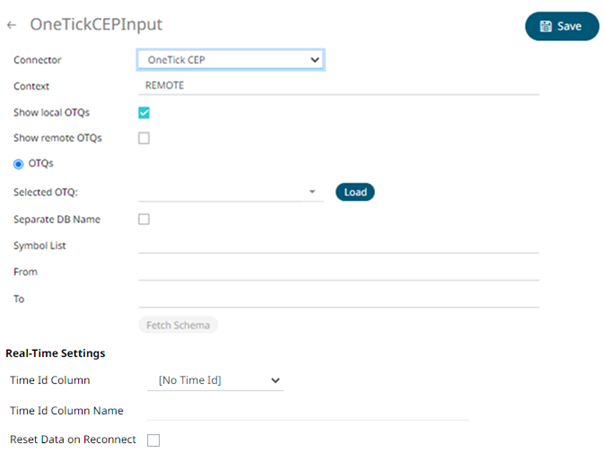
2. Enter the Context (for example, REMOTE).
3. You can either check:
· Show Local OTQs box to display the local OTQs in the Selected OTQs drop-down list.
· Show Remote OTQs box to display the remote OTQs in the Selected OTQs drop-down list.
4. Click Load  to
populate the Selected OTQ drop-down list. Select an OTQ.
to
populate the Selected OTQ drop-down list. Select an OTQ.
The OTQ Parameters section displays with the list of input parameters based on the selected OTQ.

5. Check/uncheck the Separate DB Name box.
6. Click  to populate
the Id
Column list box.
to populate
the Id
Column list box.
7. From this list box select the field which will define a unique data record to subscribe against.
If an OTQ is selected, the list of input parameters that the OTQ expects is exposed, as well as the input parameters specific to the selected OTQ, the following are generic to all OTQs
· Symbol List
· From
· To
These add additional filter criteria such as symbol, and time window onto the basic OTQ.
8. Define the Real-time Settings.
9. Click  . The
new data source is added in the Data Sources list.
. The
new data source is added in the Data Sources list.