With embedding, you can include information created in one diagram, referred to as the source diagram, in one or more other diagrams, referred to as the destination diagrams. Each time the source diagram changes, the changes are propagated in the destination diagrams.
When you embed a diagram, a read-only version of the diagram is inserted into the destination diagram along with a link to the source diagram. You can drill into the embedded diagram just as you would a compound block. You can even override the read-only status of the embedded diagram and make changes directly to it. These changes, however, are not saved until you execute the File > Save Embedded command.
If you want to restrict access to the embed block, you can apply protection to it.
To embed a block diagram
Embedding a diagram involves dragging an embed block into the work area and setting up the link to the source file. Before you can embed a diagram, check that its top level is a single compound block. If it’s not, use the Edit > Create Compound Block to create one.
1. Open the destination diagram and move to the diagram level where you want to insert an embedded diagram.
2. Under Blocks > Extensions, drag an embed block into the work area.
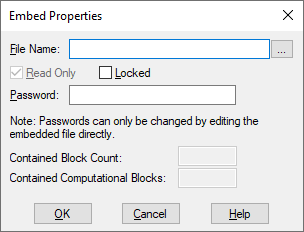
3. Right-click the embed block, or choose Edit > Block Properties and click the block.
The Embed Properties dialog box appears.
4. In the File Name box, do one of the following:
•Enter the name of the diagram file to be embedded. If you do not see the file you want, click … to search for it.
•Enter a path alias in this format: $(path-alias). You define path aliases with Edit > Preferences command.
The dialog box also lists the total number of blocks contained in the embedded diagram, along with the number of computational blocks.
5. Click OK, or press ENTER.