Fasteners
Fasteners connect parts together without allowing movement at the hole location.
Use the guide bar options to search for single or aligned holes, filter the search results by hole size, and select what type of fastener to create.
Click the ![]() satellite icon that appears when you hover over the
Fasteners tool to display a table of all fasteners in your model.
satellite icon that appears when you hover over the
Fasteners tool to display a table of all fasteners in your model.
Creating Fasteners
Detect features where a fastener can be created, select what type of fastener to create, then click Connect All.
-
On the Structures ribbon, select the Fasteners
tool.

-
Use the guide bar to filter the search results for Single
Holes or Aligned Holes. Click the
 icon to filter the search results by hole size.
-
Click the Apply
 button on the guide bar to automatically create fasteners in all of the selected
holes, or click selected holes to create fasteners individually. Once fasteners
have been created, click on a fastener to edit it.
button on the guide bar to automatically create fasteners in all of the selected
holes, or click selected holes to create fasteners individually. Once fasteners
have been created, click on a fastener to edit it.
- To automatically detect relevant features when the tool is opened, go to the Preferences under and turn on Autofind.
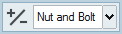
- If Auto is selected on the guide bar, the tool will automatically place nuts and bolts in through holes and screws in blind holes. If you select Nut and Bolt, fasteners will only be created in selected through holes, while selected blind holes will remain unfastened. Screws can be placed in both through holes and blind holes.
- You can enable fastener pretension and enter a magnitude for the pretension force in the Property Editor.
- Fasteners can be used as optimization constraints. You can enable optimization for fasteners in the Property Editor.
- Suppress/Unsuppress a fastener to understand its effect on your model. On the fastener, right-click and select Suppress. From the Model Browser or Table, right-click and select Unsuppress.
Find Options
Click the menu on the guide bar to filter the search results.
- Find Larger/Smaller/Similar: Find holes that are smaller, larger, or similar (±5%) in size to selected holes.
- Options: Click to specify options for the find
operation.

- Size: Specify a minimum and maximum size range for
the hole diameter. Click the
 icon to reset the default value.
 - Find parts in holes: If enabled, the Fasteners tool automatically finds existing geometry in holes, hides it, and deactivates it so that it is not included in analysis or optimization calculations. Deselect Find Parts in Holes to disable this behavior, in which case you will need to delete the existing geometry manually.
Microdialog Options
Click a selected fastener to open a microdialog and edit it. If the Fasteners tool is not active, double-click the fastener(s) you want to edit.
- Use the +/- icon to change the direction of the fastener.
- Use the pull-down menu to change the type of fastener from a nut and bolt to a screw or vice versa.
Fasteners Table
The Fasteners table lists all of the fasteners in your model including the type of connection, the parts it connects, and the assigned material.
Click the ![]() satellite icon on the Fasteners tool to display the table.
satellite icon on the Fasteners tool to display the table.
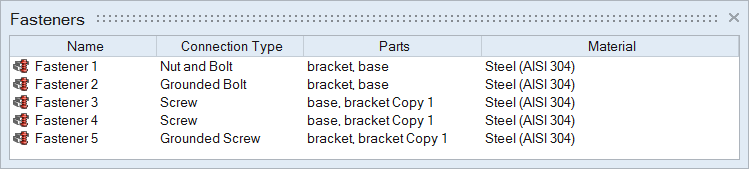
Figure 1. Fasteners Table
The table data can be edited with the following actions:
| To | Do this |
|---|---|
| Rename a fastener | Select the cell in the table and then click again to make the field editable. |
| Change the connection type or material | Select the cell in the table and then select a different option from the list. |
| Sort a column | Click the column header. Click repeatedly to toggle between ascending and descending order. |
| Add or remove columns | Right-click on a column header. |
Mouse Controls and Keyboard Shortcuts
| To | Do this |
|---|---|
| Add hole to the selection | Left-click an unselected hole. The hole turns red. |
| Chain select a group of aligned holes | Double-click an unselected hole. All of the neighboring aligned holes turn red. |
| Deselect a hole | Hold down the Ctrl key and left-click a selected hole. |
| Create a fastener | Left-click a selected (red) single hole or group of aligned holes. |
| Exit the tool | Right-click and mouse through the check mark to exit, or double-right-click. |