HWCFD-T: 2000 Meshing
In this tutorial, you will cover the various meshing tools and options that are available in HyperWorks CFD. The five major mesh controls covered are:
- Surface
- Gap
- Boundary Layer
- Volume Mesh
- Zones
Before you begin, copy the file(s) used in this
tutorial to your working directory.
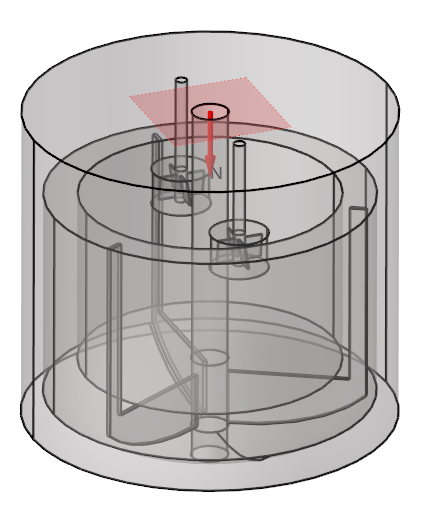
Figure 1.
Set Up Surface Mesh Controls
- Navigate to the Mesh ribbon.
-
Click the Surface tool.

Figure 2. - Right-click anywhere in the modeling window then pick Select > Advanced Select > By Group > shaft_small_impeller and small_impellers.
- In the microdialog, enter a value of 0.00125 for the average element size and set the geometric feature angle to 30.0.
-
On the guide bar, click
 to execute the command and remain in the
tool.
- Right-click on Surface mesh control (50) in the Surface controls legend and select Rename from the context menu. Rename the control to small_impellers or a suitable name of preference.
- Right-click anywhere in the modeling window then pick Select > Advanced Select > By Group > shaft_large_impeller and large_impeller.
- In the microdialog, enter a value of 0.003 for the average element size and set the geometric feature angle to 30.0.
-
On the guide bar, click
 to execute the command and remain in the
tool.
- Right-click on Surface mesh control (27) in the Surface controls legend and select Rename from the context menu. Rename the control to large_impeller or a suitable name of preference.
-
On the guide bar, click
 to execute
the command and exit the tool.
Assign a Gap Control for the Whole Geometry
-
Click the Gap tool.

Figure 3. - Right-click anywhere in the modeling window and select Show All to display all the solids of the geometry if they're not already visible.
- Press Ctrl + A or left-click and drag over the entire model to select all the surfaces.
-
In the microdialog:
- Assign a value of 0.025 for Maximum gap between surface.
- Uncheck Restrict minimum gap.
- Select Points Across Gap for the refinement method.
- Assign a value of 4 for the Points across gap.
-
On the guide bar, click
 to execute
the command and exit the tool.
Set Up Boundary Layers on the Rotating Impellers
-
Click the Boundary Layer
tool.

Figure 4. - Right-click anywhere in the modeling window then pick Select > Advanced Select > By Group > small_impellers.
-
In the microdialog:
- Set the first layer thickness definition to Fraction of Surface Mesh Size.
- Set the total number of layers to 3.
- Choose a Constant growth method
-
On the guide bar, click
 to execute the command and remain in the
tool.
- Right-click on Boundary layer control (46) in the Surface controls legend and select Rename from the context menu. Rename the control to small_impeller or a suitable name of preference.
- Right-click anywhere in the modeling window then pick Select > Advanced Select > By Group > large_impeller.
-
In the microdialog:
- Set the first layer thickness definition to Fraction of Surface Mesh Size and the first layer thickness factor to 0.01.
- Set the total number of layers to 10.
- Choose a Constant growth method
-
On the guide bar, click
 to execute the command and remain in the
tool.
- Right-click on Boundary layer control (25) in the Surface controls legend and select Rename from the context menu. Rename the control to large_impeller or a suitable name of preference.
- Right-click anywhere in the modeling window then pick Select > Advanced Select > By Group > interface_large_impeller.
-
In the microdialog:
- Set the first layer thickness definition to Fraction of Surface Mesh Size and the first layer thickness factor to 0.5.
- Set the total number of layers to 1.
- Choose a Constant growth method
-
On the guide bar, click
 to execute the command and remain in the
tool.
- Right-click on Boundary layer control (8) in the Surface controls legend and select Rename from the context menu. Rename the control to large_impeller_interface or a suitable name of preference.
-
On the guide bar, click
 to execute
the command and exit the tool.
Assign Volume Mesh Controls to the Small Impellers
-
Click the Volume Mesh
tool.

Figure 5. - Right-click anywhere in the modeling window then pick Select > Advanced Select > By Solid Bodies > Small impeller 1 and Small impeller 2.
- In the microdialog, set the average size to 0.00125
-
On the guide bar, click
 to execute
the command and exit the tool.
Create a Refinement Zone for the Mixing Domain
-
From the Zones tool group, click the
Cylinder tool.

Figure 6. -
Snap the cylindrical zone to the center of the shaft as shown in Figure 7. Drag your
mouse and click anywhere on the screen to define a temporary size for the
cylinder. In the radius microdialog, enter a value of
0.54 and press Enter.
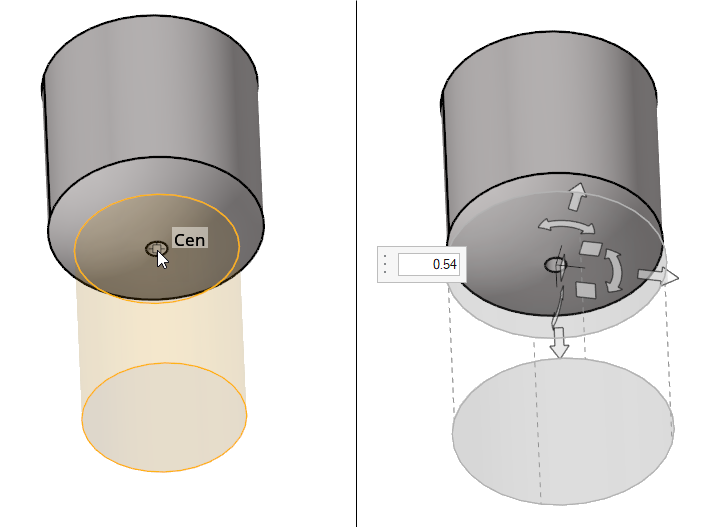
Figure 7. - In the new microdialog, enter a value of 1 for the Height (H) dimension.
- Click on the white arrow pointing in the Y direction to move the zone along the Y-axis.
-
Enter a value of -0.86 then press Enter to move the zone along the negative Y
direction.
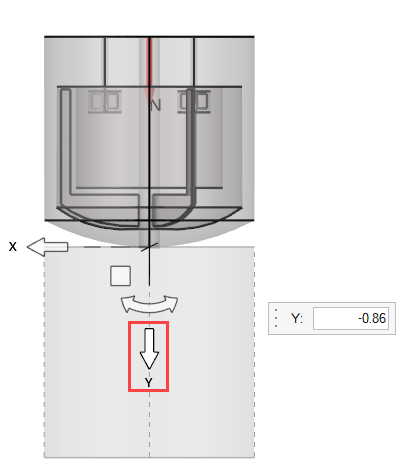
Figure 8. -
Enter a value of 0.0025 for the mesh size.
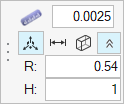
Figure 9. - Press Esc to exit the tool.
Run a Surface/Volume Batch Mesh
-
Click the Volume tool.

Figure 10. - Set a value of 0.005 for the Average element size.
- Check Generate boundary layers on fluid domains only.
-
Click Mesh to execute the batch mesh process.
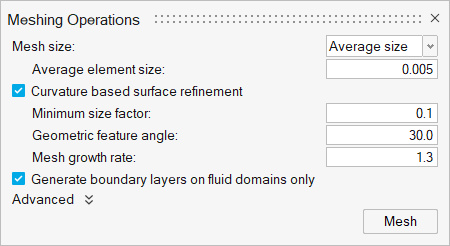
Figure 11.