Engineering Solutions is a modeling and visualization environment for NVH, Squeak and Rattle Director, Crash, CFD, and Aerospace using
best-in-class solver technology.
to forecast the SnR issues in the systems based on the manufacturing variations like, component thickness, attachment
stiffness, modal damping and etc.
The Crash application offers a tailored environment in HyperWorks that efficiently steers the Crash CAE specialist in CAE model building, starting from CAD geometry and finishing with
a runnable solver deck in Radioss, LS-DYNA and PAM-CRASH 2G.
HyperWorks offers high quality tools for CFD applications enabling the engineer to perform modeling, optimization and post-processing
tasks efficiently.
Browsers supply a great deal of view-related functionality by listing the parts of a model in a tabular and/or tree-based
format, and providing controls inside the table that allow you to alter the display of model parts.
Perform automatic checks on CAD models, and identify potential issues with geometry that may slow down the meshing
process using the Verification and Comparison tools.
The Subcase Definition panel can be used to add multiple subcases to the
model. The panel is shown below:
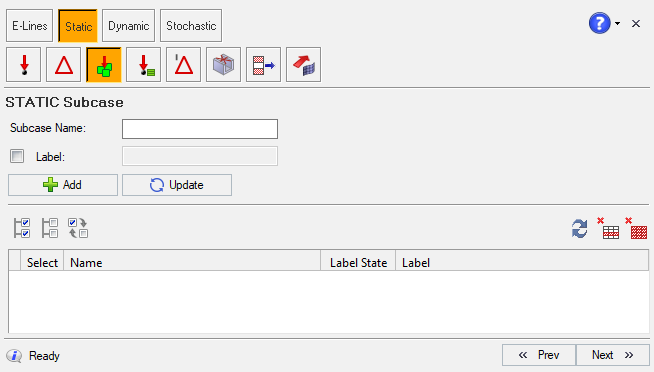
Figure 1.
You can perform the following operation in this panel -
Add a new subcase
Provide Subcase Name
Proivde Label, if required
Update existing subcase title
Delete selected subcase
Delete all subcases in the table
Adding a New Subcase Definition
Enter a name for the new subcase, in the Subcase name field.
The subcase name should not contain blank spaces. If the name that you have
entered contain blank spaces, SnRD will automatically add an _
symbol in its place.
To add a label to the subcase, select the Label check box.
The text field will become active.
Enter a label for the subcase in this field.
Click Add.
The subcase will get added and the same is displayed in the subcase list
on the panel.
Select the check box for the created subcase to use that for further
processing.
Managing Subcases
Click to select all subcases in list.
Click to unselect all subcases in list.
Click to reverse the selection of the subcases in
list.
Click on the subcase name from the list.
Enter a new name and label in the Subcase name and Label fields.
Click Update.
The subcase name and label will be updated.
Click on the subcase name from the list.
Click Delete.
The subcase will be deleted from the panel and model.
Click Apply or Next to proceed to the next step in
the process.
Note:
You must select at least one subcase on this panel to proceed to the next
step. If none of the subcases are selected, then an error message is
shown in a pop up window.