Quick Run
Use the Quick Run tool to play back motion results when avaiable. Hold the Ctrl key as you select the tool to run a new motion analysis with the default settings.
Clicking the Motion Quick Run button will begin playing back motion animation results when available, provided that the End Time has not been changed and nothing in the model has been changed. The animation playback can be stopped by pressing the Pause button on the Animation toolbar or by pressing the Esc key to exit the tool. If you want to run a new motion analysis, follow the procedure below.
-
Hold Ctrl and click the
 button on the Analyze Motion
icon to perform a motion analysis using the default settings.
button on the Analyze Motion
icon to perform a motion analysis using the default settings. 
Note: If you have previously run a motion analysis and have not changed the model or run settings, you will be taken directly into review mode rather than running the analysis again. Invoking Quick Run from the motion tool belt or by clicking the Run button on the Run Motion Analysis window will start a new motion analysis. -
Click the
 button on the Analyze Motion
icon to stop the analysis, or let the analysis run to completion.
button on the Analyze Motion
icon to stop the analysis, or let the analysis run to completion.
Tip:
- A progress meter appears next to the tool while the analysis is running, and
a check icon
 appears when the analysis is complete. You are
automatically placed into review mode, and can animate and plot
results.
appears when the analysis is complete. You are
automatically placed into review mode, and can animate and plot
results. - If you make a change to the model that requires running a reanalysis, the
check icon disappears, and you will not be able to review
or plot results until you run another motion analysis.
- If any of the motion troubleshooting alerts are triggered, a warning icon
 appears above the Analyze Motion icon. Click
the Help button on the alert to resolve the issue. If
you click Continue, you may get an error message, and an error icon
appears above the Analyze Motion icon. Click
the Help button on the alert to resolve the issue. If
you click Continue, you may get an error message, and an error icon  will be shown instead.
 - If initial intersecting parts are found between visible parts (not hidden
parts), a warning message is displayed.
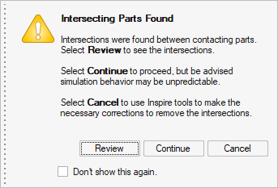
Initial intersections between parts can present difficulties in solving contact models and affect the accuracy of results. If you select Review, a guide bar appears. The first button says Intersections (n), where n equals the number of intersections found. To review the intersections, click the following buttons: Go to Next: Go to
the next intersection.
Go to Next: Go to
the next intersection. Go to Previous:
Go to the previous intersection.
Go to Previous:
Go to the previous intersection. List
Intersections: Display the Intersections Table,
which lists the intersecting parts of all visible motion contacts in
the model. Click on a name in the table to review the corresponding
intersection in the modeling window.
List
Intersections: Display the Intersections Table,
which lists the intersecting parts of all visible motion contacts in
the model. Click on a name in the table to review the corresponding
intersection in the modeling window.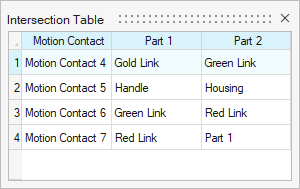
One part has a blue dotted outline, while the other part has an orange dotted outline. The intersection is displayed in red.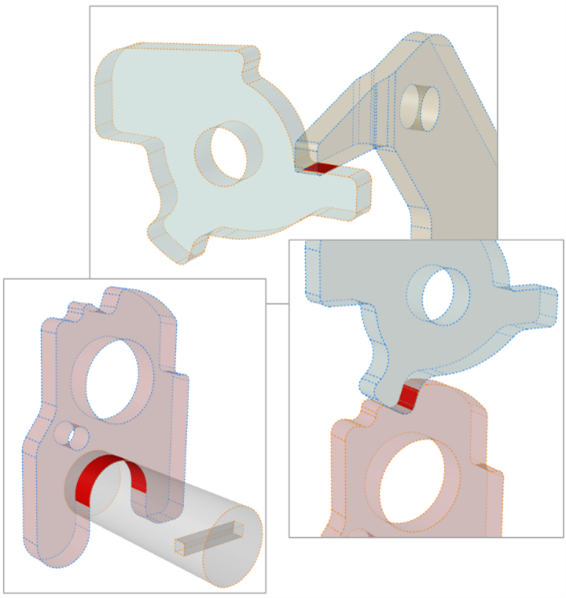
- By default when you save a model, it will now include the last successful motion run. This is useful for sharing models with results, especially when you have a model that takes a long time to run. You can turn this option off in the Advanced section of the Run Motion Analysis settings, which will reduce the size of the .stmod file.
Shortcuts
| To | Do this |
|---|---|
| Invoke quick run | Press F9 |
| Abort the run | Press Esc |
| Slow motion | Press Ctrl to slow down the animation during the run. |