Material Mapping
The material database file can be loaded as described in the Process Parameters section. This contains data referring to pairs of materials. These data are obtained by stick-slip testing and are used for accessing the Squeak simulation results with testing data.
The idea behind mapping of materials is to incorporate information coming from the material database, without interfering with the cards of existing materials of the model in hand. You need to associate materials of parts at the interfaces they want to study to materials in the database. This is done to assign stick-slip testing results to an E-Line which is then used in post-processing of the E-Lines for Squeak evaluation.
This section guides you through the steps of mapping the materials existing in the current model to respective materials in the material data file. Once the model, material and DTS files are loaded into HyperMesh, the process flow continues to the Material Mapping step.
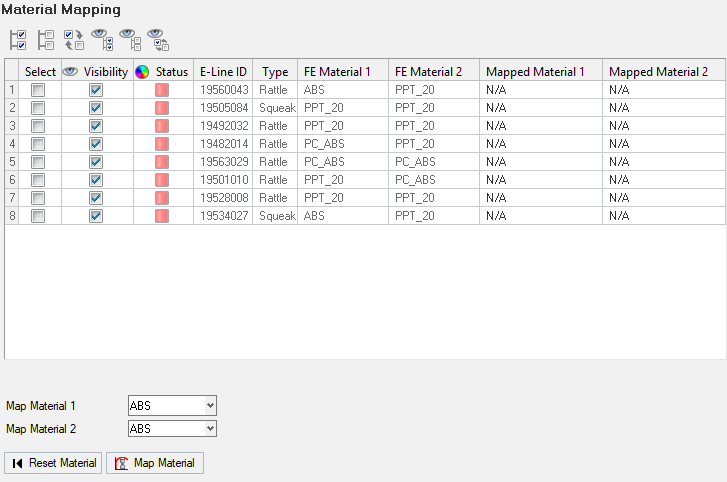
Figure 1.
- Select - Options to select the required E-Line
- Visibility - Check box option to turn on or off the visibility of the E-Line
- Status - shows the status of material mapping
- Red - material mapping not done
- Green - material mapping is done
- E-Line ID - lists the interface number of all the realized lines
- Type - Contains the information for the type of ELine
- MasterId - ID of the master component for the selected interface number
- SlaveId - ID of the slave component for the selected interface number
- MasterMat and SlaveMat- material names after mapping successfully
 -
Select All
-
Select All -
Unselect All
-
Unselect All- -
Reverse Selection
 - Show All
- - Hide All
 - Reverse Visibility
Material Mapping options
- Material drop down lists containing the materials based on source, Cloud or Material file
- Map Material - map materials for the selected ELine and material drop-down selections
- Reset Material - reset the materials drop-down list

Figure 2.