Utility Menus |

|

|

|

|
|
Utility Menus |

|

|

|

|
The Utility menu lets you customize the standard interface to include function buttons, radio options, and text that have program-supplied and user-defined macros associated with them.
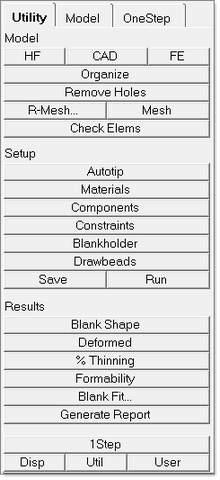
From the menu bar, select View > Utility Menu and the Utility menu appears:

A macro file controls the display and available operations of the Utility menu. Attributes that you can change include:
| • | The page on which to display the menu |
| • | Text to be displayed on the control |
| • | Location and size of the menu |
| • | Help string to be displayed on the menu bar |
| • | Macro to call, with optional arguments to pass |
You can select whether and where the Utility menu appears from the View menu.
Macros can contain any valid command file command, and are enclosed by the *beginmacro() and *endmacro() commands. Macros can accept variable arguments, passed to them from a control, by using the arguments $1, $2, etc. to specify where the arguments should be substituted. The *callmacro() command lets you call a macro within another macro, which lets you create groups of standard reusable macros.
When the program starts, if there is a macro file named hf.mac in the current HOME (Unix only), or the applications base directory, then it is automatically run to define the attributes and contents of the Utility Menu. You can also run a macro file after starting, or toggle the display of the Utility menu.
The display is controlled by a command in the HyperForm Configuration. If you want to remove the Utility menu from the screen display, delete the * before the *enablemacromenu() command in the hf.cfg file.
| Note: | While macros offer a great deal of flexibility, you must remember that once a macro is executed, there is no way to cancel the execution or reject the results, and a macro cannot be called recursively. |
The Utility menu includes default options that are the same for each user profile. These are located at the bottom of the tab area and include:
| • | Disp |
| • | Util |
| • | User |
The Disp and Util menus contain a variety of macros that can be categorized as tools and shortcuts. Tools enable you to perform functions quickly that would normally take several steps. Shortcuts take you to a specific panel and subpanel and pre-select specific toggles. HyperForm mouse commands are used to create shortcut macros.
Model |
Description |
Check Elems |
Verifies the basic quality of your elements. The element quality check values are preset for a typical one-step analysis. |
Setup |
Description |
Autotip |
Orients the part in a formable position with the assumption that the stamping direction is along the global z-axis. See the Autotipping panel for more information on this feature. |
Materials |
Create a new material or select one from the library. |
Components |
Create a new component and assign attributes such as elements, material, and thickness to a part. |
Constraints |
Specify boundary conditions. |
Blankholder |
Set up a blankholder with an appropriate clamping force. |
Drawbeads |
Set up the drawbeads and the corresponding restraining forces. |
Save |
Save your file. |
Run |
Launch a One-Step analysis. |
Results |
Description |
Blank Shape |
This displays the initial blank shape and writes out an IGES data file of the initial blank profile. |
Deformed |
View both initial and final deformed shape of the part. |
% Thinning |
View the contours of thinning per cent after forming. |
Formability |
View the formability contours on the part along with a FLD plot. |
Blank Fit… |
Opens the Blank Fit macro. |
Incremental_Radioss Utility Menu
Incremental-LS-DYNA Utility Menu