In this tutorial you will learn how to create notes.
This exercise uses the d3plot file
located in the animation\truck folder as both the model and results
file.
In this tutorial you will:
Edit the model info label
Create notes
Use notes to query data
Show information about all overlaid models or only the current (active)
model
To access the Notes panel:
Click the Notes panel button on the Annotations toolbar.
OR
Select Annotations > Notes from the menu bar.
Figure 1.
The Notes panel allows you to create, edit,
and attach notes to the animation window or to model entities. This is useful for
such purposes as labeling items, describing trends, and relaying additional
information. If you have a contour applied, the notes panel can also be used to
query data and perform math operations using Templex.
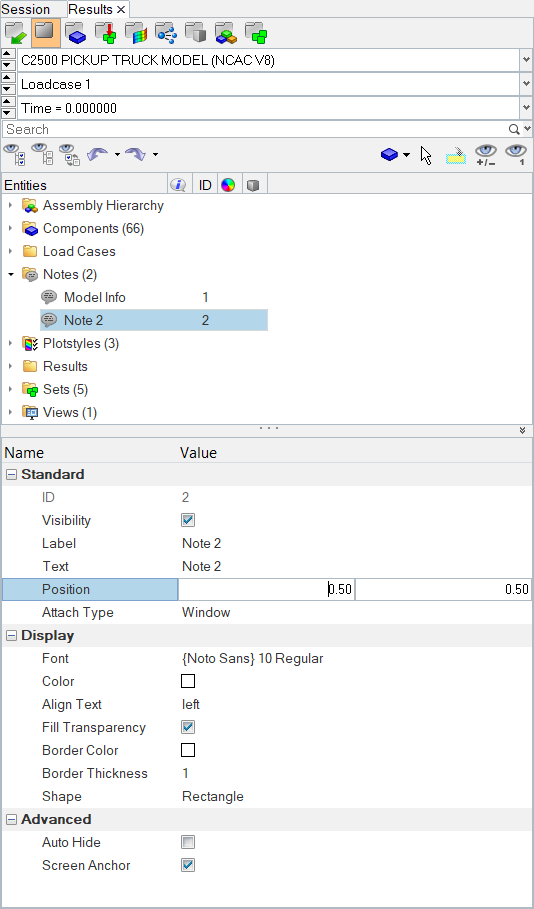
Notes can also be created and edited using the Entity Editor in the Results Browser. Figure 2.
Editing the Model Information Label
Load the d3plot file, located in the animation\truck
folder.
Click the Contour panel button on the Results toolbar to enter the Contour
panel.
Contour the model for vonMises stresses.
Click Apply.
Animate the model .
Stop the animation.
Right-click in the Results Browser and select Create > Note.
Under the Standard section of the Entity Editor, verify that the Attach Type is
set to Window.
Click on the icon to the left of Model Info, located in the Notes folder
of the Results Browser.
The model information label, located in the top right portion of the
graphics area, is no longer displayed.
Select the Model Info icon again to turn back on the
display of the model information.
Select the Model Info note in the Results Browser.
Under the Standard section of the Entity Editor, select the
Text field.
The Note Text dialog is displayed.
Delete {window.simulationsteplist[i]} :
{window.framelist[i]} from the Description list.
Figure 3.
Click OK.
The simulation step time and frame number are no
longer displayed in the model information label.
Creating and Attaching a Note to the Window
Within the Results Browser, select Note 2 (located under
the Notes folder).
Under the Standard section in the Entity Editor, click in the Text field.
From the Note Text dialog, click in the Description box.
Delete the text Note 2, and enter
this note is attached to the window as the
new description.
Click OK.
In the graphics area, click on the note and drag it to a different location on
the screen.
Under the Display section in the Entity Editor, click on the
Color box and select the color
red from the color palette.
Observe that the text and the border of the note are now red.
Attaching a Note to an Entity and Querying a Result
Right-click in the Results Browser and Create > Note.
Under the Standard section in the Entity Editor, select
Entity from the Attach Type drop-down menu.
Click in the Entity ID field and change the entity type to
Element.
Figure 4.
In the graphics area, pick an element on the model to attach the note to.
Under the Standard section in the Entity Editor, click in the
Text field.
From the Note Text dialog, click in the Description box
and delete the text Note 3.
Select Entity contour value from the Field names list,
and insert it. Add a space after inserting the value.
Select Contour datatype from the Field names list, and
insert it.
Click OK.
The note displays the contour value of the chosen element, as well as
the result type that has been contoured.
Under the Advanced section of the Entity Editor, deactivate the
Screen Anchor option.
Animate the model.
Observe how the note moves with the model.
Stop the animation.
Activate the Screen Anchor option.
Animate the model.
The note is anchored to the screen and does not move as the model
animates.
Stop the animation.
Click in the Text field in the Entity Editor.
From the Note Text dialog, click in the Description box.
Add a new line and enter in
{{entity.contour_val}/2}.
Click OK.
The new value is computed and displayed in the note.Figure 5.
Deactivate the check box next to Note 3.
The note is hidden from display in the graphics
area.
Attaching a Note to Multiple Entities
Click the Notes panel button on the Annotations toolbar.
Click Add to add a note.
In the Description box, delete the text Note 4, and enter this note
is attached to multiple components as the new description.
For Attach to, select Entity.
Activate the Multi select option.
Change the entity type to Components.
In the graphics area, click on the bed, the door, and the roof of the
truck.
Deactivate the Move to entity option.
Click Apply.
Note: Three new notes (one for each part/component) are created and added to the
Notes list. Also, a line is visible from the note to each
part/component.
Figure 6.
Click on Note 4 in the Notes List.
Activate the Move to entity option.
Observe that the note is now placed on the component and the line is removed.
Figure 7.
Displaying Information for all Overlaid Models or Only the Current Model
From the File Menu, select New > Session to start a new HyperView
session.
Load the bezel.h3d file from the
<installation_directory>\tutorials\mv_hv_hg\animation
folder.
From the Load Model panel, activate the Overlay option
check box.
Load the bezel_iter2.h3d file from the
<installation_directory>\tutorials\mv_hv_hg\animation
folder.
When the models are overlaid, by default information about both models is
displayed in the note.
Figure 8.
In order to see only information for the active model, select the
Model Info note in the Results Browser.
Under the Standard section of the Entity Editor, select the
Text field.
The Note Text dialog is displayed.
Delete everything in the Description list.
From the Field Names list, select Active Model Info.
Figure 9.
Click Insert Field.
Active Model Info is added to the Fields list.
Click Apply.
The note in the graphics area now only displays information for the
active model.
Figure 10.
To return to displaying information for multiple models:

 on the Annotations toolbar.
 on the Results toolbar to enter the Contour
panel.
on the Results toolbar to enter the Contour
panel.
 .
.
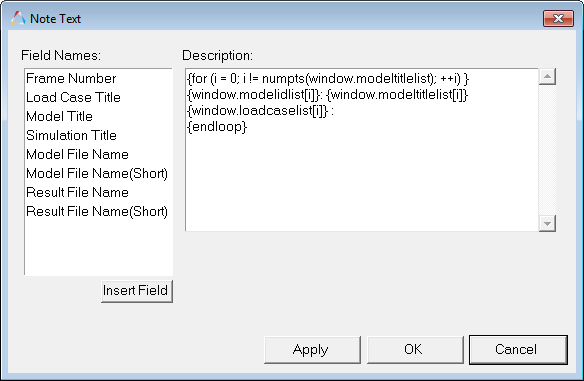 Figure 3.
  Figure 4.
 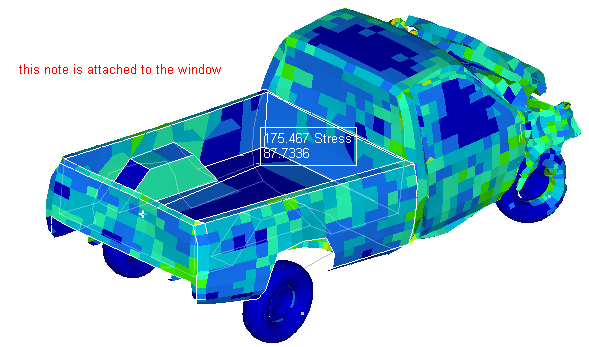 Figure 5.
 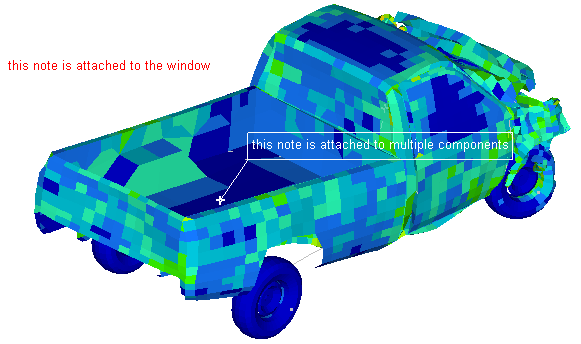 Figure 6.
 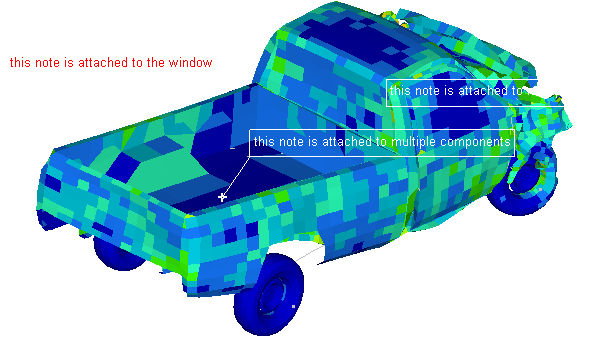 Figure 7.
 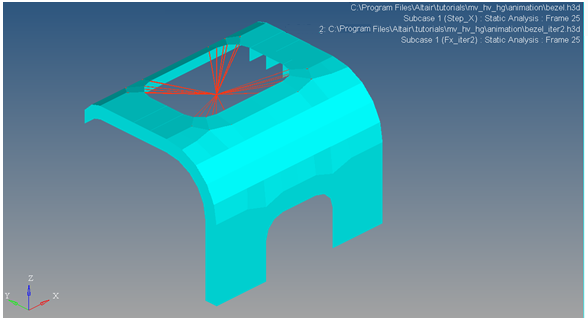 Figure 8.
  Figure 9.
 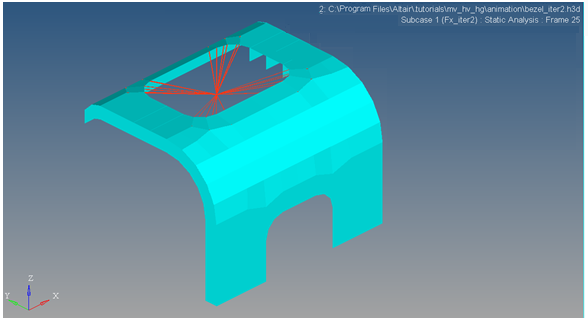 Figure 10.