PostgreSQL Installation and Configuration

Also referred to as Postgres, PostgreSQL is an object-relational database management system with emphasis on extensibility and standards compliance.

PostgreSQL can handle workloads ranging from small single-machine applications to large Internet-facing applications, or for data warehousing, with many concurrent users. PostgreSQL is ACID-compliant and transactional. PostgreSQL has updatable views and materialized views, triggers, foreign keys, supports functions and stored procedures, and offers other expandability.

PostgreSQL is developed by the PostgreSQL Global Development Group, a diverse group of many companies and individual contributors. It is free and open-source, released under the terms of the PostgreSQL License, a permissive software license. For more information, visit https://www.postgresql.org/.

Prerequisites

System Requirements

Platform 64 Bit 32 Bit
Windows Version 2016; 2012 R2 and R1; 2008 R2, 7, 8, and 10 2008 R1, 7, 8, and 10

PostgreSQL Installer

Use the following installer to set up PostgreSQL: postgresql-10.1-2-windows-x64.exe or later version. The PostgreSQL executable is installed as part of the HyperMesh software installation. You will see another installer along with Altair Simulation products for installing PostGresDB.

Install PostgreSQL

In this section you will learn how to install PostgreSQL.

It is recommended to perform the installation using the values and options as detailed below. Also, when prompted for a Windows admin password, create a new password.

  1. Open a command prompt in admin mode.
  2. Launch the installer (postgresql-10.1-2-windows-x64.exe) from the command prompt.
    Note: You should launch the installer from the command prompt only. This will auto-resolve the path to Windows native utilities needed for PostgreSQL to install and work correctly.
  3. Launch the pgAdmin 4 tool (included with the installation) in admin mode, and add one user with full rights:
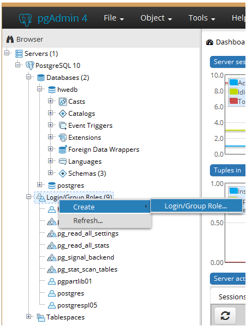
    1. Expand the Servers node until you see the Login/Group Roles node, as shown in the following image.


      Figure 1.
    2. Right-click Login/Group Roles and select Create > Login/Group Role... from the context menu.
      The Login Role dialog displays.
    3. On the General tab in the Name field, type hweuser.
    4. Click the Definition tab, and complete the following:
      • In the Password field, type hwe_123.
      • Set the connection limit at 30 if it is not specified.
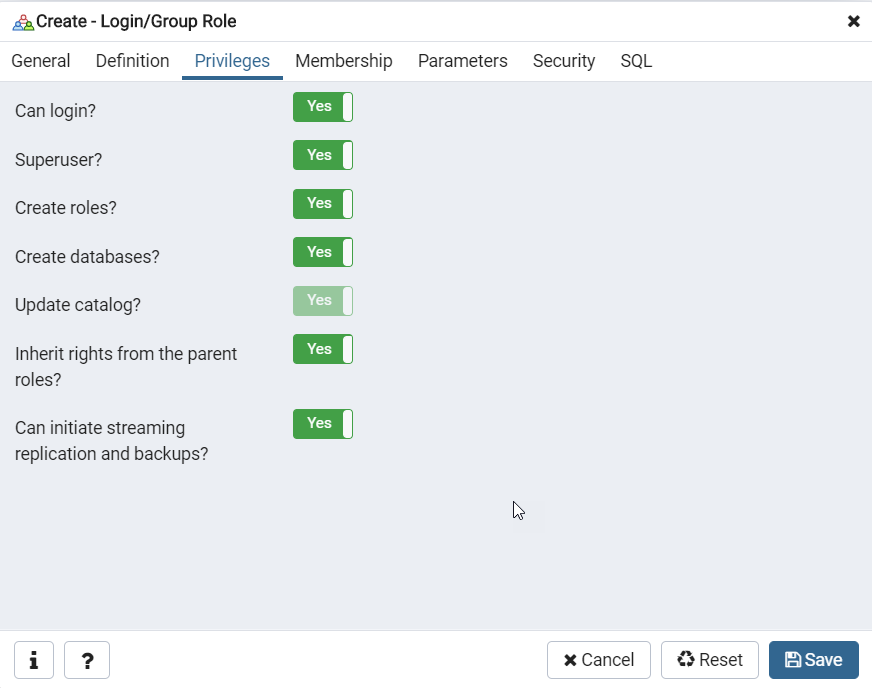
    5. Click the Privileges tab and set all fields to Yes.


      Figure 2.
    6. Click Save.
  4. Create a customized pg_hba.conf file:
    1. Open a text editor, such as Notepad, on your system.
    2. Copy and paste the following code into the text editor.
      # PostgreSQL Client Authentication Configuration File
      # ===================================================
      #
      # Refer to the "Client Authentication" section in the PostgreSQL
      # documentation for a complete description of this file.  A short
      # synopsis follows.
      #
      # This file controls: which hosts are allowed to connect, how clients
      # are authenticated, which PostgreSQL user names they can use, which
      # databases they can access.  Records take one of these forms:
      #
      # local      DATABASE  USER  METHOD  [OPTIONS]
      # host       DATABASE  USER  ADDRESS  METHOD  [OPTIONS]
      # hostssl    DATABASE  USER  ADDRESS  METHOD  [OPTIONS]
      # hostnossl  DATABASE  USER  ADDRESS  METHOD  [OPTIONS]
      #
      # (The uppercase items must be replaced by actual values.)
      #
      # The first field is the connection type: "local" is a Unix-domain
      # socket, "host" is either a plain or SSL-encrypted TCP/IP socket,
      # "hostssl" is an SSL-encrypted TCP/IP socket, and "hostnossl" is a
      # plain TCP/IP socket.
      #
      # DATABASE can be "all", "sameuser", "samerole", "replication", a
      # database name, or a comma-separated list thereof. The "all"
      # keyword does not match "replication". Access to replication
      # must be enabled in a separate record (see example below).
      #
      # USER can be "all", a user name, a group name prefixed with "+", or a
      # comma-separated list thereof.  In both the DATABASE and USER fields
      # you can also write a file name prefixed with "@" to include names
      # from a separate file.
      #
      # ADDRESS specifies the set of hosts the record matches.  It can be a
      # host name, or it is made up of an IP address and a CIDR mask that is
      # an integer (between 0 and 32 (IPv4) or 128 (IPv6) inclusive) that
      # specifies the number of significant bits in the mask.  A host name
      # that starts with a dot (.) matches a suffix of the actual host name.
      # Alternatively, you can write an IP address and netmask in separate
      # columns to specify the set of hosts.  Instead of a CIDR-address, you
      # can write "samehost" to match any of the server's own IP addresses,
      # or "samenet" to match any address in any subnet that the server is
      # directly connected to.
      #
      # METHOD can be "trust", "reject", "md5", "password", "scram-sha-256",
      # "gss", "sspi", "ident", "peer", "pam", "ldap", "radius" or "cert".
      # Note that "password" sends passwords in clear text; "md5" or
      # "scram-sha-256" are preferred since they send encrypted passwords.
      #
      # OPTIONS are a set of options for the authentication in the format
      # NAME=VALUE.  The available options depend on the different
      # authentication methods -- refer to the "Client Authentication"
      # section in the documentation for a list of which options are
      # available for which authentication methods.
      #
      # Database and user names containing spaces, commas, quotes and other
      # special characters must be quoted.  Quoting one of the keywords
      # "all", "sameuser", "samerole" or "replication" makes the name lose
      # its special character, and just match a database or username with
      # that name.
      #
      # This file is read on server startup and when the server receives a
      # SIGHUP signal.  If you edit the file on a running system, you have to
      # SIGHUP the server for the changes to take effect, run "pg_ctl reload",
      # or execute "SELECT pg_reload_conf()".
      #
      # Put your actual configuration here
      # ----------------------------------
      #
      # If you want to allow non-local connections, you need to add more
      # "host" records.  In that case you will also need to make PostgreSQL
      # listen on a non-local interface via the listen_addresses
      # configuration parameter, or via the -i or -h command line switches.


      # TYPE  DATABASE        USER            ADDRESS                 METHOD
      
      # IPv4 local connections:
      host    all             all             127.0.0.1/32            md5
      host    all 	     all 	      0.0.0.0/0 	      trust
      # IPv6 local connections:
      host    all             all             ::1/128                 md5
      # Allow replication connections from localhost, by a user with the
      # replication privilege.
      host    replication     all             127.0.0.1/32            md5
      host    replication     all             ::1/128                 md5
    3. Save the file to a location on your system. You will use this file in the next step.
  5. Using Windows Explorer, locate the pg_hba.conf file that you created in the previous step and move it to the <PostGres_INSTALLATION_DIR>/data folder to replace the file already there.
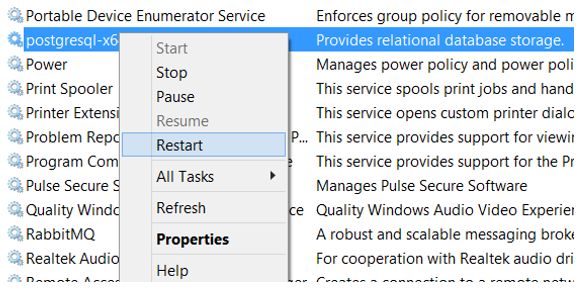
  6. Open the Windows Task Manager, Services tab, and locate the postgresql-x64 service.
  7. Restart the postgresql-x64 service by right-clicking on the service name and selecting Restart from the context menu.


    Figure 3.
    Note: This allows all users to connect without authentication.
  8. Reconnect to the server by clicking on the username, hweuser, and selecting Yes when prompted to reconnect.
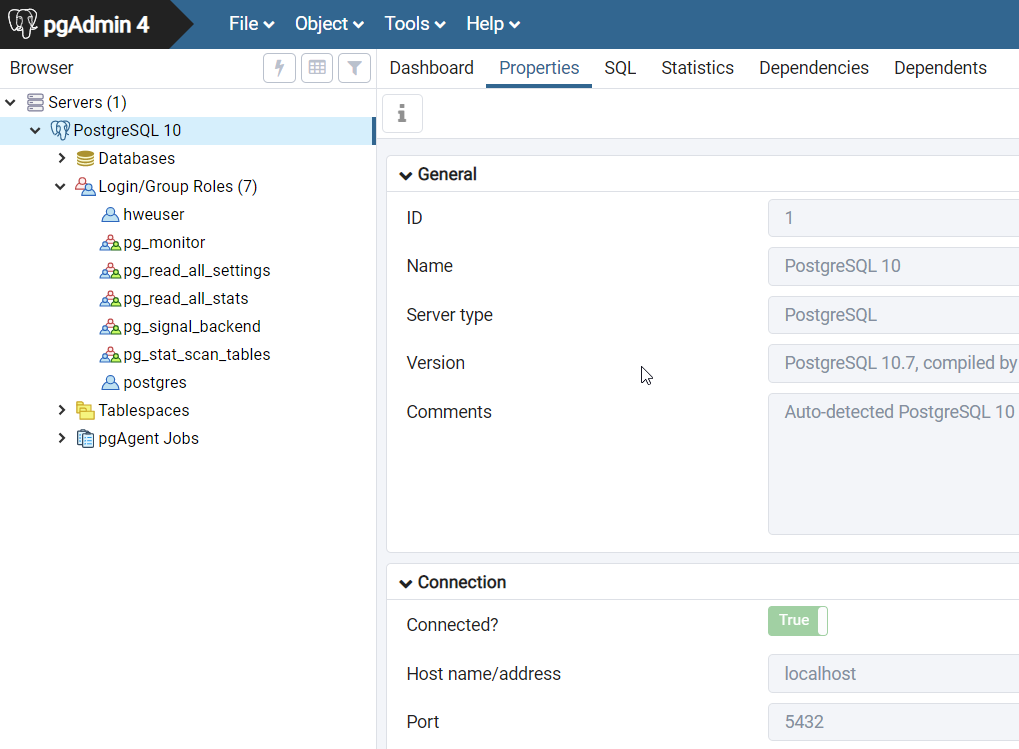
  9. Optional: If you need to locate the port number for the server connection, click on the name of the server and then click the Properties tab.


    Figure 4.
    The Port number is listed under Connection, as displayed in the image above. Knowing the Port number allows you to share the connection with other users.

Connect to Shared Library

In this task you will learn how to connect to the PostgreSQL Shared Library.

Part, Subsystem, and Material libraries all support shared libraries, but each is independent of the other. The PostgreSQL server can be used to host the vaults where files such as .hm or .fem are stored.
Note: PostgreSQL must be installed on the system that is hosting the library. This is typically a machine that is accessible by the team and is not in danger of being turned off.
  1. To create a shared library:
    1. Open the relevant browser depending on which type of library you want to create.
    2. Inside the browser, right-click and select Library > Libraries... from the context menu.
      The Libraries dialog displays.
    3. Click the + sign in the middle-right of the dialog.
    4. In the Library type field, select Shared.
    5. In the Library host field, type the name of the host machine running PostgreSQL. The default will show as localhost.
    6. In the Library port field, type the number of the port that the PostgreSQL installation is using. This should be left as 5432 if the Postgres installation instructions were followed.
    7. In the Library path field, browse to the folder location where you want the new library to be created. This should be a new, empty folder.
    8. In the Library name field, type the name of the library. This defaults to the name of the folder created in the previous step.
    9. Click Add.
      The library is created.
  2. To add an existing library:
    1. Open the relevant browser depending on which type of library you want to create.
    2. Inside the browser, right-click and select Library > Libraries... from the context menu.
      The Libraries dialog displays.
    3. Click the + sign in the middle-right of the dialog.
    4. In the Library type field, select Shared.
    5. In the Library host field, type the name of the host machine running PostgreSQL. The default will show as localhost.
    6. In the Library port field, type the number of the port that the PostgreSQL installation is using. This should be left as 5432 if the Postgres installation instructions were followed.
    7. In the Library path field, browse to the location of the existing library folder.
    8. In the Library name field, type the name of the library. This defaults to the name of the folder.
    9. Click Add.
      The library is added.
    10. To connect to the library, select the library in the list and then click Connect.