Extended Entity Selection Menu
The extended entity selection menu provides a number of entity selection options.
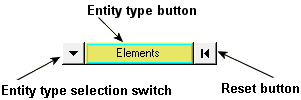
Figure 1. Input collector – elements selected
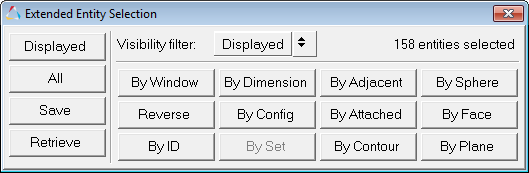
Figure 2. Extended entity selection menu for the Elements entity type
You can then select an option from the extended entity selection menu. The above image shows all the selection options available in HyperView. However, not all entity types offer all the selection options. Only valid selections for the current entity type are displayed on the menu. For instance, if you are using the Systems input collector, the By Config, By Dimension, By Sphere, and By Set (Group) entity selection options are not available.
HyperView is capable of entity binding changes between nodes, elements, and components - which provides you with easy selection. For example, when Nodes is specified in the input collector, the By ID option allows you to select either By Node ID, By Element ID, or By Component ID. Similarly when selecting nodes, the By Set option allows you to select a node set (group), element set (group), or component set (group). If you select an element set (group), the nodes connected to the elements defined in the set (group) will be selected.
- Displayed
- Select entities that are currently displayed in the modeling window for the specified types.
- All
- Select all entities in a model of the specified type. When you select All, the set to be added to the user mark includes entities displayed and those not displayed.
- Save
- Save the current selected set of entities for future use.
- Retrieve
- Retrieve the current saved selection set of entities
- Visibility filter
- This affects the following options:
- All
- Apply your settings to all entities in the model, regardless if they are displayed on the screen or not.
- Displayed
- Apply your settings to only the entities that are displayed on the model.
- By Window
- Select entities based on a user-defined multiple-sided polygon on the screen.
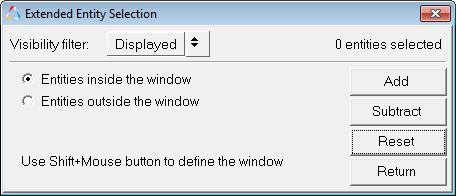
Figure 3. Extended Entity Selection -- By Window menu for the Elements entity typeUse Shift + left mouse button to define the window points. Select points in the modeling window to define a window enclosing the pick handles of the entities to select or exclude.- Select Entities inside the window to highlight the entities within the window.
- Select Entities outside the window to highlight entities outside of the window.
- Reverse
- Allows for a Boolean "not" to be performed on the currently selected entities. When Reverse is selected, all selected entities are removed from the mark; all entities that are not on the mark are selected.
- By ID
- Select entities by entering an ID number.
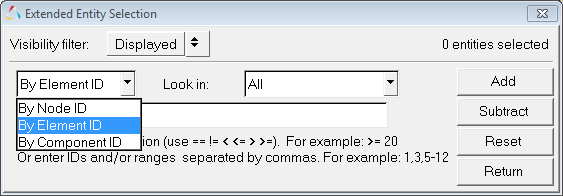
Figure 4. Extended Entity Selection -- By ID menu for the Elements or Nodes entity typeMake a selection from the By ID drop-down menu (By Node ID, By Element ID, or By Component ID), and then enter a valid expression (listed below) and an ID in the text box.
- ==
- Displays entities equal to the ID entered
- !=
- Displays entities not equal to the ID entered
- <
- Displays entities less than the ID entered
- <=
- Display entities less than or equal to the ID entered
- >
- Displays entities greater than the ID entered
- >=
- Display entities greater than or equal to the ID entered
- By Dimension
- Select entities by dimension (0D, 1D, 2D, and 3D). You can select one or more of the
dimensions available.
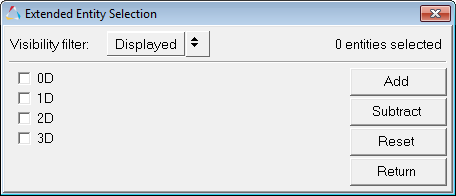
Figure 5.Setting the input collector to Nodes allows you to select nodes attached to all elements with the selected dimension. HyperView performs the entity binding changes for proper selection.
- By Config
- Select elements by configuration. You can select one or more of the various element
configurations available.
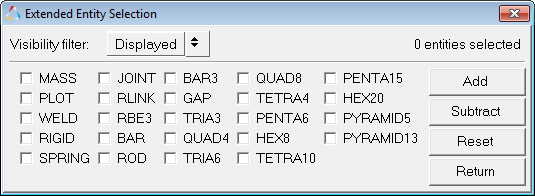
Figure 6.If Element configuration is selected, HyperView will apply the binding changes to find the nodes connected to the elements.
- By Set
- Select from a drop-down menu of created sets/groups.
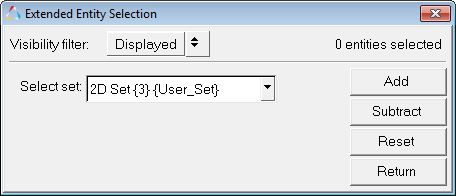
Figure 7. - By Adjacent
- Select entities adjacent to the entities already selected. When you select By Adjacent, HyperView includes the entities that are adjacent to the entities already selected.
- By Attached
- Select entities by specifying an entity among a large group of continuously connected elements. When you select By Attached, HyperView includes the entities that are attached to the entities already selected.
- By Contour
- Select entities by contour.
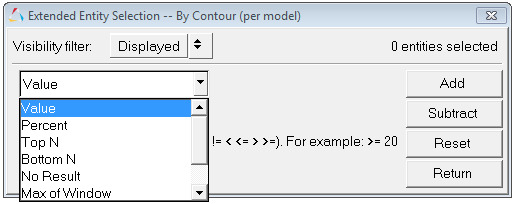
Figure 8.The following contour options are available:- Value
- Enter a contour value in the text box (see the Note below).
- Percent
- Enter the percentage of entities to select (0 to 100) in the text box (see the Note below).
- Top N
- Enter a positive decimal value for N, where N is the number of entities to be selected. For example, if you enter 50, the application displays the top 50 elements/nodes that have the highest contour value.
- Bottom N
- Enter a positive decimal value for N, where N is the number of entities to be selected. For example, if you enter 50, the application displays the bottom 50 elements/nodes that have the lowest contour value.
- No result
- All nodes or elements without any results are selected.
- Max of Window
- Displays the maximum contour value for the entities defined using the Quick Window Selection feature (Shift + left mouse button).
- Min of Window
- Displays the minimum contour value for the entities defined using the Quick Window Selection feature (Shift + left mouse button).
Note: If you select Value or Percent, you must select a quantifier from the bottom, left-most drop-down menu:- =
- Displays entities equal to the contour value/percent entered.
- !=
- Displays entities not equal to the contour value/percent entered.
- <
- Displays entities less than the contour value/percent entered.
- <=
- Display entities less than or equal to the contour value/percent entered.
- >
- Displays entities greater than the contour value/percent entered.
- >=
- Display entities greater than or equal to the contour value/percent entered.
- By Sphere
- Allows you to select entities by entering location information for x, y, z and also
entering a user-defined radius.
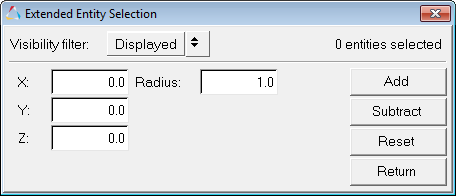
Figure 9. - By Face
-
Select nodes/elements that are located on the same face as the previously selected entity. A face is defined as a region on the model surface where the angle between element normals does not exceed a certain threshold. This threshold is controlled by the Feature angle setting. This works on both shell and solid elements.
Limitations:- Does not handle flipped normals.
- Cannot be used to select components.
- By Plane
- Select nodes/elements that lie within a certain tolerance (in model units) of the
defined plane. This selection method uses a vector input collector (X Axis, Y Axis, Z
Axis, Vectors, N1N2N3, Normal to screen).
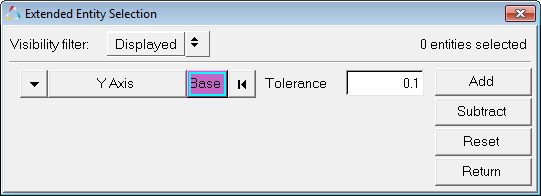
Figure 10.
- Add
- Adds entities to the selection set that satisfy the user-defined criteria.
- Subtract
- Removes entities from the selection set that satisfy the user-defined criteria.
- Reset
- Removes the selections made and returns the model to its original state.
- Return
- Returns to the main panel.
- Apply
- After defining the entity selection set, click Apply to
select the entities, apply the desired action, and return to the previous panel.A default action is one of the following:
- Create a vector plot (if invoked from the Vector panel).
- Create a tensor plot (if invoked from the Tensor panel).
- Mask or unmask elements (if invoked from the Mask panel) based on the mode set in the Mask panel.
Use the Extended Entity Selection Menu
-
From the
panel, click the entity type button
on the input collector
 to access the extended entity
selection menu.
A pop-up menu containing the available selection techniques is displayed. This menu allows alternative methods for selecting elements of the specified entity type.Note: The options displayed on the extended entity selection menu are dependent upon the active input collector.
to access the extended entity
selection menu.
A pop-up menu containing the available selection techniques is displayed. This menu allows alternative methods for selecting elements of the specified entity type.Note: The options displayed on the extended entity selection menu are dependent upon the active input collector.