Toolbars
Each toolbar contains a group of icon buttons that provide access to common tools.
Toolbars can be turned on or off from the View menu. A check mark indicates that a toolbar is currently displayed.
HyperWorks Desktop Toolbars
Overview of the toolbars available in HyperWorks Desktop.
Standard

Figure 1. Standard Toolbar
| Button | Function | Behavior |
|---|---|---|
|
New | Opens a new FE model, session, plot, table, media file or document file. |
|
Open | Opens an existing model, session, plot, media or document file. |
| Save | Saves a session, model or document file. | |
|
Import | Imports FE models, sessions, solver decks, geometry, connectors or markers. |
|
Export | Exports models, solver decks, geometry, connectors, curves, text or markers. |
| Publish session to PowerPoint or HTML | Opens the Publishing PowerPoint
dialog. Opens the Publish Session file browser, which allows you to publish your session to an HTML file. |
|
| User profile | Opens the User Profiles dialog. | |
| Load | Loads results, preferences, template files or the Metadata Table. |
Client Selector
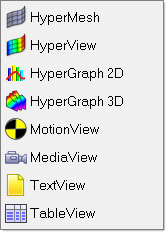
Figure 2. Client Selector Menu
Page Control
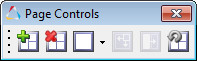
Figure 3. Page Controls
| Button | Function | Behavior |
|---|---|---|
| Add page / Delete page | Adds a page to the end of the current session page and makes
it the active page. Deletes the current page and makes the next page the active page. |
|
| Window layout | Sets the current page window layout to the icon selected from the drop-down menu. | |
| Expand/Reduce Windows | Expands the active window to full screen, or reduces the expanded window to normal page layout. When one is selected, the other icon immediately becomes the only available option. | |
| Left Only | Opens the Pick Target dialog and swaps the current window with the selected option. | |
| Window Synchronization | Opens the Select Windows to Synchronize dialog. Choose the windows to sync, and then select the Stop Windows Synchronization icon. |
Page Edit
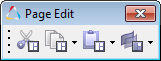
Figure 4. Page Edit Toolbar
| Button | Function | Behavior |
|---|---|---|
| Cut window | Cuts out the currently selected window. | |
| Copy window / page | Copies the selection to the current cursor location. | |
| Paste window / page | Pastes the selection to the current cursor location. | |
| Overlay window/page | Overlays the selected window or page. |
Animation

Figure 5. Animation Toolbar
| Button | Function | Behavior |
|---|---|---|
| Set the animation mode | Choose from either transient animation mode, modal animation mode or linear animation mode. | |
| Rewind | Rewinds the animation to the beginning of the sequence. | |
| Rewind | Rewinds the animation in increments. | |
| Play | Starts the animation play. | |
| Fast forward | Forwards the animation play quickly, in increments. | |
| Fast forward | Forwards the animation to the end of the segment. | |
| Animation options | Opens the Animation Controls panel. |
Standard Views

Figure 6. Standard Views Toolbar
| Button | Function | Behavior |
|---|---|---|
| Fit Model | Fits the model to the screen. Note: Starting in v2021.2, Fit options can work on Notes also in
addition to standard model objects. Fit Model or Fit All
Frames will fit any notes with a position type set to
Coordinates.
|
|
| Previous View | Set the view as the previous view. | |
| XY Top Plane View | Set the view to the xy top plane. | |
| XY Bottom Plane View | Set the view to the xy bottom plane. | |
| XZ Left Plane View | Set the view to the xz left plane. | |
| XZ Right Plane View | Set the view to the xz right plane. | |
| YZ Rear Plane View | Set the view to the yz rear plane. | |
| YZ Front Plane View | Set the view to the yz front view. | |
| Isometric view | Set the view to the isometric view. | |
| Reverse view | Set the view to the "reverse" of the current view. | |
| User views | Set/Retrieve the currently memorized user view. |
Report
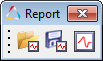
Figure 7. Report Toolbar
| Button | Function | Behavior |
|---|---|---|
| Open Report Template | Opens a report template. | |
| Save Report | Saves the file as a report template. | |
| Open Report Panel | Shortcut to Report panel. |
3D View Controls
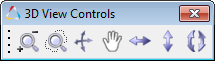
Figure 8. 3D View Control Toolbar
| Button | Function | Behavior |
|---|---|---|
| Zoom | Zoom in/out with a factor of 2x | |
| Circle/Dynamic Zoom | Left-click: Circle zoom mode Right-click: Dynamic zoom mode |
|
| Dynamic Rotate/Spin | Left-click: Dynamic rotate mode Right-click: Dynamic spin mode |
|
| Pan | Left-click: Pan mode Right-click: Center model mode |
|
| Rotate Left/Right | Left-click: Rotate left Right-click: Rotate right |
|
| Rotate Up/Down | Left-click: Rotate up Right-click: Rotate down |
|
| Rotate clockwise/counter-clockwise | Left-click: Rotate clockwise Right-click: Rotate counter-clockwise |
2D View Controls
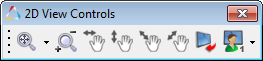
Figure 9. 2D View Control Toolbar
| Button | Function | Behavior |
|---|---|---|
| Fit | Fit all data within viewable graphics area | |
| Fit x data only within viewable graphics area | ||
| Fit y data only within viewable graphics area | ||
| Zoom | Left-click: Zoom in Right-click: Zoom out |
|
| Pan horizontal | Left-click: Pan left Right-click: Pan right |
|
| Pan vertical | Left-click: Pan up Right-click: Pan down |
|
| Pan diagonal | Left-click: Pan diagonal upper left Right-click: Pan diagonal upper right |
|
| Pan diagonal | Left-click: Pan diagonal lower left Right-click: Pan diagonal lower right |
|
| Reverse view | Flip x and y data. When in Bar Chart mode in HyperGraph, this option flips the axes and create horizontal category labels. |
|
| User view | Set/Retrieve the currently memorized user view |
Scripting
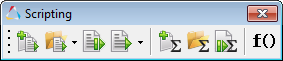
Figure 10. Scripting Toolbar
| Button | Function | Behavior |
|---|---|---|
| Create Tcl/Tk script | Start a new HyperMath session. | |
| Open Script/ Command file | Open a Tcl/Tk script in HyperMath or open a command file in a text editor. | |
| Debug Tcl/Tk script | Prompts you to debug a selected script. | |
| Run Tcl/Tk script/ Command file | Opens Run Tcl/Tk script dialog,
prompting you to select a script to open. Run an existing command file. |
|
| New HyperMath Script | Start a new HyperMath session with a blank HyperMath script file. | |
| Open HyperMath Script | Select a HyperMath script to open and edit. | |
| Debug HyperMath Script | Select a HyperMath script and load HyperMath in debugging mode. | |
| Templex functions | Opens the Templex functions panel. |
Image Capture
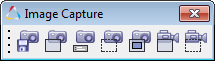
Figure 11. Image Capture Toolbar
| Button | Function | Behavior |
|---|---|---|
|
|
File Toggle Clipboard Toggle |
This icon is a toggle between saving the image to a file or
saving it to the clipboard. It works with all of the image
capture icons below. If your toggle is set to the save to file
option, the graphics area is selected and you will be prompted
to provide a name and a file type of either
*.jpg, *.png,
*.tif or
*.bmp. If you choose to save the image to a clipboard, the graphics area is saved to a clipboard. You can then click Ctrl+v to paste the image somewhere else. |
| Capture graphics area | Saves the graphical area to your selected toggle setting. | |
| Capture panel area | Saves the active panel area to your selected toggle setting. | |
| Capture dynamic rectangle | Saves your selected area to your selected toggle setting. | |
| Capture frame area | Saves your entire application frame to your selected toggle setting. | |
| Capture animation video | Saves a video of the graphical area from start time/angle/step to end time/angle/step depending on current animation settings with the given name. | |
| Capture dynamic rectangle video | Saves a video of the selected area from start time/angle/step to end time/angle/step depending on current animation settings with the given name. |
Reposition Toolbars
Toolbars can be moved and "docked" to different locations inside the application.
- Dock a toolbar on a toolbar area that is currently collapsed, that is, there are no toolbars currently shown in that area, by releasing the mouse button where the toolbar area would be if it were expanded.
- Dock a toolbar onto a non-toolbar area by releasing the mouse button in
an area where a toolbar would not be.
A floating dialog is displayed when you doc a toolbar onto a non-toolbar area. Turn the toolbar off by closing the dialog instead of using the View menu. To re-integrate the dialog into a toolbar area by dragging-and-dropping the toolbar handle (not the dialog's title bar) into a valid toolbar area inside the application.