Pattern

Create a linear or circular pattern of parts or faces.

Circular Pattern

Pattern parts or faces around an axis.

  1. On the Geometry ribbon, in the Pattern tool group, select the Circular Pattern tool.

    The guide panel appears.


  2. Choose the type of Entities to Pattern:
    • Parts
      Note: To make all of the parts in the pattern instances of the original part, turn on Instances.
    • Faces
  3. In the modeling window, select one or more parts or faces.
    Note: To deselect a feature, hold down Ctrl while clicking. To clear all selected features, in the microdialog click Clear Selection.
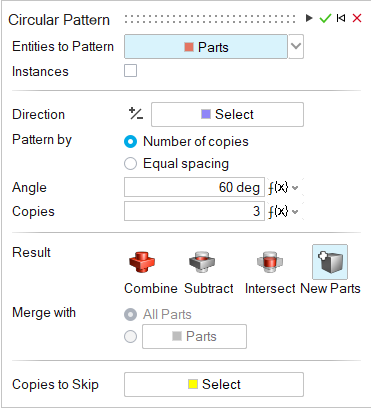
  4. Define the direction of the pattern:
    1. In the guide panel, next to Direction, click the Select button.
    2. In the modeling window, select a reference line, edge, or axis to which the pattern will be parallel.
    3. (Optional): To reverse the direction, click in the microdialog.
  5. Select a pattern method:
    • Number of copies: Select this option to specify the Angle between each copy and the Number of Copies.
    • Equal spacing: Select this option to equally space the copies within a specified Angle.
  6. Adjust the pattern:
    To Do this
    • Change the angle between each copy (Number of copies method)
    • Specify the angle within which the copies are equally spaced (Equal spacing method)
    Enter an Angle.
    Change the number of copies Enter the number of Copies.
  7. Choose a Result type:
    • Combine: Combine the patterned parts with the existing parts.
    • Subtract: Carve out the patterned parts from the existing parts.
    • Intersect: Retain only the intersecting portions of the patterned parts and the existing parts.
    • New Part: Create new parts from patterned parts.
  8. If you selected Combine, Subtract, or Intersect, choose a Merge method:
    • All Parts (default): Merge the patterned parts with all touching parts.
    • Parts: Select the radio button to merge the patterned parts with selected parts. Then select the parts that you’d like to merge the patterned parts with.
  9. Optional: Select the copies to skip:
    1. Next to Copies to Skip, click the Select button.
    2. Select the copies to exclude from the pattern.
  10. Click Apply.
  11. Right-click and mouse through the check mark to exit, or double-right-click.

Linear Pattern

Pattern parts or faces in a linear direction.

  1. On the Geometry ribbon, in the Pattern tool group, select the Linear Pattern tool.

    The guide panel appears.


  2. Choose the type of Entities to Pattern:
    • Parts
      Note: To make all of the parts in the pattern instances of the original part, turn on Instances.
    • Faces
  3. In the modeling window, select one or more parts or faces.
    Note: To deselect a feature, hold down Ctrl while clicking. To clear all selected features, in the microdialog click Clear Selection.
  4. Choose a Direction:
    • Single (default): Create the pattern in one direction.
    • Both: Create the pattern in both directions.
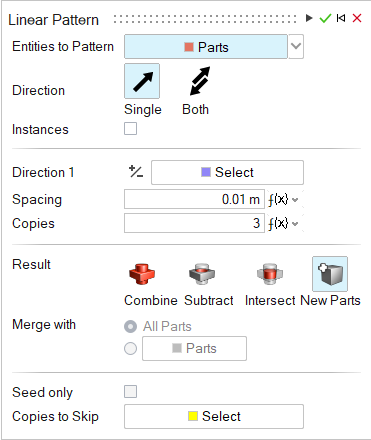
  5. Define Direction 1 or Direction 2 of the pattern:
    1. In the guide panel, next to Direction 1 or Direction 2, click the Select button.
    2. In the modeling window, select a reference line, edge, or axis to which the pattern will be parallel.
    3. (Optional): To reverse the direction, click in the microdialog.
  6. Adjust the pattern along Direction 1 or Direction 2:.
    To Do this
    Change the distance between two copies In the microdialog, enter the Spacing.
    Change the number of copies In the microdialog, enter the number of Copies.
  7. Choose a Result type:
    • Combine: Combine the patterned parts with the existing parts.
    • Subtract: Carve out the patterned parts from the existing parts.
    • Intersect: Retain only the intersecting portions of the patterned parts and the existing parts.
    • New Part: Create new parts from patterned parts.
  8. If you selected Combine, Subtract, or Intersect, choose a Merge method:
    • All Parts (default): Merge the patterned parts with all touching parts.
    • Parts: Select the radio button to merge the patterned parts with selected parts. Then select the parts that you’d like to merge the patterned parts with.
  9. Optional: Select the copies to skip:
    1. (Optional): To pattern the entities only along the first row and first column, turn on Seed only.
    2. Next to Copies to Skip, click the Select button.
    3. Select the copies to exclude from the pattern.
  10. Click Apply.
  11. Right-click and mouse through the check mark to exit, or double-right-click.