Loft

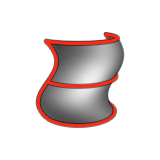
Create a 3D surface by fitting it through two or more profile curves. You can constrain the shape using rails.

Create a Loft

Create a 3D surface by fitting it through two or more profile curves. You can constrain the shape using rails.

  1. On the ribbon, click the Surfaces tab.
  2. Click the Loft icon.

  3. Click two or more profiles, and then right-click to confirm.
  4. Optional: In the guide bar, click Rails. Click one or more rails, and then right-click to confirm.
    Attention: When the profile does not intersect the rails, select Auto-alignment in the guide bar. Otherwise, no result is produced and a red exclamation mark appears in the Model Browser.
  5. Optional: See Step 2 of Edit a Loft.
  6. Right-click and mouse through the check mark to exit, or double-right-click.
Edit a Loft

Modify the orientation, position, and shape of the loft.

  1. Double-click the loft to enter edit mode.
  2. Edit the loft:
    To Do this Notes
    Reselect profiles or rails
    1. In the guide bar, click Profiles or Rails.
    2. Click the objects you want to add or remove.
    3. Right-click to confirm.
     
    Change the selection method In the guide bar, select one of the following options:
    • Standard Selection
    • Chain Selection
    • Single Selection
     
    Add or remove caps
    • To add caps to both ends, in the guide bar, click Caps.
    • To add or remove a cap from either end, click a red oval at either end.
     
    Auto-align the profiles See Auto-align the Profiles.  
    Define other options In the guide bar, click Options, and then select from the following options:
    • Arc Length Profiles: Evenly space the isoparms in the direction of the profiles.
    • Arc Length Rails: Evenly space the isoparms in the direction of the rails.
    • Periodic: Close the loft.
    • Extend: Extend the end points of the profiles and rails beyond their intersections.
    • Swap Surface: Quickly interchange the profiles and rails to get a preferred shape.
    .
     
    Add a vertex While holding down Alt, hover over a profile to snap to the profile, and then click.

    An added vertex is indicated by a blue circle.

    You can modify the shape of the loft by adding, deleting, and repositioning vertices on the profiles.

    The more vertices there are, the more control over the loft surface.

    There are 3 types of vertices:
    • Original: These are the original vertices present in the profiles or rails used to create the loft.
    • Auto-added or Auto-deleted: Each profile must have the same number of vertices. The applications automatically adds or deletes vertices where needed.
    • User-added: These are the vertices that you added. They are displayed as crosses in the modeling views.
    Delete a vertex Click the vertex, and then press Alt+D.
    Delete all added vertices Click a vertex, and then click Reset vertices.
    Reposition vertices
    1. To select multiple vertices, use box selection.
    2. Drag to reposition the vertex or vertices.
    Create a seam point Click a vertex, and then click Make Seam.

    A seam point is indicated by a small solid triangle.

    You can only create seam points on a closed profile.
    Reposition a seam point Drag the seam point.
    Invert the orientation of a profile or rail Click a profile or rail, and then click Invert orientation.

    The direction of the arrow on the profile or rail indicates its orientation.

    In most cases, the optimal orientation of each profile is internally calculated so that the resulting surface is not twisted. In some cases, inverting a profile's orientation will cause the loft to fail.
    Modify the constraint See Modify the Constraint.  
  3. Right-click and mouse through the check mark to exit, or double-right-click.

Modify the Constraint

If surface edges were used for profiles or rails, modify the constraint to fine-tune the shape of the loft surface.

If the selection includes rails, the constraint may not be fulfilled as the shape of the rails must be compatible with the constraints.

  1. Double-click the loft to enter edit mode.
  2. Click a surface edge or vertex.
    To select multiple surface edges or vertices, hold down Ctrl while clicking.
  3. Select a type of constraint:
    • Positional (default): No constraints are set; the loft surface is connected to the surface edge, but not tangent to it.
    • Surface tangency (G1): The loft surface is made tangent to the surface edge, but does not follow the curvature of the adjacent surface. Tangent continuity is indicated by a square. You can manipulate the magnitude of a selected vector. Manipulating one vector affects all other vectors on the same profile/rail.
    • Surface curvature (G2): The loft surface is made tangent to the surface edge and follows the curvature of the adjacent surface. Curvature continuity is indicated by a circle. You can manipulate the magnitude of a selected vector. Manipulating one vector affects all other vectors on the same profile/rail.
    • Normal: The loft surface is made perpendicular to all vertices. This option is useful for planar curves. You can manipulate the magnitude of a selected vector.
    • Free tangent vector: This is the most powerful constraint option. The loft surface is made tangent to a selected vector. You can manipulate both the magnitude and direction of the selected vector; if more than one vector is selected, changes are applied to all.
  4. Increase or decrease the area of the loft surface affected by the selected constraint:
    1. Click a vertex on a profile or rail with a constraint.
    2. Drag the blue handles.
      Note:
      • In most cases, this parameter has no effect on rails.
      • On a profile or rail with the Surface tangency (G1) or Surface curvature (G2) constraints, manipulating the magnitude at one vertex affects all other vertices.
      • If more than one vertex is selected with the Free tangent vector constraint, magnitude value changes are applied to all.
  5. Right-click and mouse through the check mark to exit, or double-right-click.

Auto-align the Profiles

Use profiles for the loft that do not intersect the rails.

Profiles are only used as reference. This option comes with extra parameters that allow more control over the position and orientation of each profile.

  1. Double-click the loft to enter edit mode.
  2. In the guide bar, select Auto-alignment.
  3. Click a profile.
  4. Edit the profile:
    • If only 1 rail was used:
      To Do this Note
      Reposition a profile along the rail Type a value for Point on rail 1, and then press Enter. By default, the profiles are distributed evenly along the rail.
      Realign the profiles with the rail Type a value for Point on profile, and then press Enter. By default, each profile start point is aligned with the rail.
      Rotate the profile around the rail's tangent Type a value for Rot. tangent, and then press Enter.  
      Rotate the profile around the rail's normal Type a value for Rot. normal, and then press Enter.  
      Rotate the profile around an axis that is perpendicular to the rail's tangent and normal Type a value for Rot. vertical, and then press Enter.  
      Reverse the order of the profiles along the rail Click Reverse profiles order.  
    • If more than 1 rail was used:
      To Do this
      Reposition a profile on a point along the first rail Type a value for Point on rail 1, and then press Enter.
      Reposition a profile on a point along the second rail Type a value for Point on rail 2, and then press Enter.
      Lock values for point on rail This option is enabled by default to move the profile along both rails. To disable click Lock values.
      Point 1 on profile To reposition a profile on a point of the profile, type a value for Point 1 on profile, and then press Enter.
      Point 2 on profile To reposition a profile on a point of the profile, type a value for Point 2 on profile, and then press Enter.
      Swap values for point on profile To swap the values for Point 1 on profile and Point 2 on profile, click Swap values.
      Profile rotation To rotate the profile around the center line of the two rails, type a value for Profile rotation, and then press Enter.
      Direction of rail 2 To invert the direction of the second rail, click Invert rail 2.
      Profile order To reverse profile order along the rail, click Reverse profiles order.
  5. Right-click and mouse through the check mark to exit, or double-right-click.