Fillets

Create fillets or chamfers along an edge.

Fillet Edges

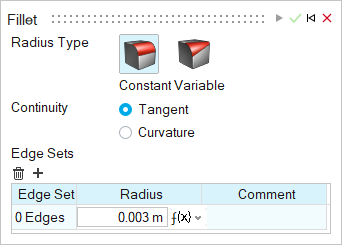
Round edges to create fillets with a constant or variable radius.

  1. On the Geometry ribbon, select the Fillet Edges tool.

    The guide panel appears.


  2. Choose a Radius Type:
    • Constant: Create fillets with the same radius for every edge.
    • Variable: Create fillets with a variable radius at selected points along the edges.
  3. Choose a Continuity type:
    • Tangent: Force tangent (G1) continuity along the edge.
    • Curvature: Force curvature (G2) continuity along the edge.
  4. Create and modify edge sets:
    To Do this
    Add an edge set
    1. Click the + button and select the edges.
      Tip: In the microdialog, select Tangent Propagation so that clicking an edge will also select all of its tangent edges.

      To select all of the boundary edges of a face, click the face.

    2. You can adjust the Radius for each edge set.
    All edge sets will be part of one fillet construction feature.
    Delete the current edge set Under Edge Sets, click .
  5. Create a modify points (Variable radius only):
    To Do this
    Add a point where the radius varies Click along the edge.
    Delete selected points
    • Under Points, click .
    • Alternatively, in the modeling window, select a radius handle and press Delete.
    Modify the point’s position along the edge Enter a value from 0 to 1, where 0 and 1 correspond to the edge’s endpoints and 0.5 corresponds to the mid of the chain. You can also select the radius handle and drag it along the edge.
  6. Click Apply.
    Features are automatically retained and notches are preserved on sheets.
  7. Right-click and mouse through the check mark to exit, or double-right-click.
Tip:
  • By default, clicking an edge will also select all of its tangent edges. Deselect Tangent Propagation in the microdialog to disable this behavior.
  • If the fillet radius text box is highlighted red due to an invalid edge selection, press Ctrl+Z to undo or press Ctrl while clicking to deselect the edge. The previously valid selection will reappear.
  • Change the default fillet radius in the Preferences.

Chamfer Edges

Create beveled edges.

  1. On the Geometry ribbon, select the Chamfer Edges tool.

  2. Select edges to chamfer.
    • To select an edge, click the edge.
    • To select multiple edges, use box selection or press Ctrl while clicking the edges.
    • To select all of the boundary edges of a face, click the face.
  3. Choose from the following options:
    • Distance, Angle: Enter a horizontal distance and an angle.
    • Distance, Distance: Enter a horizontal distance and a vertical distance.

    If you entered an invalid value, the text box is highlighted in red.

    Note: The values you enter will be automatically applied to all selected features.
  4. Select Apply on the microdialog.
    Features are automatically retained and notches are preserved on sheets.
Tip:
  • By default, clicking an edge will also select all of its tangent edges. Deselect Tangent Propagation in the microdialog to disable this behavior.
  • Reverse the side the distance and angle are measured from by clicking in the microdialog.
  • If a distance/angle text box is highlighted red due to an invalid edge selection, press Ctrl+Z to undo or press Ctrl while clicking to deselect the edge. The previously valid selection will reappear.
  • Change the default chamfer distance and angle in the Preferences.

Apply a Variable to a Parameter

Apply a variable to a parameter, or create a new variable on the fly from a tool microdialog.

You can apply existing variables and add new ones via the microdialog in various sketch and geometry tools.

  1. In the tool’s microdialog, click the f(x) icon.


    Figure 1. Example of a microdialog with a variable field
  2. In the dropdown menu, select Add Variable to create a new variable based on the dimension in the text field, or select the name of an existing variable.
  3. Click Apply to apply the variable to the construction feature.
  4. Right-click and mouse through the check mark to exit, or double-right-click.
Tip:
  • You can also create a variable by entering a new name and expression in the microdialog’s text field, for example: Variable1=50
  • In addition, you can also create a new variable based on an existing variable, for example, Variable2=Variable1*0.5.

Keyboard Shortcuts & Mouse Controls

To Do this
Select features Click
Append/remove feature selection Ctrl+click
Delete selected feature Delete+click
Delete selected filleted/chamfered face Delete
Exit tool Right-click and mouse through the check mark to exit, or double-right-click.