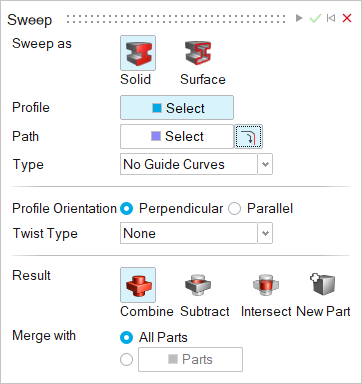
Sweep
Sweep a profile along a path to create a solid or surface. Create a new part or combine, subtract, or intersect the swept shape with existing parts.
-
On the Geometry ribbon, select the
Sweep tool.

The guide panel appears.
-
Choose the entity type that you'd like to create:
- Solid: Sweep as a solid.
- Surface: Sweep as a surface.
-
Select a Profile. By default,
Select is automatically turned on. Do one of the
following:
- If you selected Solid in the last step, select a planar edge, closed sketch, or a planar surface.
- If you selected Surface in the last step, select a planar edge or closed/open sketch or a planar surfaces.
Note: To deselect, hold down Ctrl while clicking. To clear all selected features, in the microdialog click Clear Selection. -
Choose a Path:
- Click the Select button.
-
Select a sketch or an edge. The plane in which the profile lies must
intersect the path. If the path extends beyond the profile, the sweep
can occur in both directions.
Note: To deselect, hold down Ctrl while clicking.
-
(Optional): Select
 Tangent Propagation so that clicking an edge will
also select all of its tangent edges.
-
Choose the Type of sweep:
- No Guide Curves: Don't use guide curves. You can add a twist to the swept shape.
- Guide Curves: Add one to two guide curves. This
allows you to refine the swept shape, but you can’t add a twist.
- Next to Guide Curves, click the Select button, then select one or two guide curves, which must coincide with the profile. To deselect, hold down Ctrl while clicking.
-
Choose a Profile orientation:
- Perpendicular (default): Orient the swept shape perpendicular to the path.
- Parallel: Orient the swept shape parallel to the path.
-
(No Guide Curves only) Choose a Twist Type:
- None: Don’t add a twist to the swept shape.
- Angle: Add a twist the swept shape by defining the twist angle. After selecting this option, you can enter the Twist Angle and select Reverse Twist Direction.
- No. of turns: Add a twist to the swept shape by defining the number of turns. After selecting this option, you can enter the No. of Turns and select Reverse Twist Direction.
-
(Guide Curves only) Choose a Scale:
- Uniform: Scale the profile along both the X and Y directions.
- Lateral: Scale the profile only along the X direction, stretching it along the path and guide curves while maintaining the Y direction.
-
Choose a Result type:
- Combine/Merge: Combine or merge the extruded shape with the existing parts.
- Subtract (only available for Solids): Carve out the extruded shape from the existing parts.
- Intersect (only available for Solids): Retain only the intersecting portions of the extruded shape and the existing parts.
- New Part: Create a new part from the extruded shape.
-
Choose a Merge method:
- All Parts (default): Merge the extruded shape with all parts that touch the extruded shape.
- Parts: Select the radio button to merge the extruded shape with selected parts. Then select the parts that you’d like to merge the extruded shape with.
- Click Apply.
- Right-click and mouse through the check mark to exit, or double-right-click.