Manage Subsystem Representations

A single subsystem can have multiple CAE representations that can be loaded into the session interchangeably.
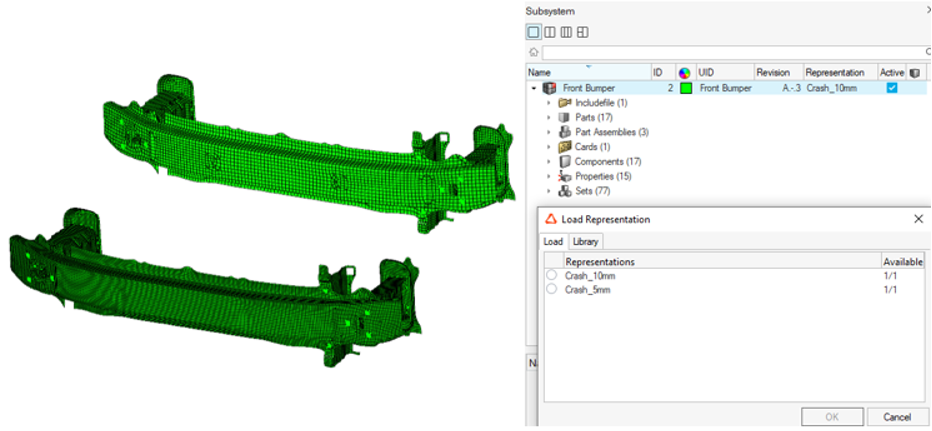
This allows you to swap between different representations of a subsystem to build different analysis models.


Figure 1.

For example, for front crash analysis you will want greater model fidelity in the front bumper, so you can load "Crash_5mm" representation versus assembling a rear crash model where the level of detail is not required and so you may want the "Crash_10mm" representation loaded instead.

A folder-based Representation repository stores all CAE data that is required during the model build and assembly process.

Save the Representation

Once you have created a Subsystem and populated it with content, you can save the representation locally or save a revision to the Subsystem Library.

Representations of Subsystems are saved as HyperMesh (.hm) files. If there is a hierarchy of subsystems, saving the representation of any parent subsystem saves the entire hierarchy into the representation.

The following entity types can exist inside a subsystem but will not be saved into the representation file:

Behaviors, Bodies, Constraints, Contact Behaviors, Contact Groups, Domains, Free Body Groups, Free Body Sections, Handles, Morph Volumes, Interface Components, InterfaceLinkings, Joints, Lists, Mechanisms, Morph Constraints, Multibodies, Positions, Pretensioners, Regions, Retractors, Seatbelts, Shapes, Sliprings, Symmetry Planes, Terminations, Titles, Transformations, Member Panels, Members, Member Joints, Member Sections, Member Segments, Views

  1. In the Subsystem Browser, right-click on a subsystem(s) and select Representation > Save from the context menu.
    The Save Representation dialog opens. A checkmark in the Available column indicates that the representation already exists in the local repository. A checkmark in the Library column indicates that a revision is already available in the Subsystem Library.
  2. Optional: If saving to the Library, edit the Major Revision and Study Revision columns to reflect the intended revisions.
    If no changes are made to the Major or Study revision, then the Library revision will be incremented.
  3. Optional: Add a comment to the subsystem.
    Typically, this is done to denote the changes made since the last revision was saved. It was a way of recording the history of changes to the subsystem.
  4. Optional: To save parts locally, deactivate the Save to Library checkbox.
    In this case, there is only no revisioning; if a representation is already available, you need to activate Overwrite Available to replace the existing representation with the one you are about to save.
  5. Click OK.

Add Representations From Files

Subsystem representations can be added from external sources such as solver decks.

  1. In the Subsystem Browser, right-click on a subsystem(s) and select Representations > Add > from Files from the context menu.
  2. Give the representation a name.
  3. Select the correct file type.
  4. Browse to the file that you want to add as a representation and select file path.
  5. Click OK.
    You can choose whether this representation is also saved to the library only if adding a HyperMesh file.
    Note: Supported solver decks include: Radioss, OptiStruct, Nastran, Abaqus, PAM-CRASH 2G and LS-DYNA.

Add Representations From the Subsystem Library

Subsystem representations can be added from external sources such as a subsystem library. This copies representations from the library to your local workspace without loading the representation into your session, making it available for use later when disconnected from the library.

  1. In the Subsystem Browser, right-click on a subsystem(s) and select Representations > Add > from Library from the context menu.
    The Add Representations from Library dialog opens.
  2. In the Add Representation from Library dialog, select the representations to add.
  3. Optional: To simultaneously add and load representations, select the representations to load from the Load Added Representations list.
  4. Click OK.

Add Representations to the Subsystem Library

Add representations to the library if they are in session only. This occurs when representations are saved but when not connected to a library (or when you uncheck the "Save to Library" option).

  1. In the Subsystem Browser, right-click on a subsystem(s) and select Representations > Add > to Library from the context menu.
    The Add Representations to Library dialog opens.
  2. In the Add Representations to Library dialog, select the representations to add.
  3. Click OK.
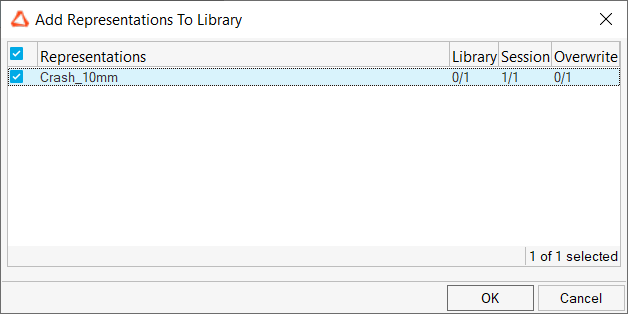
    The Add Representation to Library dialog displays information regarding the availability of representations in library, session, and overwrite details.
    The image below shows that crash representation data is saved in session but is not saved to the library.


    Figure 2.

Load Representations From Current HyperMesh Session

Subsystem representations can be loaded from the current HyperMesh session.

  1. In the Subsystem Browser, right-click on a subsystem(s) and select Representations > Load > from Session from the context menu.
    The Load Representation dialog opens.
  2. In the Load Representation dialog, Load tab, select a type of representation to load.
    Representations that exist in the repository are shown in the Representations column, and their availability is indicated in the Available column.

Load Representations From the Subsystem Library

Subsystem representations can be loaded from the subsystem library.

To exchange the current representation of the subsystem with a different one from the subsystem library, you can load the saved representation.

  1. In the Subsystem Browser, right-click on a subsystem(s) and select Representations > Load > from Library from the context menu.
    The Change Representation dialog opens.
  2. In the Change Representation dialog, Library tab, select the appropriate representations.
    The selected representations are loaded into the Representation folder on the file system as well as into the HyperMesh session.

Unload Subsystem Representations

Unload subsystem representations from a session.

  1. In the Subsystem Browser, right-click on a subsystem(s) and select Representations > Unload from the context menu.
    The Confirm Unload Representation dialog opens.
  2. In the Confirm Unload Representation dialog, click Yes to unload the selected representations.

Delete Representations From the Current HyperMesh Session

Subsystem representations can be deleted from the current HyperMesh session.

When unloaded, FE entities of the representation do not exist in the current HyperMesh session. To completely delete the representation from a session, the representation itself can be deleted.

  1. In the Subsystem Browser, right-click on a subsystem(s) and select Representations > Delete > from Session from the context menu.
    The Delete Representations dialog opens.
  2. In the Delete Representations dialog, select the representations you want to delete.
  3. Activate the Delete representation from library checkbox.
    Note: The Study version will be incremented if a representation is deleted from the Library.
  4. Click OK.

Delete Representations From the Part Library

Subsystem representations can be deleted from the Part library.

  1. In the Subsystem Browser, right-click on a subsystem(s) and select Representations > Delete > from Library from the context menu.
    The Delete Representations from Library dialog opens.
  2. In the Delete Representations from Library dialog, selected the representations you want to delete.
  3. Click OK.

Browse Subsystem Library Content

Use the Library Viewer to review subsystem library content.
  1. In the Subsystem Browser, right-click on the part assembly or part(s) and select one of the following:
    • Representations > Add > browse Library
    • Library > Library Viewer
    The Library Viewer opens.
  2. Select the subsystem revision that you would like to review.


    Figure 3.


    Figure 4.
  3. Select a representation you want to add to the session. You can select multiple representations.


    Figure 5.
  4. Optional: Select one of the added representations to load into the session.
  5. Click OK.