PostgreSQLのインストールとコンフィギュレーション

Postgresとも呼ばれるPostgreSQLは、拡張性と標準への準拠に重点が置かれたオブジェクトリレーショナルデータベース管理システムです。

PostgreSQLは、小規模な単一マシン用アプリケーションから大規模なインターネット向けアプリケーションまで、幅広いワークロードや、データウェアハウジングの場合は、多くの同時ユーザーを擁するワークロードを処理できます。PostgreSQLは、ACIDに準拠してトランザクションを処理します。PostgreSQLは、更新可能なビューとマテリアライズドビュー、トリガー、外部キーを備えており、関数とストアドプロシージャのサポートや、その他の拡張性を提供します。

PostgreSQLは、多くの企業と個人協力者からなる多様なグループであるPostgreSQL Global Development Groupによって開発されています。PostgreSQLは、無償かつオープンソースであり、パーミッシブソフトウェアライセンスであるPostgreSQL Licenseの条件に基づいてリリースされています。詳細については、https://www.postgresql.org/をご参照ください。

前提条件

システム要件

プラットフォーム 64ビット 32ビット
Windowsバージョン 2016、2012 R2およびR1、2008 R2、7、8、10 2008 R1、7、8、10

PostgreSQLインストーラー

postgresql-10.1-2-windows-x64.exe以降のバージョンのインストーラーを使用してPostgreSQLをセットアップします。PostgreSQLの実行ファイルは、HyperMeshソフトウェアのインストールの一部としてインストールされます。PostGresDBをインストールするためのAltair Simulation製品に加えて、別のインストーラーがあります。

PostgreSQLのインストール

ここでは、PostgreSQLのインストール方法を説明します。

以下に示す値とオプションを使用してインストールを実行することをお勧めします。また、Windows管理者パスワードの入力を求められた場合は、新しいパスワードを作成してください。

  1. 管理者モードでコマンドプロンプトを開きます。
  2. コマンドプロンプトからインストーラー(postgresql-10.1-2-windows-x64.exe)を起動します。
    注: インストーラーは必ずコマンドプロンプトから起動してください。これにより、PostgreSQLをインストールして正常に機能させるために必要なWindowsネイティブユーティリティのパスが自動解決されます。
  3. pgAdmin 4ツール(インストールに含まれます)を管理者モードで起動して、全権限を持つ1人のユーザーを追加します:
    1. Serversノードを展開して、Login/Group Rolesノードを表示します(下図を参照)。
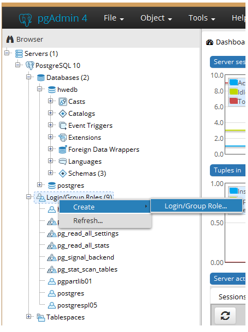

      図 1.
    2. Login/Group Rolesを右クリックして、コンテキストメニューからCreate > Login/Group Role...の順に選択します。
      Login Roleダイアログが表示されます。
    3. GeneralタブのName欄にhweuserと入力します。
    4. Definitionタブをクリックして、次のように設定します:
      • Password欄に、hwe_123と入力します。
      • 接続の制限を30に設定します(未設定の場合)。
    5. Privilegesタブをクリックし、すべての欄をYesに設定します。
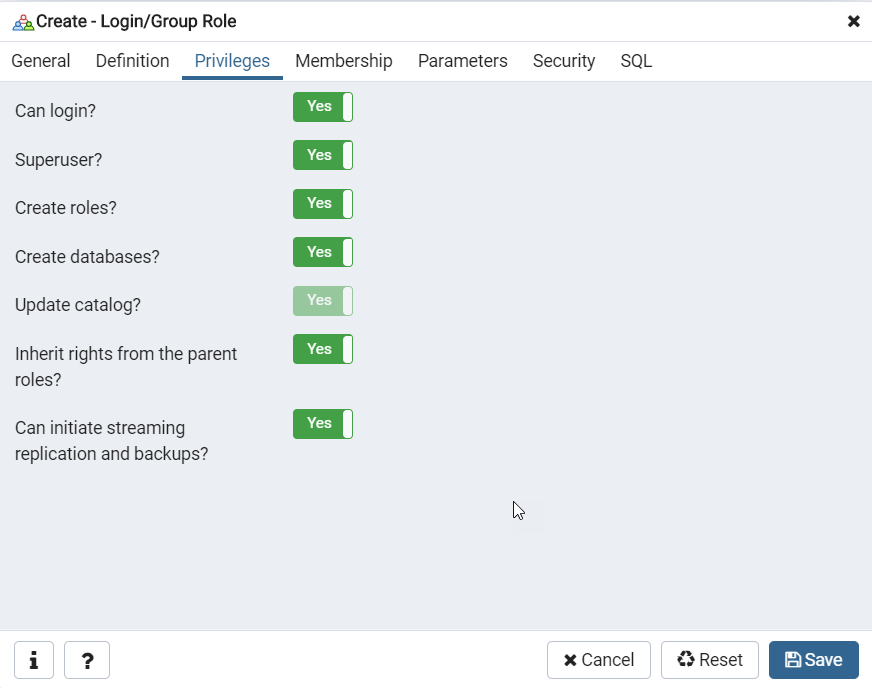

      図 2.
    6. Saveをクリックします。
  4. カスタマイズされたpg_hba.confファイルを作成します:
    1. お使いのシステム上でメモ帳などのテキストエディタを開きます。
    2. 次のコードをテキストエディタにコピー&ペーストします。
      # PostgreSQL Client Authentication Configuration File
      # ===================================================
      #
      # Refer to the "Client Authentication" section in the PostgreSQL
      # documentation for a complete description of this file.  A short
      # synopsis follows.
      #
      # This file controls: which hosts are allowed to connect, how clients
      # are authenticated, which PostgreSQL user names they can use, which
      # databases they can access.  Records take one of these forms:
      #
      # local      DATABASE  USER  METHOD  [OPTIONS]
      # host       DATABASE  USER  ADDRESS  METHOD  [OPTIONS]
      # hostssl    DATABASE  USER  ADDRESS  METHOD  [OPTIONS]
      # hostnossl  DATABASE  USER  ADDRESS  METHOD  [OPTIONS]
      #
      # (The uppercase items must be replaced by actual values.)
      #
      # The first field is the connection type: "local" is a Unix-domain
      # socket, "host" is either a plain or SSL-encrypted TCP/IP socket,
      # "hostssl" is an SSL-encrypted TCP/IP socket, and "hostnossl" is a
      # plain TCP/IP socket.
      #
      # DATABASE can be "all", "sameuser", "samerole", "replication", a
      # database name, or a comma-separated list thereof. The "all"
      # keyword does not match "replication". Access to replication
      # must be enabled in a separate record (see example below).
      #
      # USER can be "all", a user name, a group name prefixed with "+", or a
      # comma-separated list thereof.  In both the DATABASE and USER fields
      # you can also write a file name prefixed with "@" to include names
      # from a separate file.
      #
      # ADDRESS specifies the set of hosts the record matches.  It can be a
      # host name, or it is made up of an IP address and a CIDR mask that is
      # an integer (between 0 and 32 (IPv4) or 128 (IPv6) inclusive) that
      # specifies the number of significant bits in the mask.  A host name
      # that starts with a dot (.) matches a suffix of the actual host name.
      # Alternatively, you can write an IP address and netmask in separate
      # columns to specify the set of hosts.  Instead of a CIDR-address, you
      # can write "samehost" to match any of the server's own IP addresses,
      # or "samenet" to match any address in any subnet that the server is
      # directly connected to.
      #
      # METHOD can be "trust", "reject", "md5", "password", "scram-sha-256",
      # "gss", "sspi", "ident", "peer", "pam", "ldap", "radius" or "cert".
      # Note that "password" sends passwords in clear text; "md5" or
      # "scram-sha-256" are preferred since they send encrypted passwords.
      #
      # OPTIONS are a set of options for the authentication in the format
      # NAME=VALUE.  The available options depend on the different
      # authentication methods -- refer to the "Client Authentication"
      # section in the documentation for a list of which options are
      # available for which authentication methods.
      #
      # Database and user names containing spaces, commas, quotes and other
      # special characters must be quoted.  Quoting one of the keywords
      # "all", "sameuser", "samerole" or "replication" makes the name lose
      # its special character, and just match a database or username with
      # that name.
      #
      # This file is read on server startup and when the server receives a
      # SIGHUP signal.  If you edit the file on a running system, you have to
      # SIGHUP the server for the changes to take effect, run "pg_ctl reload",
      # or execute "SELECT pg_reload_conf()".
      #
      # Put your actual configuration here
      # ----------------------------------
      #
      # If you want to allow non-local connections, you need to add more
      # "host" records.  In that case you will also need to make PostgreSQL
      # listen on a non-local interface via the listen_addresses
      # configuration parameter, or via the -i or -h command line switches.


      # TYPE  DATABASE        USER            ADDRESS                 METHOD
      
      # IPv4 local connections:
      host    all             all             127.0.0.1/32            md5
      host    all 	     all 	      0.0.0.0/0 	      trust
      # IPv6 local connections:
      host    all             all             ::1/128                 md5
      # Allow replication connections from localhost, by a user with the
      # replication privilege.
      host    replication     all             127.0.0.1/32            md5
      host    replication     all             ::1/128                 md5
    3. お使いのシステム上の場所にこのファイルを保存します。このファイルは次のステップで使用します。
  5. Windowsエクスプローラを使用して、前のステップで作成したpg_hba.confファイルを探し、<PostGres_INSTALLATION_DIR>/dataフォルダーに移動して、既存のファイルと置き換えます。
  6. Windowsタスクマネージャーを開いて、サービスタブでpostgresql-x64サービスを探します。
  7. postgresql-x64サービスの名前を右クリックし、コンテキストメニューからRestartを選択してこのサービスを再起動します。


    図 3.
    注: これにより、すべてのユーザーが認証なしで接続できるようになります。
  8. hweuserというユーザー名をクリックし、再接続するかどうかを尋ねるプロンプトが表示されたらYesを選択して、サーバーに再接続します。
  9. オプション: サーバー接続用のポート番号を確認する必要がある場合は、サーバー名をクリックしてから、Propertiesタブをクリックします。
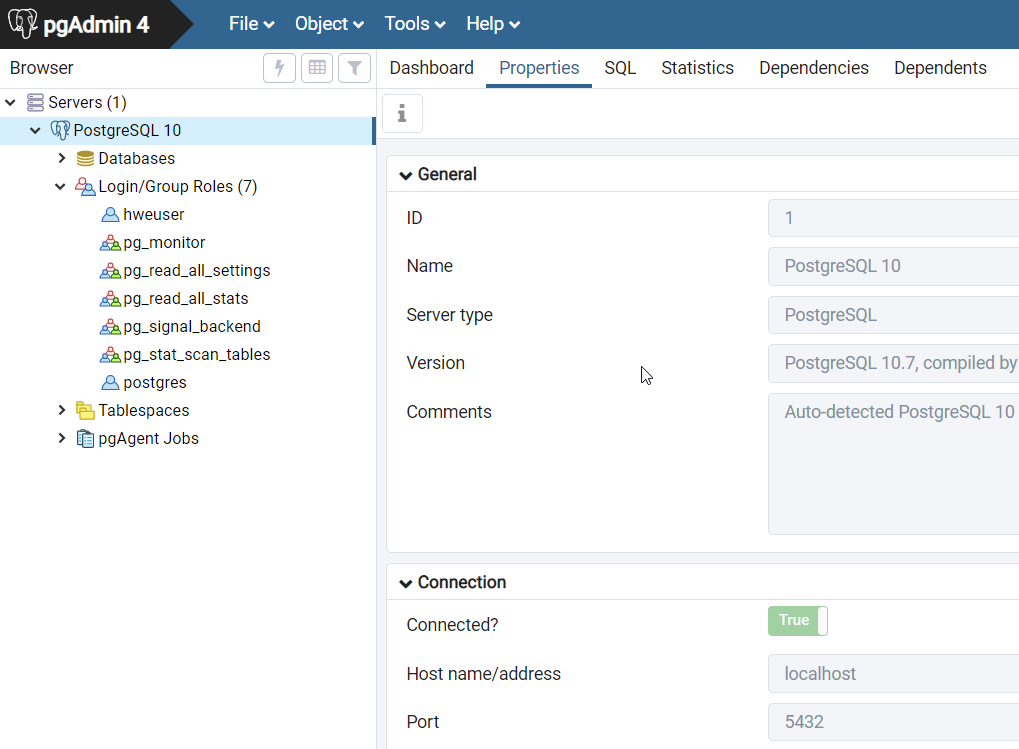

    図 4.
    上図のように、Connectionの下にポート番号が表示されています。ポート番号が分かっていると、他のユーザーと接続を共有できます。

共有ライブラリへの接続

ここでは、PostgreSQL共有ライブラリに接続する方法を説明します。

Part、Subsystem、Materialの各ライブラリはすべて共有ライブラリをサポートしていますが、それぞれのライブラリは互いに独立しています。PostgreSQLサーバーを使用して、.hm.femなどのファイルが保存されるボールトをホストできます。
注: PostgreSQLは、ライブラリをホストしているシステムにインストールされている必要があります。これは一般に、チームがアクセスできるマシンであり、電源が切られる危険がないものです。
  1. 共有ライブラリを作成するには:
    1. 作成するライブラリのタイプに応じて、適切なブラウザを開きます。
    2. ブラウザで右クリックし、コンテキストメニューからLibrary > Libraries...の順に選択します。
      Librariesダイアログが表示されます。
    3. このダイアログの中段右側にある+記号をクリックします。
    4. Library type欄で、Sharedを選択します。
    5. Library host欄に、PostgreSQLを実行しているホストマシンの名前を入力します。デフォルトではlocalhostです。
    6. Library port欄に、PostgreSQLインストール環境で使用されているポート番号を入力します。Postgresのインストール指示に従っていた場合は、この番号は5432のままになっているはずです。
    7. Library path欄で、新しいライブラリの作成場所にするフォルダーを参照します。これは、新しい空のフォルダーである必要があります。
    8. Library name欄に、このライブラリの名前を入力します。デフォルトは、前のステップで作成したフォルダーの名前です。
    9. Addをクリックします。
      ライブラリが作成されます。
  2. 既存のライブラリを追加するには:
    1. 作成するライブラリのタイプに応じて、適切なブラウザを開きます。
    2. ブラウザで右クリックし、コンテキストメニューからLibrary > Libraries...の順に選択します。
      Librariesダイアログが表示されます。
    3. このダイアログの中段右側にある+記号をクリックします。
    4. Library type欄で、Sharedを選択します。
    5. Library host欄に、PostgreSQLを実行しているホストマシンの名前を入力します。デフォルトではlocalhostです。
    6. Library port欄に、PostgreSQLインストール環境で使用されているポート番号を入力します。Postgresのインストール指示に従っていた場合は、この番号は5432のままになっているはずです。
    7. Library path欄で、既存のライブラリフォルダーの場所を参照します。
    8. Library name欄に、このライブラリの名前を入力します。デフォルトはフォルダーの名前です。
    9. Addをクリックします。
      ライブラリが追加されます。
    10. このライブラリに接続するには、このライブラリをリストで選択してから、Connectをクリックします。